Render Quality
|
grandMA3 User Manual » Patch and Fixture Setup » Render Quality
|
Version 2.1
|
The render quality defines how the light and fixture bodies are rendered in the 3D Viewer.
All the render settings are stored in a Render Quality pool object and can be easily selected in the pool.
There are some predefined render qualities in the pool. There is always a selected object. The 3D Viewer can use any render qualities or be linked to the selected pool object.
New pool objects can be made and edited to change the render settings.
The editor has two different tabs. The one called "Main Settings" deals with the general settings defining how detailed the rendering should be.
The main settings contain the following:
-
Name:
This is the name of the pool object. Tapping it allows changing the name. -
Scribble:
This is the assigned scribble, and tapping it allows selecting a scribble or creating a new one. -
Appearance:
This is the assigned appearance. Tapping allows for selecting an appearance or creating a new one. -
Note:
A note can be added to a render quality. -
Beam:
This toggles through a list of different simulation qualities that can be selected for the light beam. It goes from low to high quality. The higher quality uses more computer resources.-
No Beam:
This does not render any beams. This mode does not show any gobos or spot rendering. -
Line:
This renders a simple line as the beam. This mode does not show any gobos or spot rendering. -
Standard:
This is a simple light beam from the fixture. -
High:
This mode adds more reality to the light beam. -
High Fancy:
This is a more precise calculation of light dissipation.
-
No Beam:
-
Shadow:
Turns On or Off if the beam shall throw shadows when hitting another object. Therefore, the 3D object needs the setting Cast Shadow enabled within the patch, and the fixture's Shadow Quality must be set to a value above None.Each fixture has a Shadow Quality setting in the Patch. Learn more in the Add Fixture to the Show topic.
-
Gobo:
This setting defines whether gobos shall be rendered within the beam and spot. It has three different options:-
Disabled:
Gobos are not rendered. -
Enabled:
Gobos are rendered. -
Animated:
This means that in addition to the gobo, gobo animations like gobo shake or gobo wheel spin are rendered. When gobo is only set to enabled, these animations will not be rendered.
-
Disabled:
-
Multi LED Beam Mode:
This defines how multi-emitter fixtures render the light beam. The options are:-
Separated Beams:
This renders a beam for each emitter. -
Single Beam Mean Color:
This renders a single beam using the mean color. -
Single Beam Dynamic Gobo:
This takes the output of the emitters and creates a "virtual dynamic gobo". This is then rendered as a single beam.
-
Separated Beams:
-
Body Quality:
This defines the quality of the fixture body rendering. The options are-
None:
No meshes of fixtures are visualized. Nevertheless, environmental objects are displayed. -
Box:
A whole fixture's body is visualized as one box. This box has the dimensions of the fixture. -
Low:
Every geometry of a fixture is visualized as a box. This is not changed if one of the fixture's meshes is a default cylinder. -
Simple:
Fixtures with a common geometrical structure of a moving head (Base - Yoke - Head - Lens with or without Pigtail) are visualized with grandMA3 default meshes. All other fixtures are visualized in "Low" mode. -
Standard:
Fixtures with a vertex count above 1 200 are visualized in "Simple" quality mode. The meshes of fixtures with a vertex count lower than 1 200 are not changed. -
High:
Fixtures with a vertex count above 10 000 are visualized in "Standard" quality mode. The meshes of fixtures with a vertex count lower than 10 000 are not changed. -
Ultra:
The fixtures are visualized with their original meshes, no matter the vertex count.
-
None:
-
Dilution Type:
This defines the dilution intensity of the beam and the spot relative to the distance. These are the options:-
None:
The beam and spot keep their brightness over the distance. -
Linear:
Corresponds to a linear attenuation of the intensity over the distance. -
Correct:
Corresponds to a more realistic attenuation.
-
None:
-
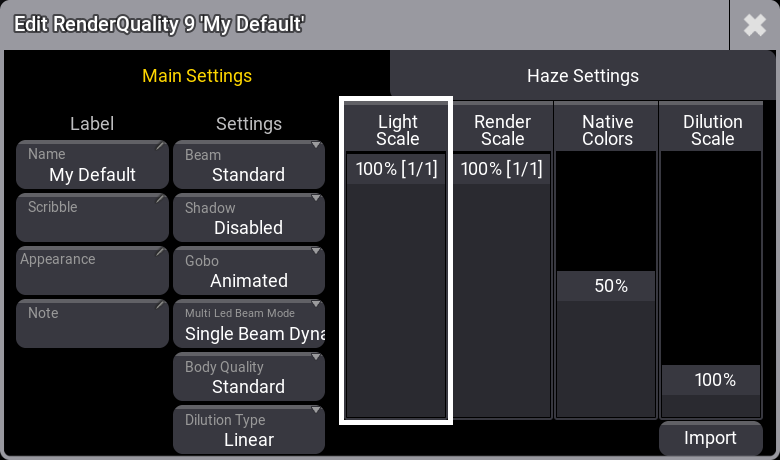
Light Scale:
This changes the resolution of the light rendering in the 3D Viewer. 100% means that the 3D Viewer is rendered with its native resolution. 10% means that the resolution of the light in the 3D Viewer is divided by 5 in width and height. -
Render Scale:
This changes the resolution of the whole rendering in the 3D Viewer. 100% means that the 3D Viewer is rendered with its native resolution. 10% means that the resolution of the 3D Viewer is divided by 5 in width and height. -
Native Colors:
This fader interpolates between the native representation of colors and the intensities of the beams and spots. An automatic method that changes the colors and intensities so that the rendered beams are easier to separate. A higher value for native colors can make distinguishing between individual overlapping beams impossible but provides stronger colors and higher contrasts. -
Dilution Scale:
This defines the beam intensity dilution of the beam dilution. The higher the value, the less the beam is attenuated, resulting in a beam that remains visible over further distance.
Render Scale and Light Scale can be used in combination. Setting both to 1/2 means that the whole 3D Viewer is rendered with half of its resolution, while the light is rendered with a quarter of its resolution.
The Import button allows for importing the settings of the exported render quality objects.
Pool objects can be exported using the Show Creator menu or the Export Keyword.
The other tab looks like this:
Using this feature makes the 3D Viewer look more realistic.
The 3D Viewer must activate the Priority setting to visualize the haze animation.
The priority mode is used to prioritize the 3D rendering. It takes away resources from displaying other UI elements. Learn more about it in the 3D Viewer topic.
The haze exists inside a volume space. The space is defined by the location of the patch's non-environmental devices positioned in the stage space.
If this volume space is too big, the haze rendering is disabled. If this happens, a warning will appear in the upper left corner of the 3D Viewer: "Haze has been automatically disabled as the maximum volume defined by the non-environmental fixtures is in [size of volume]% overload.". The haze rendering is enabled again when the volume space is made smaller. It is an internal setting that defines whether or not the haze is rendered. This does not change the "Enable" setting mentioned below.
Another restriction to the haze rendering is the show data limit on the show file. As soon as 90% of the 10GB data limit is reached, the haze rendering will be disabled, and a corresponding warning text will be displayed in the 3D Viewer.
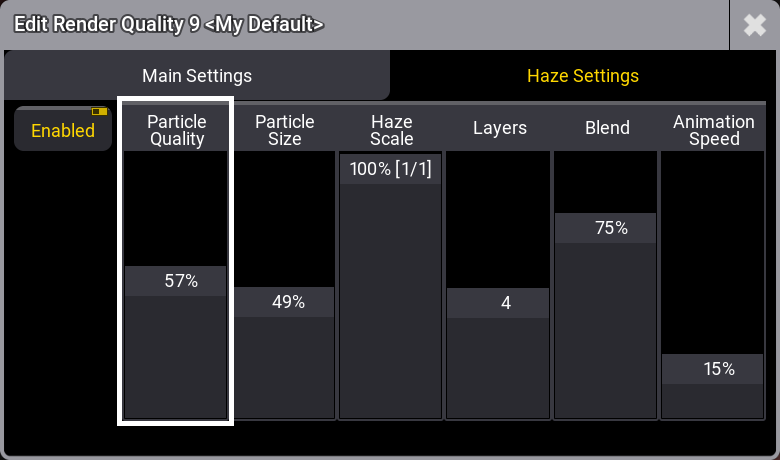
These are the haze settings:
- Enable:
This toggles if the haze rendering is activated. Limitations might internally disable the haze rendering, so this setting defines if the rendering is desired. - Particle Quality:
This defines how accurately the clouds of haze are rendered. The higher the value, the better the quality. - Particle Size:
This defines the size of the haze particles. A low value makes the haze more like clouds. A higher value makes the haze more dense. - Haze Scale:
This changes the resolution of the haze texture. The higher the number, the more detailed the texture, and then more resources are needed to calculate the rendering. - Layers:
This defines how many layers of haze are used in depth. The higher the value, the more spatial the haze looks. - Blend:
This defines how well the haze is blended in the air. The lower the values, the more it blends into the air and seems more even. A higher value makes it appear more realistic. - Animation Speed:
The speed at which haze moves around. The haze will not be animated if the 3D viewer does not have Priority enabled.