Bitmap
|
grandMA3 User Manual » Bitmap
|
Version 2.0
|
The Bitmaps allow the use of media files (images, gobos, symbols, or videos) for mapping them to a selection of fixtures. Bitmaps are organized in the Bitmaps pool. The Bitmap pool is part of the data pools. To address the Bitmap pool objects, use the Bitmap keyword.

|
|
Hint: |
|
For testing purposes, three simple simple video clips are provided. These can be imported into the Video pool.
|
|
|
Hint: |
|
If NDI input is used in a setup with several consoles and processing processing units, the NDI stream must be available at all calculating stations.
|
Bitmap Canvas
The canvas is an essential concept for Bitmaps.
To be able to output a Bitmap to fixtures, it is necessary to select fixtures and arrange them in the Selection Grid. The Bitmap applies the dynamic value changes coming from the media file to a canvas. This canvas is mapped to the selection grid.
The Selection Grid window shows the selected fixtures and their arrangement. It is a very useful programming tool. Learn more about it in the Selection Grid topic.
A purple rectangle in the selection grid represents the canvas. It is visible as long as one attribute of the selection uses a Bitmap as a value. The canvas should be in the same area as the arranged fixtures for the fixture to be affected by the Bitmap.
The size and aspect of the canvas can be changed using different settings in the Bitmap Configuration.
The selected fixtures should be arranged in the selection grid in a manner that makes sense for the desired output. The canvas can be adjusted automatically or by different built-in functions.
The Bitmap Editor is described below. The editor has some buttons related to the canvas and the fixture arrangement in the canvas area.
Tapping At applies the Bitmap to the current selection.
Tapping Dimensions From Selection changes the width and height of the selected Bitmap Configuration (see below) to match the current selection's size in the selection grid.
Tapping Format Selection scales the current selection in the grid so it fits as close as possible to the size of the canvas. The ratio of the selection in the selection grid is taken into account when scaling the selection.
Toggling On Auto Format automatically performs a "Format Selection" when the Bitmap is applied to a new selection.
Bitmap Editor
The best way to create a new bitmap is by editing an empty pool object. This opens the Bitmap Editor:
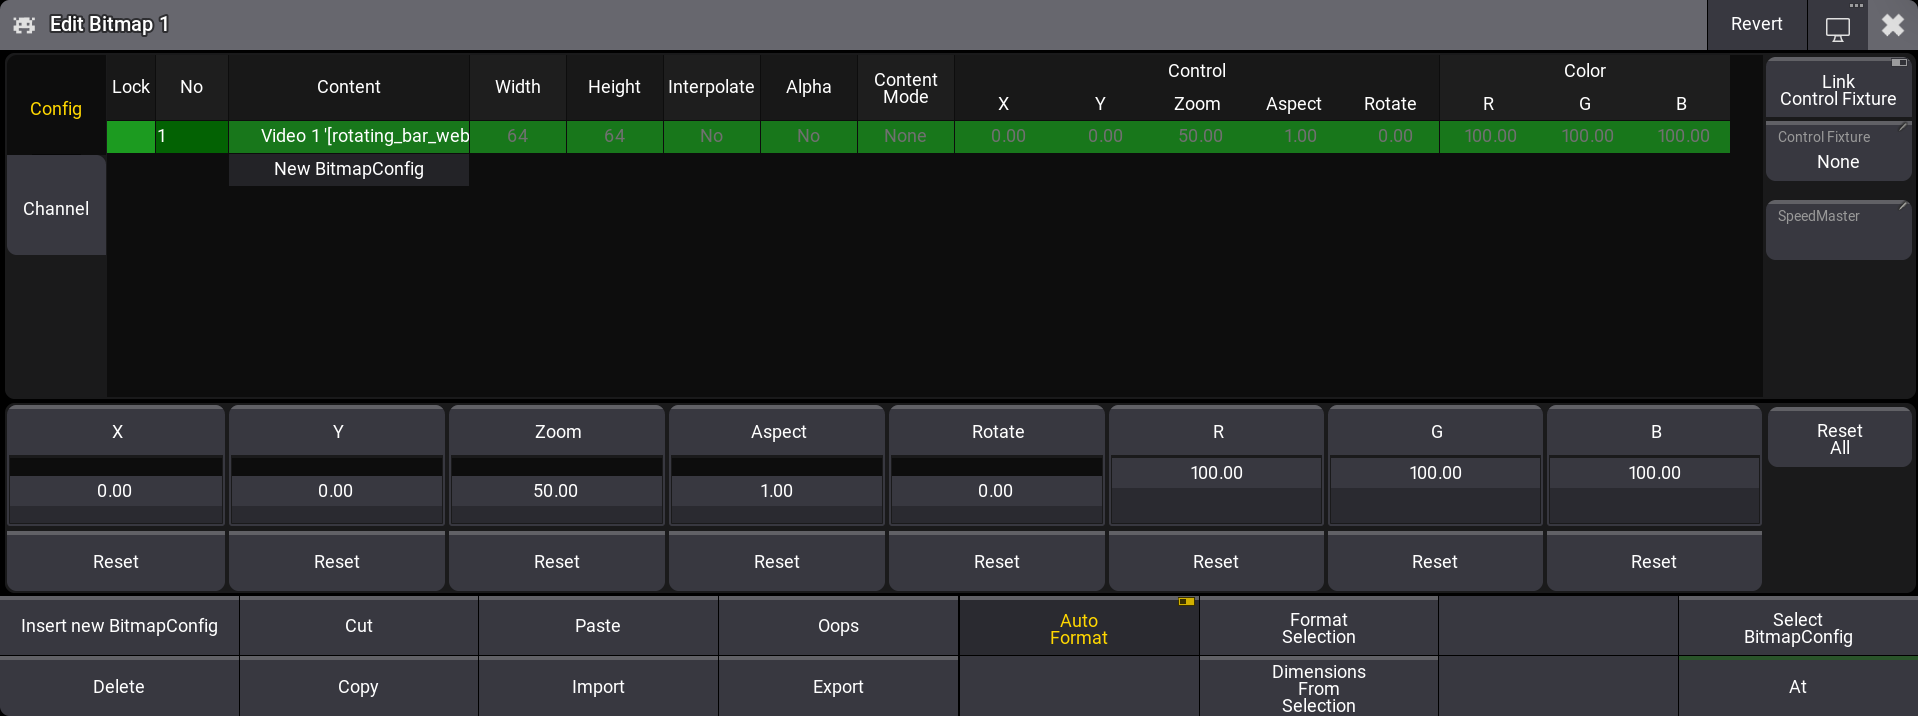
The top area of the editor gives access to the Bitmap Configurations or the Bitmap Channels. Tap the relevant tab on the left side to switch between the two. On the right side of this area, there are some buttons to add connections to a Bitmap Control Fixture (read more about this below) and a Speed Master.
Below this area are on-screen faders that give access to change the Control and Color attributes of the selected Bitmap Configuration. Each on-screen fader has a Reset button below. Tapping this will reset the associated fader value to the default value. A Reset All button resets all the attributes represented by the on-screen faders.
At the bottom of the editor are the usual editor buttons and some special buttons for the Bitmap editor. The special buttons are described in the following text.
The encoder toolbar changes to show the same attributes as the on-screen fader while the editor has focus.

The title bar has a Revert button. Tapping this discards all current changes to the valid values when the Bitmap editor was opened.
Bitmap Configuration
The bitmap configuration is a sheet with columns containing settings and rows representing different media files. The bitmap can contain several rows with bitmap configurations but only plays the selected bitmap configuration. The selected row is marked with a green background color. A row can be selected by tapping it in the list and then tapping Select Bitmap Config in the bottom area.
The Bitmap Configuration has the following settings organized in columns:
-
Content:
This is the media file played back by the Bitmap Configuration. -
Width:
This is the width of the canvas to which the content is mapped. The default value is 64 pixels or squares in the selection grid. -
Height:
This is the height of the canvas to which the content is mapped. The default value is 64 pixels or squares in the selection grid.
-
Interpolate:
Smoothens the transition from fixture to fixture when playing back a media file.
-
Alpha:
The used media file's alpha channel is considered and made transparent when enabled.
-
Content Mode:
This setting has three different options:-
None (default value):
The media file uses the part of the canvas based on the media file size, the canvas size, and the zoom. The result can be that the media file only takes up a small part of the canvas. -
Clip:
The media file scales to use the whole canvas size.
-
Wrap:
The media file is displayed several times across the canvas.
-
None (default value):
-
Control - X:
Moves the canvas on the X-axis in the selection grid. -
Control - Y:
Moves the canvas on the Y-axis in the selection grid.
-
Control - Zoom:
Zooms the canvas in the selection grid and keeps the aspect ratio. -
Control - Aspect:
Changes the aspect ratio of the canvas in the Y direction in the selection grid.
-
Control - Rotate:
Rotates the canvas in the selection grid. -
Color - R:
Changes the red color of the played-back media files.
-
Color - G:
Changes the green color of the played-back media files.
-
Color - B:
Changes the blue color of the played-back media files.
Adding a new bitmap configuration will set the values for Control, Width, and Height to the values of the currently selected bitmap configuration.
Bitmap Channel
The bitmap channels define which fixture attributes respond to the media file content.
The bitmap channel sheet has different fixture attributes in rows and the channel settings in columns.
These are the settings:
-
Attribute:
The fixture attribute defines what the bitmap should affect.
-
Virtual Dimmer:
The Bitmap Channel with this setting set to Yes, defines how virtual dimmers in fixtures are handled by the Bitmap.
-
Source:
The source defines which part of the media file should be analyzed to create the values for the fixture attribute.
-
Value - Low:
Defines the low value of the fixture attribute to which the source should be mapped. -
Value - High:
Defines the high value of the fixture attribute to which the source should be mapped.
Attributes can be added to change what the Bitmap effects. For instance, Tilt can be added, and a pixel's intensity in a video can be used to dynamically change the tilt between the low and high values.
Bitmap Control Fixture
One or several special Bitmap Control fixtures can be added to the patch.
The Bitmap Control fixture has attributes to change the Color values and some of the Control values in the Bitmap Configuration. It can also be used to change the selected Bitmap Configuration.
The right side of the Bitmap editor has a Control Fixture button. Tapping this opens a small select pop-up where one of the patched Bitmap Control fixtures can be selected. Selecting a fixture here automatically toggles On the Link Control Fixture. When this is On, then the selected Bitmap Control fixture can be used to control the Bitmap Configuration values. This fixture has programmer values that can be stored in cues or presets.
A suggested workflow could be the following. It assumes normal patched fixtures and an existing Bitmap.
- Patch at minimum one fixture using the MA Lighting Bitmap Control fixture type. Give it at least a FID number.
- Select the fixtures, which should use the Bitmap, and arrange them in the Selection Grid.
- Tap the desired Bitmap in the pool or use the keyword to apply the Bitmap to the selected fixtures.
- Select the Bitmap Control fixture.
- Apply the desired Bitmap to the Bitmap Control fixture by tapping the Bitmap generator object in the pool or by using the At Bitmap syntax. This will set the Bitmap Generator as the value on the Object attribute in the Gobo feature group of the Bitmap Control fixture. To apply a different Bitmap Configuration, scroll through the Config attribute.
The attributes X, Y, R, G, B, and Zoom of the Bitmap Control fixture modify the corresponding settings of the Bitmap generator.
Speed Master
The speed of the Bitmap is relevant when the content is a video. As a default, the Bitmap will play the video using the speed of the video. A Speed Master can be assigned to the Bitmap by tapping SpeedMaster on the right side. This Speed Master will then adjust the playback speed of the Bitmap.
Using Bitmaps
Bitmaps must be applied to a selection of fixtures. This can be done by tapping a Bitmap with a selection of fixtures. It can also be done using the following syntax:
At Bitmap ["Bitmap_Name" or Bitmap_Number]
This applies the Bitmap to the relevant attributes, based on the Bitmap Channels, in the programmer.
These programmer values can be stored in presets or cues.
The Bitmap Fixture connected to a Bitmap can also be stored in Presets and Cues.