View Bar and View Buttons
|
grandMA3 User
Manual » Workspace » User Interface
» View Bar and View Buttons
|
Version 2.0
|
Screens can have View Bars visible on screens. The View bar can be on the right side of the screen or
at the top of the screen. The View Bar contains View Buttons.
The view buttons can be used to store and recall views and clear the screen.
Other objects than views can be assigned. The following pool objects are supported:
- Encoder Bars
- Macros
- MAtricks
- Plugins
- Quickeys
- Screen Configurations
- Timers
- Users
- Views
If a store action without a specified object is performed on an empty view button, the default object is a new view.
The screen size might limit how many view buttons can be seen, but the view bar can be
scrolled. If the view bar is scrolled, then there is an arrow icon (![]() ) to scroll
back to the first buttons.
) to scroll
back to the first buttons.
The screen on the consoles can show 10 view buttons in a single column with the view bar on the right
side and 19 view buttons on a row when at the top.
Configure the View Bar
Editing an empty area on the user-definable area opens the Configure Display pop-up:
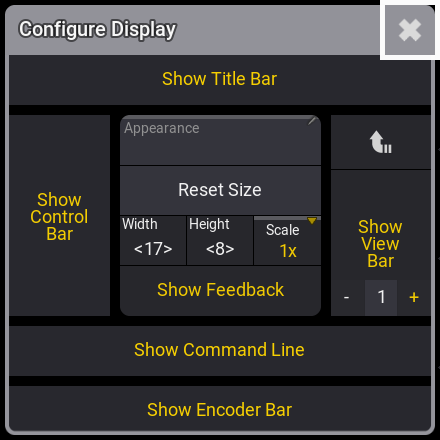
Configure Display Pop-up
This pop-up can also be opened using the Menu "DisplayConfig" command.
There are other methods to open the pop-up.
The right side of the pop-up has the option to toggle the view bar by tapping Show View Bar. There is an arrow icon (![]() ) that
toggles the position of the view bar between the right side of the screen and the top of the screen.
There is also the option to add up to three columns or three rows (depending on the view bar position)
by tapping + or limiting again down to one by tapping - below the Show View Bar.
) that
toggles the position of the view bar between the right side of the screen and the top of the screen.
There is also the option to add up to three columns or three rows (depending on the view bar position)
by tapping + or limiting again down to one by tapping - below the Show View Bar.
Each column or row begins with its own hundred number, so there can be a total of 300 view buttons on
each screen.
The view bars on each screen work independently, meaning that the view bar can have different sizes, locations, and scroll positions on each screen. View button 4 on screen 1 is "ViewButton 1.4". View button 4 on screen 2 would be "ViewButton 2.4".
Tapping an empty view button clears the screen.
Tapping and holding a view button activates the store view function, which opens the Store View pop-up. Read more about storing views in the Store and Recall Views topic.
View Button Information
The view buttons show an icon in the upper right corner and a colored bar at the top indicating the object type.

The example above shows different objects in the view bar.
Pressing and holding MA show the object number instead of the object icon.

Notice that the icon for the view object is only shown if the view contains information about just one screen. If the view contains information for two or more, then the icon is replaced by an icon showing which screens it relates to - see view button 13 above.
Tapping objects in the view bar is the same as tapping the object in the respective pool - It executes the default pool action. For instance, tapping view button 9 in the image above selects world number 2 in the world pool. The yellow selection frame is not shown in the view bar.