|
grandMA3 User Manual » Cues and Sequences » Play Back Cues
|
Version 2.1
|
Cues are stored in a Sequence. All sequences are stored in a sequence pool.
When a cue is active, the sequence is active in the pool.
It is not possible to run a cue without playing back the sequence.
Executors are controls that allow for easy hands-on playback of the sequences. Executors can playback or trigger other objects than sequences as well.
Sequences do not need to be associated with an executor to playback cues.
Relevant Playback Commands
Many keywords can be used for playback operations. They are all listed using the Help command.
For sequence playback, there are some very common keywords (read details about them by following the links):
- Go+
Use this to trigger the next cue with a "Go" trigger or to specify a cue (Go+ Cue [Cue_Number]). - Go-
Use this to trigger the previous cue. - Goto
Use this command to go to a specific cue. The specified cue is triggered when the command is executed. Please note that this command also asserts tracked values so that the visual result can be different than a normal Go command. The Assert mode for the cue is relevant. "None" and "Assert" will assert tracked values using the cue timing from the cue where the value is stored. "X-Assert" will assert the tracked values using the cue timing of the "Goto" cue. Learn more about the Goto keyword in the Goto Keyword topic. - Load
This is used to preload cues. The cue is then ready to be triggered via a Go+ command. Several cues in different sequences can be loaded and triggered together with the Go+ Loaded syntax. - Pause
Executing this command will pause all running fades, delays, and phasers, effectively halting all values where they currently are. The fade and delay are also resumed using the Pause command. - Top
This keyword is used to trigger the first cue
But there are many more that can be useful.
These functions can be assigned to executor keys for easy access (See how in the Assign Object to an Executor topic), but they can also always be sent directly to the sequence. For instance, the following command can be used if you want to go to cue 4 in sequence 6:
|
|
User name[Fixture]>Goto Cue 4 Sequence 6 |
The order of sequence and cue does not matter. So it could also be:
|
|
User name[Fixture]>Goto Sequence 6 Cue 4 |
The system interprets it as in the last example. The Command Line History window shows this response:
| OK : | Goto Sequence 6 Cue 4 |
If an executor handles a sequence, the playback commands can also be sent to the executor.
|
|
User name[Fixture]>Go Executor 101 |
This will send the go command to the object assigned to Executor 101. If this object is a sequence, the next cue will be triggered.
Sequence Priorities
When several sequences affect the same fixture attributes, then priorities become important. The priority setting is a property of the sequence.
These settings can be opened by pressing the Assign key and then one of the executors keys where the sequence is assigned. This opens the Assign Menu. On the right side of the menu, there are some buttons. Please tap Edit Settings. These are all the settings available for a sequence. The settings can also be opened by tapping Settings in the title bar of a sequence sheet. All the settings are discussed in the Sequence Settings topic.
The priority setting can be found in the Playback group of settings. Tapping it toggles through the different properties, swiping it opens a small select pop-up like this:
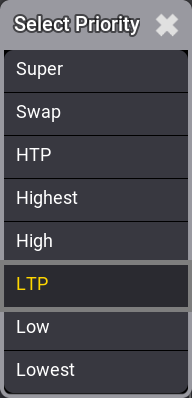
This is the list of possible priority properties. This is a short explanation of the priorities:
- Super:
This priority is the LTP priority above any other playbacks and even above the programmer. - Swap:
Intensity is working as LTP with higher priority than HTP. - HTP (Highest Takes Precedence):
The highest intensity value will be used. Other parameters will use LTP. - Highest:
Highest LTP priority - Like LTP but with the highest possible LTP priority. - High:
High LTP priority - like LTP but a higher priority than normal LTP. - LTP (Latest Takes Precedence):
This is the normal LTP priority. The newest attribute value is prioritized over the old value. - Low:
Low LTP - This is a lower LTP priority. - Lowest:
Lowest LTP - This is the lowest possible LTP priority.
LTP is one of the most used priority settings. There are five different levels of LTP priority to give different sequences different levels of LTP priorities.
The list in the pop-up is also prioritized, where Super at the top has the absolute highest priority. This also means that HTP sequences have a higher priority than LTP sequences.
Soft LTP
This option relates to how intensities change from one sequence to another when the values transfer from the original sequence to the new one.
When an attribute has a value from a cue and another cue in a different sequence with the same LTP priority is beginning to send new values to the same attribute, then Soft LTP might influence how the transition from the old value to the new value happens. This is only relevant when the new value is applied by moving the master of the new sequence. In this case, the attribute can jump from the old value to the new value and immediately have the value it should have according to the master position (Soft LTP Off), or it can start to fade from the old value to the new value using the master position as a crossfader (Soft LTP On).
|
|
Important: |
Both sequences need to be active, and both need to send value to the same attributes. Auto Start and Auto Stop are turned On by default for sequences. If these properties are turned Off, the sequences must be turned On manually for the SoftLTP function to affect the transition. If the Master faders are both at 100%, then SoftLTP does not have a function. |
Example
- Patch a fixture with a dimmer attribute.
- Give the dimmer a 50% value and store this in a new sequence - call this sequence "Original".
- Give the dimmer a value of 100% and store this as a new cue in a new sequence. Call this sequence "New".
- Assign an executor fader as the master for sequence "New".
- Ensure Auto Start and Auto Stop are active for sequence "New".
- Open a fixture sheet and make sure it is set to show the Output layer.
- Run the cue on sequence "Original" and have the master at zero for sequence "New". The dimmer value should now be 50%.
- Now move the master slowly up from zero and see the output value change.
Soft LTP On: The dimmer will fade from 50% to 100% while the master moves up to 100 (fade from the "Original" value to the "New" value).
Soft LTP Off: The dimmer will jump down to the value dictated by the master position and fade up together with the master (jump from the "Original" value to the "New" value based on fader position).
- Now try to move the fader slowly down to zero.
Soft LTP On: The dimmer fades from 100% to 50% (from the "New" value to the "Original" value).
Soft LTP Off: The dimmer value will fade down to 0% with the master, and when the sequence turns Off then the dimmer will jump to 50% (Fade down with "New" master position - jump to "Original" value when "New" is turning Off).