|
grandMA3 User Manual » Patch and Fixture Setup » DMX Sheet
|
Version 2.1
|
The DMX sheet displays the actual DMX output from the system. It shows the result from the sequences, programmer, incoming merged DMX, and any masters that might limit the output.
The sheet can be created as a window on any empty space on the screens. The minimum size is 1.5 squares wide and 2 high. It is created like any other window using the add windows.
The main part of this window displays a big grid with every DMX address represented by its own square. This makes it a very long list (all 1024 universes are there).
The first column on the left side is a label for the second column.
There are two ways to see the DMX address: Absolute DMX address and the normal Universe divided. This can be changed in the Sheet Settings. The absolute address mode displays the DMX addresses as a continuous number. This means that the first address in the second universe will not be written as "2:001" but as "513" (512 addresses from the first universe + 1 from the second).
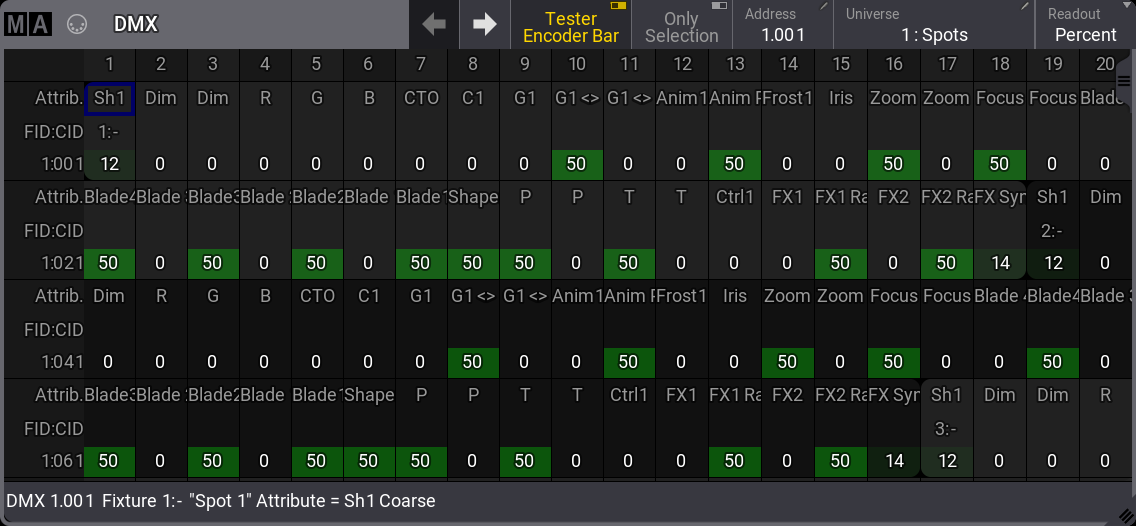
The top row displays the column number. Since the grid is a matrix, the column number should be added to the address shown in the vertical bar - the actual calculation for the square number is the number in the left column plus the number in the top row minus one.
Each square can display up to three different types of information:
-
Value:
Toggling this setting shows or hides the DMX value of the DMX channel in the sheet. -
Attribute:
Toggling this setting shows or hides the attribute related to the DMX channel in the sheet. -
ID:
Toggling this setting shows or hides the FID and CID number assigned to the fixture patched to the DMX channel in the sheet.
The three elements can be turned On or Off individually in the mask settings (read the Sheets Settings below for more about the settings).
If a fixture uses more than one DMX channel, the rounded corners are on the first and last attribute/DMX channel. The background color alternates between two shades of gray to indicate different fixtures.
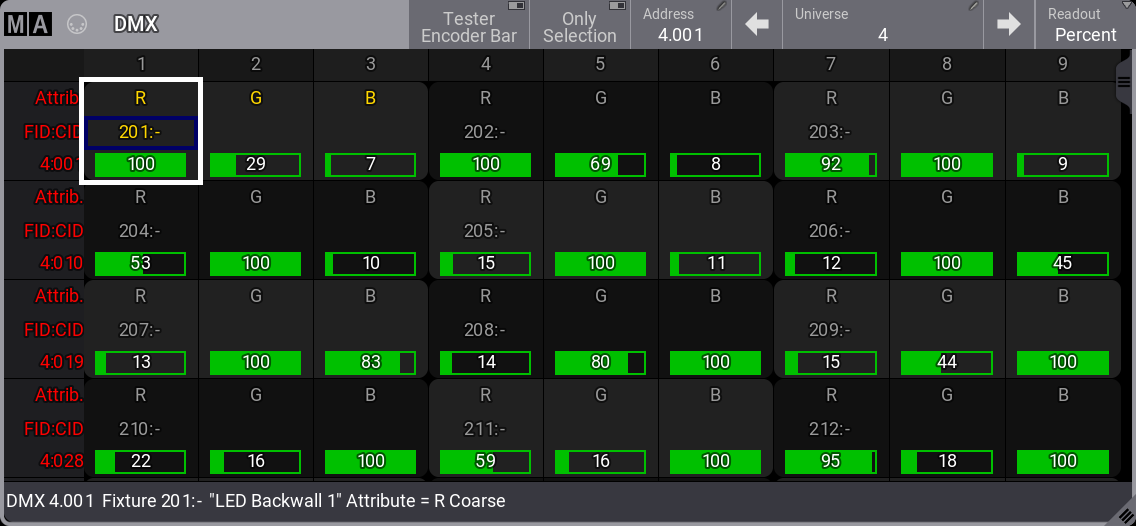
In the example above, some RGB LED fixtures are patched. The selected fixture (FID 201) gets a yellow text color in attributes and FID:CID.
If labels in the leftmost column have red text, then the channels/universes are not granted. Read more about getting more parameters in the Expand the Amount of Parameters topic.
If the cursor is moved to a square, information about that square is displayed in a text line at the bottom of the window (see the image above for an example).
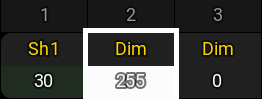
The two images show the two different ways the value can be visualized in the DMX sheet. The first is called Background, and the second is Bar. They can be changed or turned Off in the Sheet Settings. The setting is called Level Bar.
Sheet Settings
The DMX sheet has some settings that define how the sheet shows the data.
Tap the MA logo in the upper left corner of the window to open the settings. It opens the Display tab as a default.
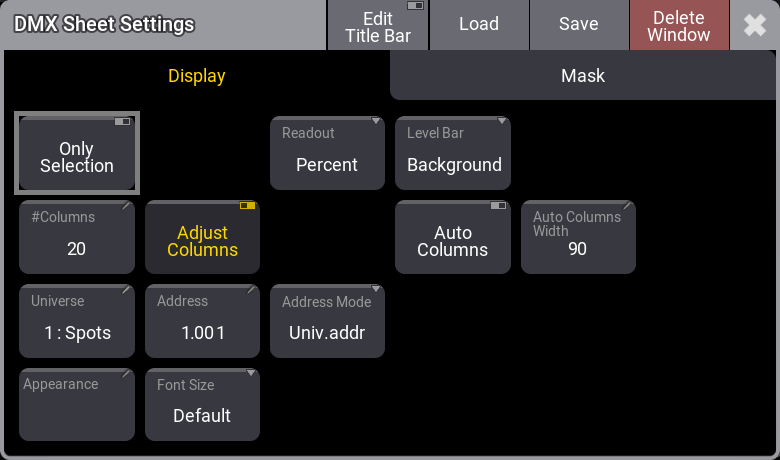
This is a short description of all the Display settings for the DMX Sheet:
-
Only Selection:
When this setting is On, the DMX sheet will automatically scroll to the universe of the first fixture selected in the programmer. It automatically turns Off if a specific universe is selected. -
#Columns:
This input button sets the number of columns a sheet should display (the settings Transpose and Adjust Columns must be switched On except in the DMX Sheet).The DMX Sheet shows all the DMX channels and their output values. Learn more in the DMX Sheet topic.
-
Universe:
This input button can change the universe a sheet should display. Tapping it opens a number input where a universe number can be typed. There is a special option called Selected. This makes the sheet scroll to the selected universe. -
Appearance:
Tapping this button opens a Select Appearance pop-up that lists all the defined appearances and the possibility of creating a new appearance. Selecting one will apply that appearance to the window. -
DmxTestBar (only when Edit Title Bar is On):
This setting is only visible when the Edit Title Bar is On. Thus, changing the setting is only possible when the setting is visible in the title bar.
The setting is an On/Off button that shows or hides the DMX tester encoder bar when the DMX Sheet has focus. Learn more in the DMX Tester section. -
Adjust Columns:
This On/Off button makes a sheet adjust the column width to match the window size and the number of columns. -
Address:
This input button opens a calculator where a DMX address can be typed. This address defines the address the sheet should scroll to. -
Font Size:
This selects the font size in the window. It is a swipe button that opens a list of sizes from 10 to 32. There is also a Default property. The default is the same as size 18. -
Readout:
This selects the value readout for DMX channels. It is a swipe button that opens a list of readout types with the following options:-
Percent:
This is a range from 0 to 100. -
Decimal:
This is a decimal range from 0 to 255. -
Hex:
This is a hexadecimal range from 00 to FF.
-
Percent:
-
Address Mode:
This toggle button changes how the DMX address is displayed. It can be split up into universes and a range of DMX addresses from 1 through 512 - this option is called Univ. add. The other option is Absolute, which shows the addresses continuously starting from number 1 and upwards. -
Level Bar:
This input field changes the level bar setting in the sheet. There are three options:-
Off:
The value only visualizes the level. -
Background:
The background changes from dark green to bright green as the value rises. -
Bar:
The value is visualized as a bar that moves from left to right as the value rises.
-
Off:
-
Auto Columns:
This On/Off button activates a function that automatically adjusts the number of columns in the DMX Sheet.
Adjust Columns need to be active for this to work. #Columns is automatically adjusted by this function. -
Universe Up (only when Edit Title Bar is On):
This is not a traditional setting. It is a button that can be visible in the title bar. Tapping the button will select the next universe.
This setting is only visible when Edit Title Bar is On. Thus, using the button is only possible when it is visible in the title bar.
-
Auto Column Width:
This On/Off button activates a function that automatically adjusts the number of columns in the DMX Sheet.
Adjust Columns need to be active for this to work. #Columns is automatically adjusted by this function. -
Universe Down (only when Edit Title Bar is On):
This is not a traditional setting. It is a button that can be visible in the title bar. Tapping the button will select the previous universe.
This setting is only visible when Edit Title Bar is On. Thus, using the button is only possible when it is visible in the title bar.
The mask tab contains the three On/Off toggle buttons called Value, Attribute, and ID. They are described in the text above.
DMX Tester
The DMX channels can have output from the DMX tester.
This can be done using the DMXAddress and DMXUniverse keywords.
It can also be done using the DMX Tester encoder bar. It can be shown by turning on the Tester Encoder Bar in the title bar of the DMX Sheet.

This encoder bar allows fast access to DMX addresses, a test value, and the option to patch the selected address to an existing fixture. A row of buttons gives fast access to some useful functions.
On the left side of the bottom row, there is a button that changes the address mode for the encoders. It can be Uni for Universe and Address separation on the first and second encoder or Abs for absolute DMX addressing on the second encoder.
The third encoder (Tester Output) defines the DMX value used for the test. Changing the readout for the DMX sheet also changes the readout for this encoder.
The fourth encoder can be tapped to open a Fixture(s) to Patch pop-up. This can be used to select an existing fixture that should be patched to the selected DMX address.
DMX addresses can also be selected by tapping on the DMX sheet.
The buttons above the encoder control have the following functions:
-
Retain:
Turning this On will keep the value from the tester active in output for any DMX address selected using the tester. Retain Off releases the previous addresses from the tester. -
DMX Channels:
This button toggles between three different values:-
All:
Any DMX address can be selected using the encoders. -
Patched:
This allows only patched DMX addresses to be selected using the encoders. -
Unpatched:
This allows only unpatched DMX addresses to be selected using the encoders.
-
All:
-
Select All:
Tapping this selects all the DMX addresses affected by the DMX tester. -
Release Selected:
This will release the currently selected DMX address from being affected by the DMX tester. -
Release Unselected:
This will release all other DMX addresses except the currently selected one from being affected by the DMX tester. -
Release All:
This will release all DMX addresses from being affected by the DMX tester. -
Park Selected:
This can park the currently selected DMX address at the current DMX value. -
Unpark Selected:
This can be used to unpark the currently selected DMX address.
When a DMX tester affects a DMX channel, the background color for the value is white.
The DMX Universe pool shows when a universe has parked DMX addresses with a small ![]() icon. Universes where the tester affects DMX channels also have a small
icon. Universes where the tester affects DMX channels also have a small ![]() icon.
icon.
It could look like this in the pool:
