|
grandMA3 User Manual » Workspace » Oops Overlay
|
Version 2.1
|
The Oops overlay displays the history of completed actions. Completed actions are displayed in form of a list and in chronological order. The action at the bottom of the overlay shows the latest entry.
The latest action or multiple actions can be Oopsed. It is also possible to use Oops filters for different kinds of actions.
For more information about Oops, see Oops keyword and Oops hardkey.
|
|
Important: |
|
All Oops entries are cleared when changing the Patch or loading a show file.
|
To open the Oops overlay:
- Press and hold Oops.
or
- Execute the command Menu "OopsOverlay".
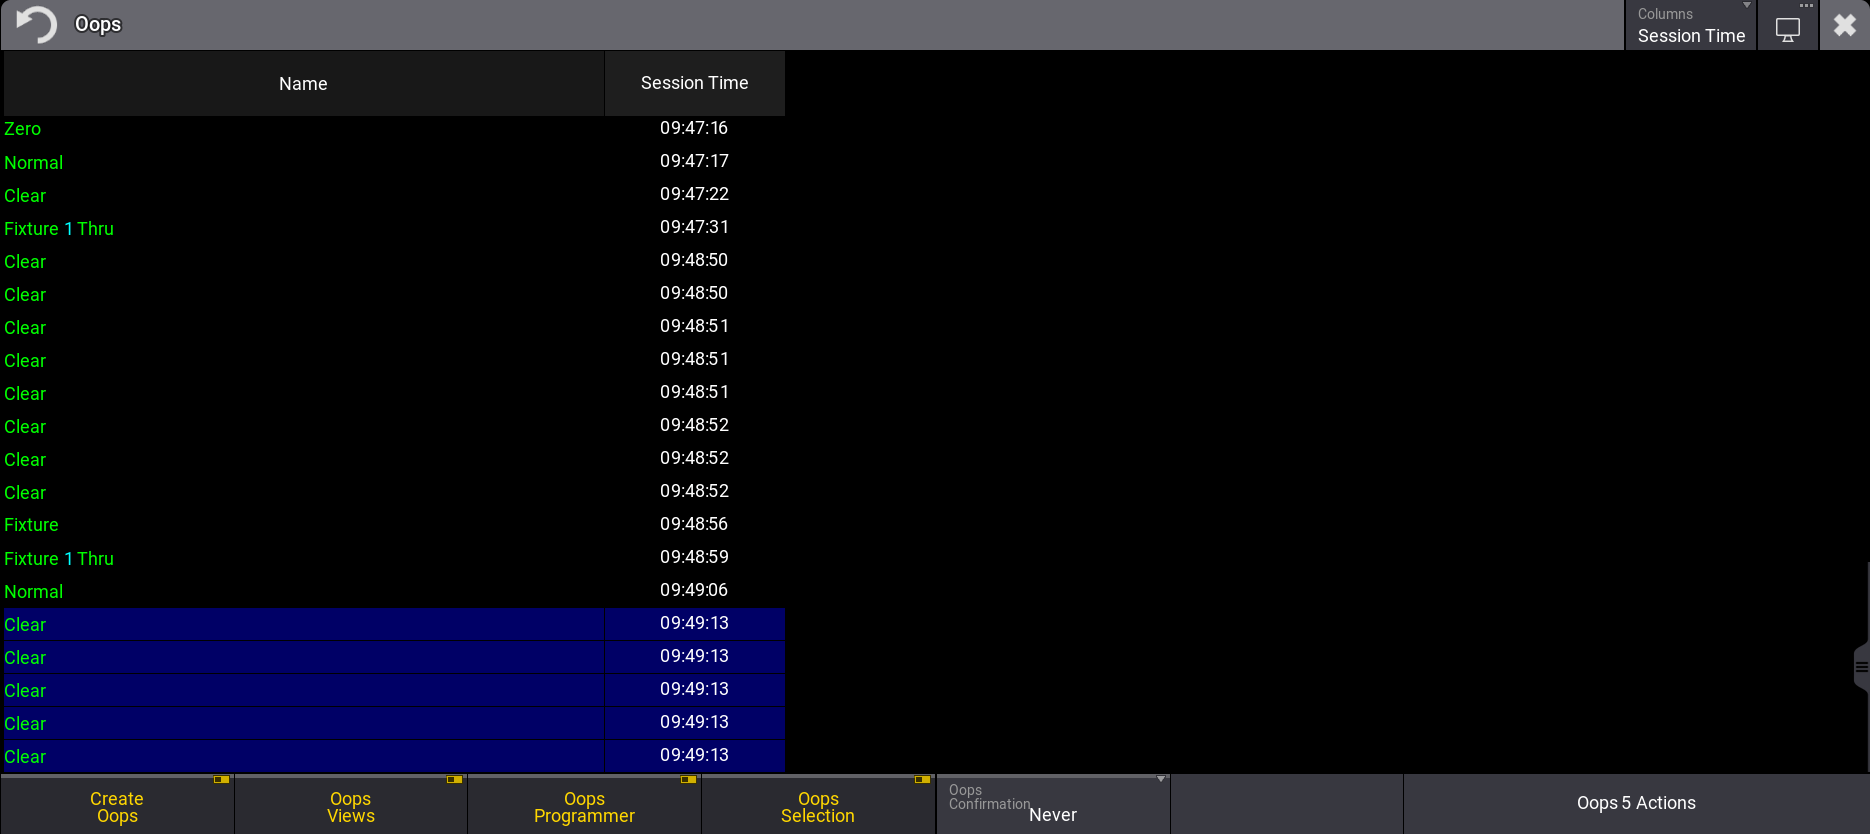
The overlay is separated into two columns:
-
Name: Shows the executed command or the action that has been done.
- Elapsed Time / Session Time: Shows the bygone time since the action has been executed.
To toggle between different time units in the overlay, tap Columns in the title bar:
- Elapsed Time: Shows the passed time since the command has been executed.
- Session Time: Shows the time off the day the command has been executed.
Oops Actions
|
|
Hint: |
|
Only the last action or a coherent amount of actions can be Oopsed. A selection of actions always includes the latest one.
|
|
|
Hint: |
| A blue background in the overlay indicates the selected action. |
Requirements:
- Change at least two values in the show file to create Oops events, for example, by setting dimmer, position and color values for fixtures.
To undo the last action:
- The action at the bottom is selected, when opening the Oops overlay.
- Tap Oops Last Action located the bottom right corner in the Oops menu. The latest action is undone and is vanished in the overlay.
To undo multiple actions:
- Use 2 Finger Scroll or the scrollbar to scroll to to a particular event in the Oops overlay.
- Tap on an any listed event to be undone. The latest event and all other events to the taped event are selected.
- TapOops x Actions. The x stands for the selected number of actions.
- The selected actions are undone and are vanished from the overlay.
Toggle Oops Filters
The following filters in the Oops overlay allow to filter events:
- Create Oops
- Oops Views
- Oops Programmer
- Oops Selection
|
|
Hint: |
| The four filters operate the corresponding settings of the User Configuration. For more information, see User Settings. |
|
|
Hint: |
| /NoOops does not generate oops events when executing commands. For more information, see /NoOops Option Keyword. |
- To create no events at all, disable Create Oops. Oops View, Oops Programmer and Oops Selection are greyed out.

Oops Confirmation
The setting Oops Confirmation defines when an Oopsed event has to be confirmed via a pop-up.
Oops Confirmation can be set to the following options:
- Always: Any Oopsed event needs to be confirmed.
- Main: Important actions needs to be confirmed, for example, storing, moving, or deleting objects.
- Never: No confirmation is needed. Oops Configuration is set to Never by default.
To change the Oops Confirmation to Always:
- At least one Oops event is created.
- Press and hold Oops. The Oops overlay opens.
- Tap, hold and swipe Oops Confirmation. A dropdown menu opens.
- Select Always. The dropdown menu closes.
- Close the Oops Overlay.
- Press Oops. A Oops pop-up appears:
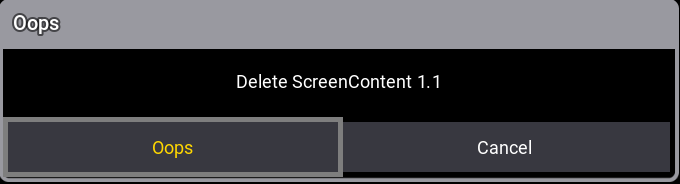
- Tap Oops to confirm. The last action is undone.
Oops in a Session
Oopsing an action is possible in a session with multi-users. For more information about multi-users in sessions, see Multi User Systems and Session.
Investigations about already changed objects by other stations are made, when Oops is used in a session.
The first station displays a failure message in the command line, if the object was already changed by another station:
