grandMA3 User Manual Publication
Activation Group
|
grandMA3 User Manual » Patch and Fixture Setup » Attribute Definitions » Activation Group
|
Version 2.0
|
An activation group is used when there are several attributes where it makes sense that they are activated together.
For instance, storing pan and tilt values together often makes sense. Having them in the same activation group makes this possible. Activating one of them also activates the other.
There are factory-defined groups that are used with the factory-defined attributes. Custom groups can be made and then used in the Attribute Definitions. The group needs to be created before it can be used.
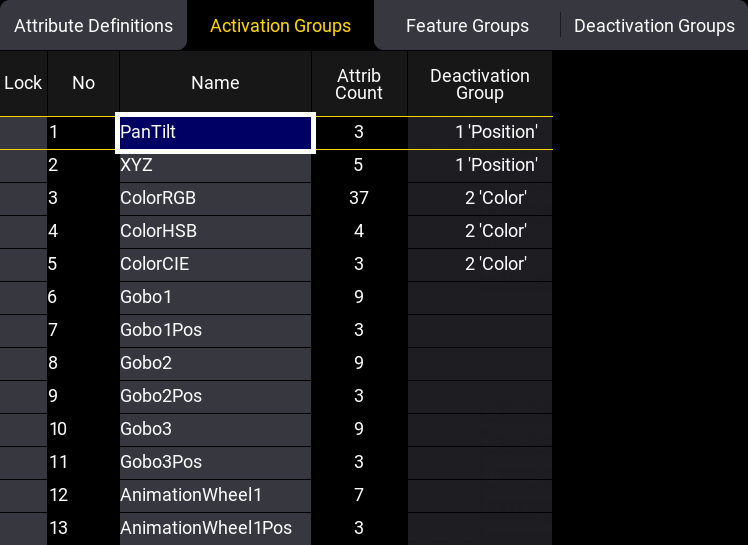
The menu has the following columns:
- Lock:
This can be used to lock the row from being edited. - No:
This is an auto-generated row number. - Name:
This is the name of the activation group. - Attrib Count:
This is a counter showing how many attributes are part of the group. - Deactivation Group:
This column selects a Deactivation Group for two or more activation groups. Read more about this in the Deactivation Group topic.
Create and Use a New Activation Group
To create a new activation group:
- Press Menu.
- Tap Patch.
- Tap Attribute Definitions on the left side.
- Tap Activation Groups on the top tabs.
- Select the line in the list, where the new group should be above.
- Tap Insert New ActivationGroup at the bottom.
- Edit the name field to add a descriptive name.
- Optionally edit the Deactivation Group cell to add a deactivation group.
- Tap Attribute Definitions on the top tabs.
- Assign the new group to the relevant attributes in the Attribute Definitions menu.
- When finished, close the menus and tap Save and Exit in the pop-up asking if the changes should be kept.
For more information on how to use the Activation Group read the Attribute Definition topic.