Recipes
|
grandMA3 Quick Start Guide » 17 - Recipes
|
Version 1.9 |
In Chapter 15, we created a sequence with multiple cues using different presets.
Recipes can produce a similar result but in a very flexible setup. This means we can program a show knowing that our fixtures might adjust in the future - both the amount and type. We can then choose to program our show so we are ready for future adjustments.
Let us have a look at the theory behind the recipes.
A recipe line can contain a set of information. This often involves a selection of fixtures (possibly from a group), a set of values (often from a preset), and some information about how to apply the value to the fixtures. This information is then "cooked" into a cue or a preset.
If an element is changed, the recipe can be re-cooked, and the cue or preset will reflect the updated information. The element containing information about how to apply the values to the selection is what makes the recipe unique compared to using all presets with embedded presets (like we did in chapter 13) and the flexibility in updating a few groups and then re-cooking an entire sequence, makes the recipes a unique and very flexible tool when you often have to make adjustments to your show setup - for instance in a touring show.
A recipe can contain multiple recipe lines. Each line can contain one set of information, making the entire recipe capable of having multiple sets of information.
This graphic is from the recipe topic:
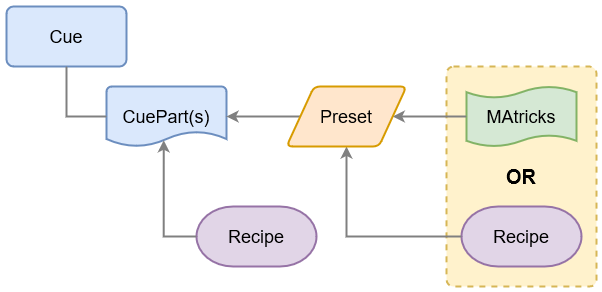
This shows us that a recipe can be stored in a cue part or preset, which can then be used in a cue part. It also shows an element called "MAtricks", which is currently out of the scope of the quick start guide.
If a cue part contains its own recipes and uses presets with recipes, then it can be a complex calculation for the software to figure out what output the fixture should have. Ultimately, it can only have output from one source at any given time.
So I suggest to keep it as simple as possible. You can create incredibly complex programming, and the software will still figure out what to do. There is a bigger risk that you confuse yourself and your colleagues.
Okay, let us do something and look at how it works.
View Setup
We should set up a view with the elements we will use.
We need a sequence sheet to look at the sequence - create one on an empty user area or call a view with a sequence sheet.
We also need a group pool with an empty group pool object. And we need the All preset pool number 1. It might also be useful to have a 3D Viewer visible.
We need to edit the sequence sheet to show us the recipe lines. Click the MA logo in the upper left corner of the sheet, then click the Mask tab. This tab has settings for adjusting how the sequence sheet looks. Click Show Recipes to toggle it On.
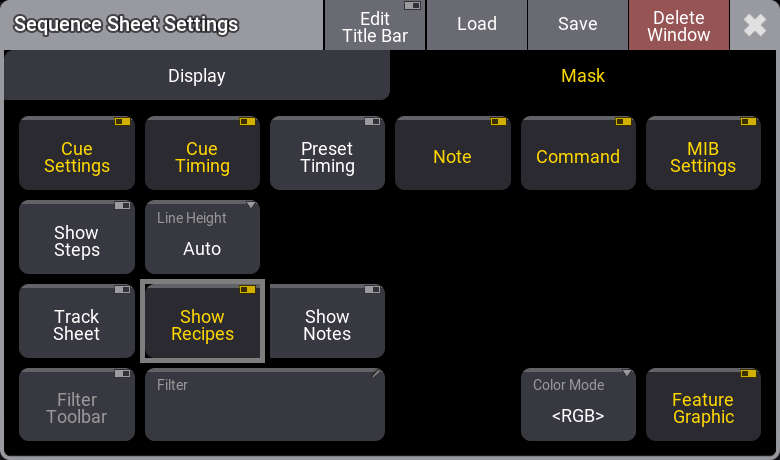
Close the settings.
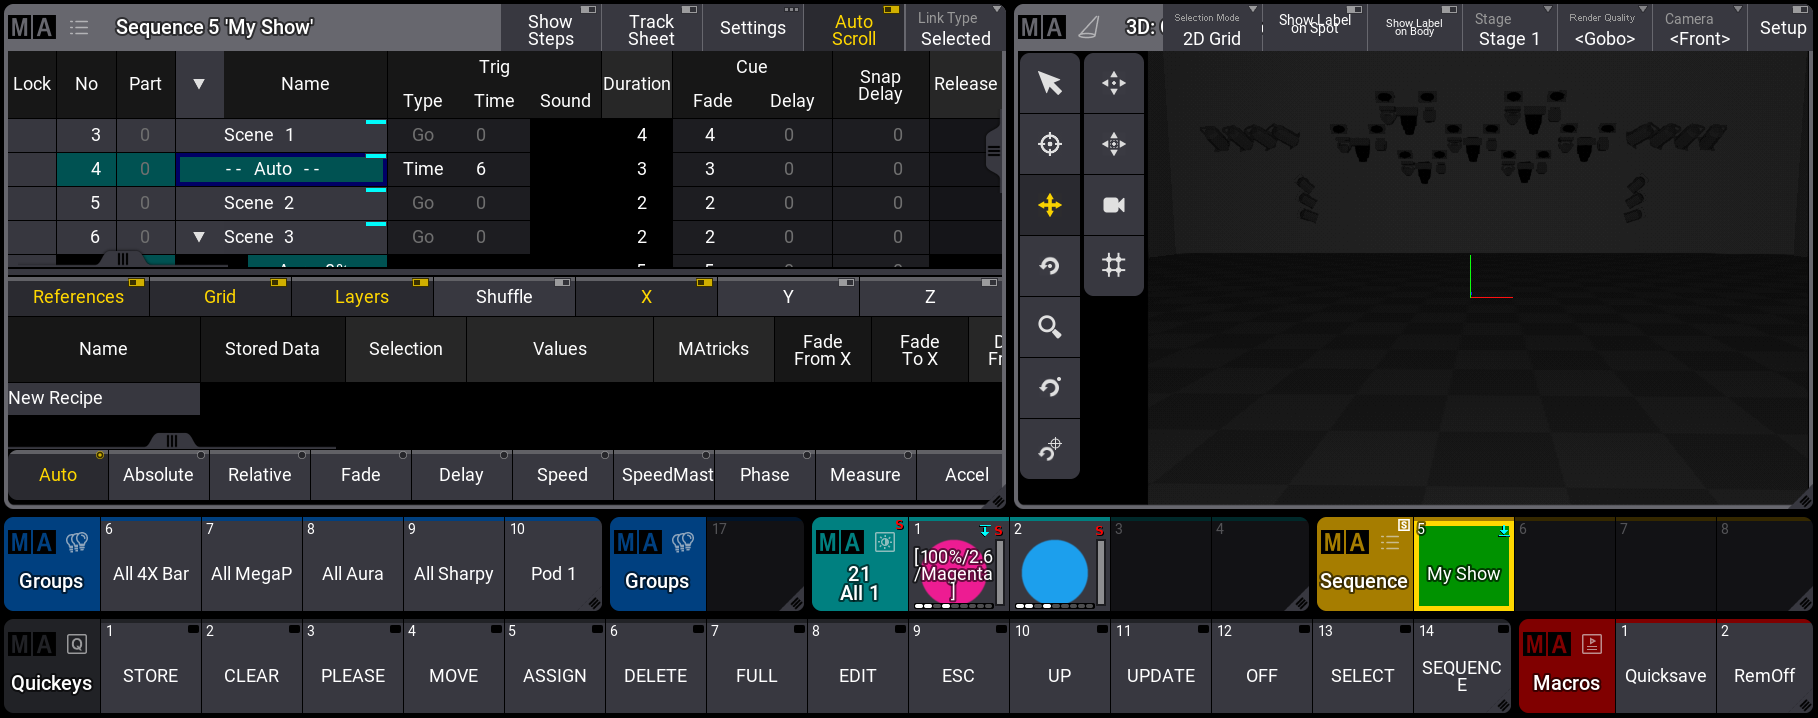
Now, the bottom part of the sequence sheet shows an area where recipes can be created and edited.
My view looks like this:
Cue with a Recipe
We are going to create a cue that uses a recipe.
Start by clearing the programmer and turn off any active sequence.
Then, store a new sequence and select it. For me, it is going to be sequence number 6.
The new sequence should contain an empty cue 1. You can assign an executor to control the sequence if you want.
We are going to create a recipe that uses a group. Select fixtures 201 and 202 and store this as a new group. This is going to be my group number 17.
We now have all the building blocks we need for our cue recipe.
You can see the recipe area in the bottom part of the sequence sheet. Click cue 1 to select it - you might need to click the cue part number.
The separation between the normal sequence sheet and the recipe area can be adjusted by clicking and moving the gray bar, separating the two areas up or down.
Right-click New Recipe in the recipe area to create a recipe line.
This line has a lot of columns that can contain settings for the recipe line. It is outside the scope of this quick start guide to explain what each of them do.
Right-click (or Edit) the field in the "Selection" column. This opens a selection pop-up with all the groups. Select the new group with the two Mega Pointes. Now right-click the "Values" field and select a color preset.
Now we can see the cue name changed, and it got a small "pot" (![]() ) icon.
) icon.

Run the first cue of the sequence. We don't see anything. Select the group and give the fixtures a dimmer value. Store this into cue 1 using merge and clear the programmer.
We can see that the fixtures get the color from the preset cooked into the cue, and the dimmer values are stored directly into the cue without referencing a preset or a recipe. Turn on Track Sheet to see what is stored in the cue. It appears that the color is just coming from the preset, just like if we stored it manually into the cue. Only the small yellow pot icon indicates that some attributes are affected by a recipe.
You should have some dimmer presets, including one with a low level and one with 100%. If you do not, then please create these (as universal presets).
Let us create a new recipe line for cue 1, so we have two lines. We also want the group to be the "selection" for this line. Use the swipey menu of the group and select Assign. Now click the new recipe line. This assigns the group as the selection.
Use any of the two methods to select a dimmer preset with a lower dimmer value as the "value".

Notice that this does not change the output. This is because the cue's manually stored "hard" values have a higher priority than the recipe data.
Let us try to change the fixture selection in the group. Select group 7 and store the new selection in the group used in the recipe - in my example, it is group 17. You can choose to merge or overwrite the group.
The result is that the other spots turn on in green and the lower dimmer value - they reference both the dimmer and color preset.
We will now remove the stored "hard" dimmer values from the cue.
With the group selection, give the fixtures a dimmer value - the actual value does not matter; we just need the active programmer value.
Execute the following command: Store Cue 1 /Remove
Clear the programmer. All the dimmer values are now removed from the cue, and the fixtures turn off. Even when we still have dimmer values in the recipe, we can remove the cooked data from the cue. If we want the dimmer values from the recipe back in the cue, then we can edit the recipe, which will trigger an auto-cook, or we can manually cook the cue or sequence again.
Let us try the manual approach. Execute the following command: Cook Sequence 6 - If your sequence is not number 6, please adjust the number to match.
This gives us a pop-up:

We did not specify how the values should be cooked into the cue in our command, so the software asks us what we want. Notice that we can also use the cook command to remove recipe data.
We want to merge the recipe data, so click Merge.
The fixture now uses the dimmer preset.
Let us try to change the dimmer preset in the second recipe line. Select a different dimmer preset with a high output. You can use the assign method or right-click the values field in the line and select the desired preset. Notice how the cue name adjusts to represent the referenced presets.
Add a third recipe line and use the same group as the selection and a position preset as the value.
When the value and selection are added, it is automatically cooked into the cue, and the fixtures reflect the output.
The final change we will make is adjusting the fade and delay times for the dimmer recipe line.
Scroll the recipe to the right to show the four "Fade" and "Delay" columns.
There is a "From X" and "To X" for both fade and delay. It is outside the scope to explain the X, but the from and to allow us to add a value range for the selection. Give the "Fade From X" field a value of 3. The "Fade To X" a value of 10. Both "Delay" fields should be 1.
The result should look like this (the presets can be different):
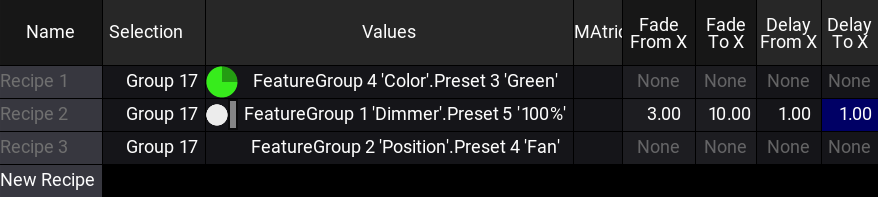
Try to turn off the sequence and then run the cue. You can see that the individual fixtures use the individual fade times matching the range in the recipe. It might be easier to see in a fixture sheet.
Finally, edit the group (Group 17) to only contain fixtures 201 and 202 and use the "overwrite" method to store only the two fixtures in the group.
Try turning off the sequence and run the cue again to see how the output adjusts to the new selection.
Preset Recipe
We are going to create a preset containing a recipe.
Clear the programmer and turn off the sequence.
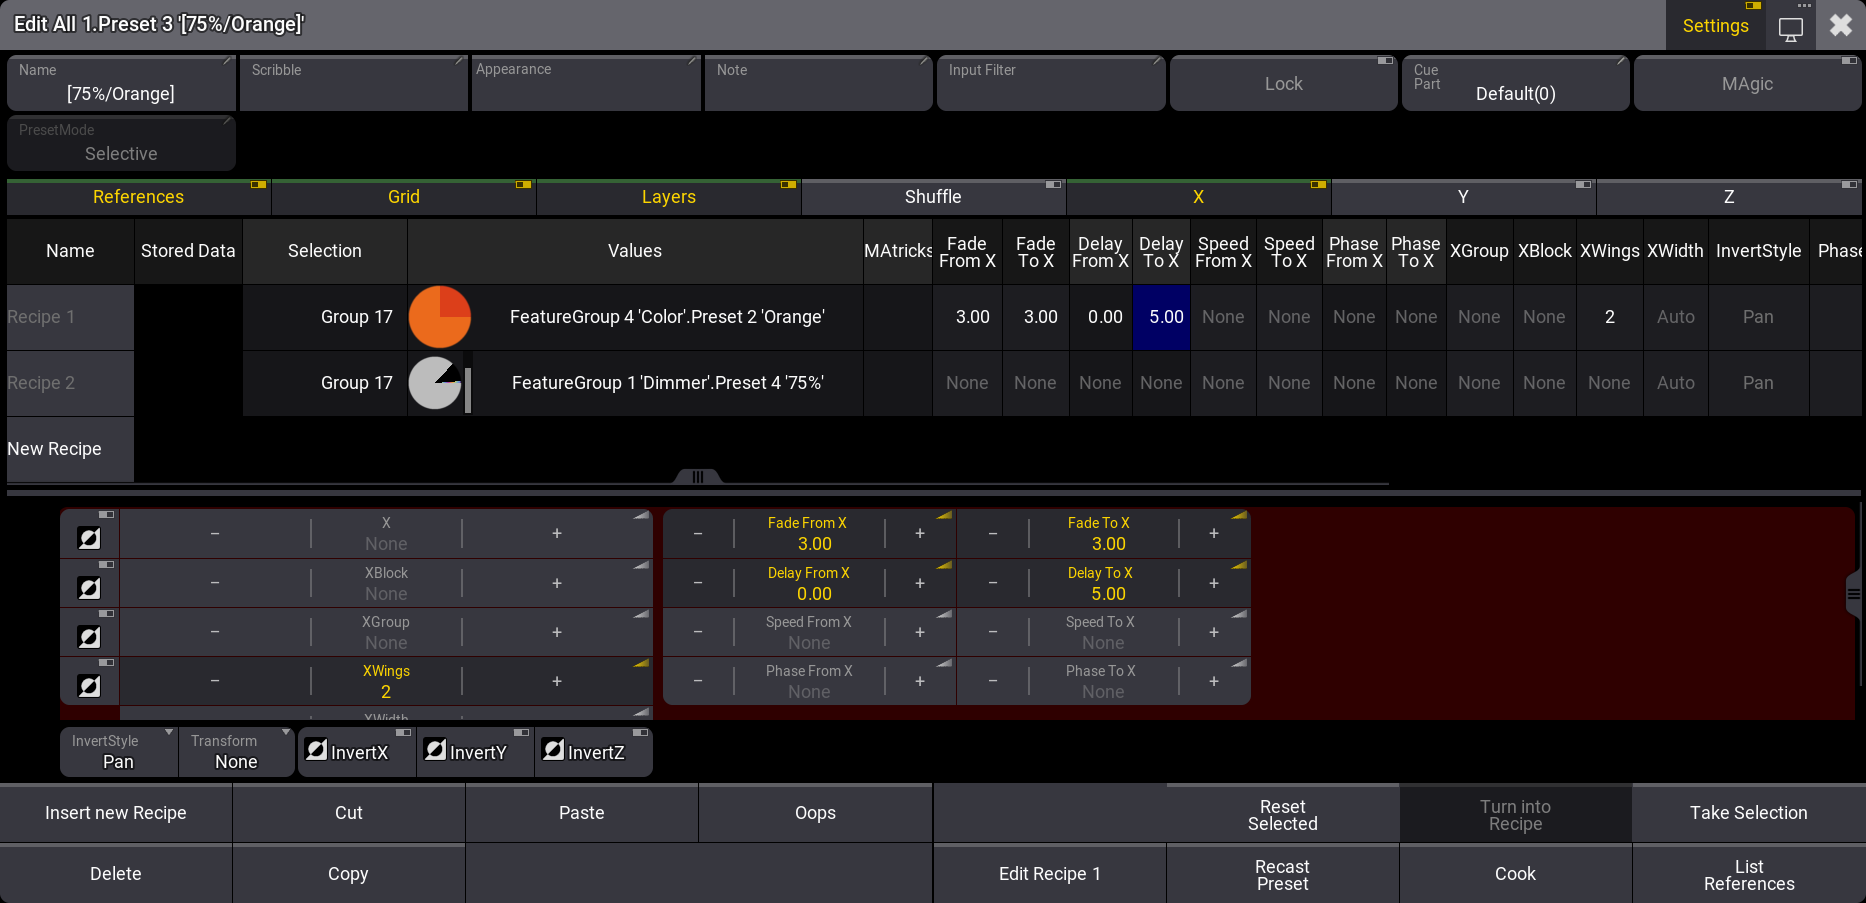
Use the swipey menu on an empty preset in the All 1 preset pool. For me, the first empty pool object is number 3. In the swipey menu, select Edit Settings. This opens an editor for the pool object.
![]()
This big editor has the same recipe section as the cues. Before we can add a recipe line, we need to click Turn into Recipe at the bottom of the editor.
This gives us the first recipe line where we can assign a "selection" and a "value". Please use the same group we use in the cues and select a color preset as the value.
Also, edit the "XWings" to a value of 2 and both the "Fade" columns to 3, the "Delay From X" to 0 and "Delay To X" to 5.
Add an extra recipe line and select the group (Group 17) and a dimmer preset for the recipe line.
The result should look something like this:
Close the editor.
Ensure the programmer is empty, and then click the new preset twice.
This calls the preset into the programmer using the fade and delay times and the recipe values.
Preset like this can be used in busking and playing back values on the fly. Changing the group or preset content updates what is called with the preset. Try selecting group 7 again (all the Mega Pointes) and store the selection on the group used in the recipe (Group 17).
Clear the programmer and call the recipe preset again. Notice how the color and dimmer values are called using the fade and delay times.
Change the group (Group 17) back to only contain fixtures 201 and 202 - remember to use "overwrite" to ensure the group only contains the two fixtures. Clear the programmer.
Add Recipe Preset to the Sequence
Click the preset twice.
Store this as cue number 2 in our recipe sequence.
Clear the programmer and run the two cues. It seems to work. The two fixtures do what we wanted.
Turn off the sequence again.
Select group 7 and store the selection in the recipe group (Group 17).
Run the two cues again.
Cue 1 looks as expected, but cue 2 still only affects the two original fixtures. Clicking the preset twice confirms that the preset actually updated to use the new group.
The problem with cue 2 is that the link to the preset was never created for the new and bigger group. The cue does not know that the recipe preset was expanded to a bigger selection.
Let us fix the problem and simply add a recipe for the second cue.
The recipe line should have our recipe group (Group 17) as the selection and the All preset as the "values".
Turn Off the sequence and try running the two cues again.
Now, the cues look as expected.
You can continue to play around with recipes if you want to explore further.
Remember to store your show when you are done.
Recap
This final chapter was a big one. Recipes can be an extensive topic, and we only scratched the surface.
There are many more details to recipes, but the hope is that you can see some of the advantages of using recipes in a show where flexibility is needed.
Recipes are explained in more detail in the Recipes topic. Using recipes in cues is explained in the Cue Recipes topic. Using them in presets is described in the Recipe Presets topic.
Finally
This is the end of the Quick Start Guide. Thank you for reading it. I hope you have enjoyed it and learned something.
We did not create the best show ever, but that was not really the goal. The goal was to introduce you to some of the many features and functions of the software.
The manual is a great resource to get detailed information about grandMA3. There are also the release notes with each new release to keep you updated on changes.
If you want to learn more, there is online E-learning and in-classroom learning - see more on MA Lightings website and possibly contact your local distributor.
I also want to mention the official forum. It is a great resource for getting help from other users and professionals.
There are also a lot of different videos online - both official and unofficial that provide great insight and information about grandMA3.
Happy Programming