grandMA3 User Manual Publication
Update grandMA3 Consoles
|
grandMA3 User Manual » Update the Software » Update grandMA3 Consoles
|
Version 2.0
|
This topic describes the software update with additional options such as factory reset, etc.
For a simple software update via the user interface, follow the instructions in the Network Update topic.
For a processing unit, the following update process is also valid.
|
|
Important: |
| - The folders EFI, ma, and the update.scr file have to be directly accessible on the flash drive and must not be located in an extra folder. - The USB flash drive's data system has to be FAT32. |
Download the Software Package
- To update a grandMA3 device, download the latest software version from www.malighting.com.
The required installer is called grandMA3 Software x.x.x.x. - Extract the zip file "grandMA3_stick_v.x.x.x.x.zip" and copy the folders EFI, ma, and the update.scr file into the root directory of your USB flash drive.
Install the Software Package on the Console
- Turn off the grandMA3 device.
- Insert the USB flash drive in a USB port.
- For devices without an integrated keyboard (e.g. grandMA3 compact console), connect an external keyboard with a USB port.
- Turn on the grandMA3 device.
- Press the key 8/F8 on the internal or the external keyboard several times.
The Boot Manager opens. - Scroll down to EFI USB Device using the arrow keys.
- Press Enter on the (external) keyboard.
The console starts to boot. The EULA screen opens. - Accept the EULA.
|
|
Important: |
| If the USB flash drive contains more than 1 version, select the version you would like to install first. |
The Install Selector dialog appears:
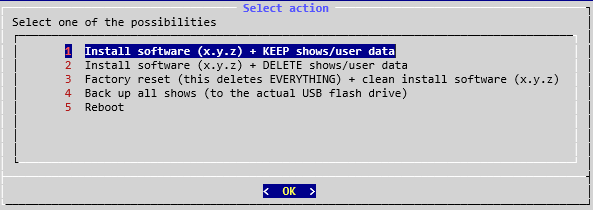
- Select option 1 to keep the shows and user data.
- Select option 2 to delete the shows and user data.
- Select option 3 for a complete factory reset to clean the system before installing the software.
- Select option 4 to save the shows on the USB flash drive.
- Select option 5 to reboot the grandMA3 device.
- Press Enter on the (external) keyboard.
Wait for completion. The grandMA3 device reboots. - Remove the USB flash drive.
The Mode Selection dialog appears.
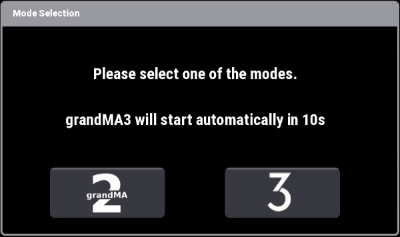
- Select one of the modes. For more information about grandMA3 mode2, read the Mode2 topic in the section grandMA3 Mode2 of the grandMA2 User Manual.
If no selection is made, the device automatically starts in grandMA3 mode. - Screens 1, 2, 3 are initializing.
The letterbox screens go into self-test mode (red, green, blue, white, and black color changer).
The command screens stay black.
It can take several seconds for them to start initializing. - The installation is complete.