|
grandMA3 User Manual » Workspace » User Interface » Adjustable Columns
|
Version 2.0
|
In certain windows and sheets, it is possible to move columns around and to show or hide columns.
|
|
Hint: |
| To save and recall your arrangements, store them as Views or use Preferences. For more information, see Store and Recall Views and Store Settings and Store Preferences |
The following windows and sheets in the Add Window dialog use gestures to adjust columns. See gestures for more information.
- Content Sheet, Fixture Sheet, Track Sheet, Layouts and Layout Editor, Timecode Editor and Timecode Viewer.
In addition to the gesture feature, the following windows and sheets use column sets to make adjustments:
- Agenda Viewer, RDM Devices Viewer, Sequence Sheet, Track Sheet.
The following video provides a basic overview of the column editing feature using gestures.
Open Column Editing
To edit specific columns, a column edit mode has to be opened in the corresponding window.
To open column editing:
- Open the corresponding window, for example, the fixture sheet via the Add window dialog.
-
Perform a 2 finger scroll gesture in the header row of the window. A gear icon (
 ) appears in the top left corner of the header.
-
Tap within three seconds. Three available buttons for column editing are shown.
- Tap Enter Column Editing. The contents of the window will be displayed in a light gray color and the columns will now be ready for editing as shown in the image below.
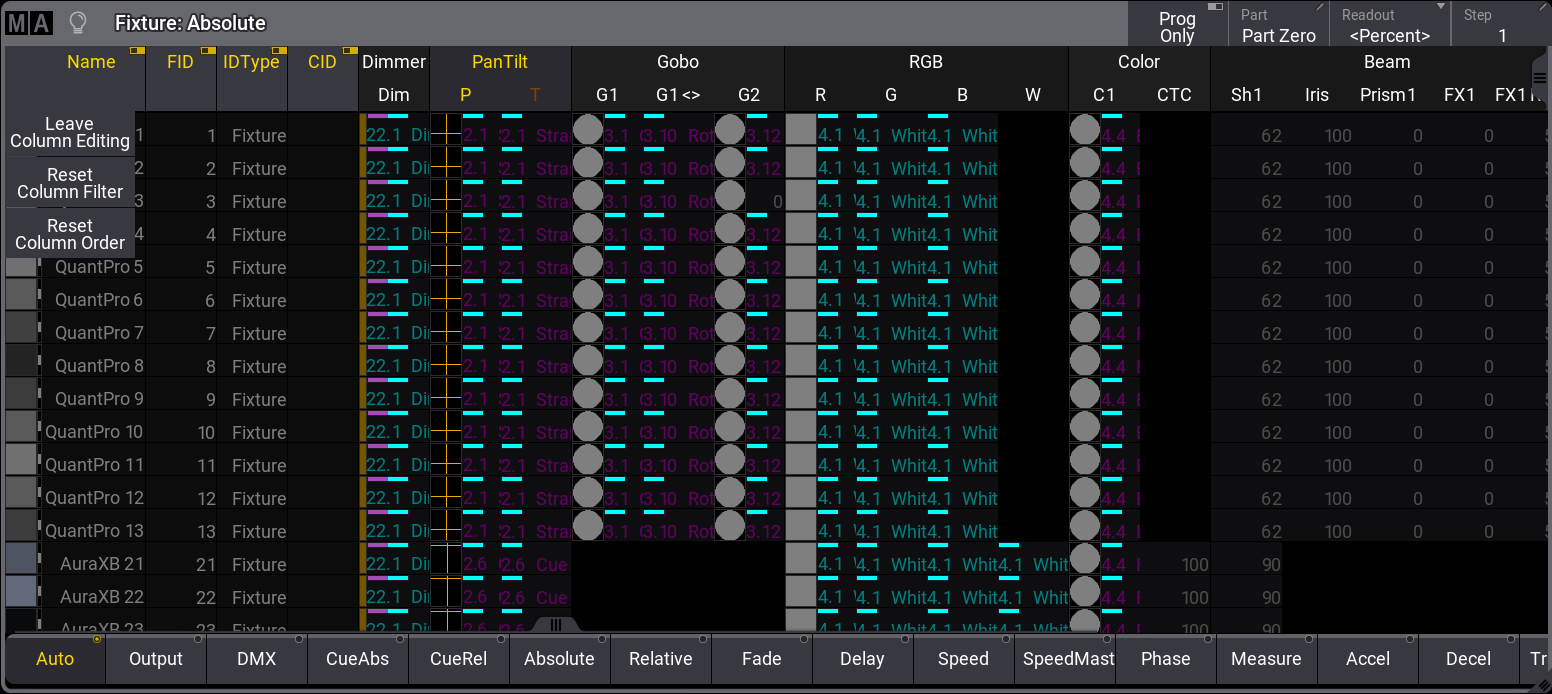
Edit Columns
A drag & drop gesture is used, to change the column order.
To change the column order in the corresponding window, for example, the fixture sheet:
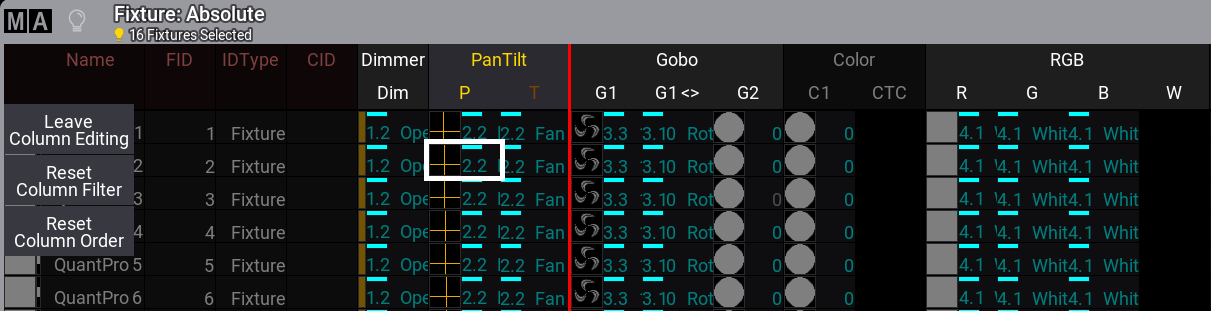
- Tap and hold a column header with one finger, for example, the Color header.
- Drag the column left or right to the desired position. A red vertical line indicates the potential position of the column if releasing the finger.
- Release the finger. The column has now moved to the new position. To reset all columns back to the initial position, tap Reset Column Order.
- Tap Leave Column Editing. The edit column mode is closed.
|
|
Hint: |
|
To move a column without entering column editing, long press a column in the header area until the red vertical line appears.
|
|
|
Restriction: |
|
Columns have certain zones in which they can be moved. Excluded zones are marked in red dark color. For example, as shown in the image above, it is not possible to move the column Color next to the column Name.
|
To filter columns in a corresponding window, for example, in the fixture sheet:
- Open column editing.
- Tap a column header to disable it, for example, Name. The column is greyed out.
-
Tap Leave Column Editing. The edit column mode is closed and an
 icon in the top right corner of the window indicates that a column is hidden.
- To reset all filters back to the initial position, tap Reset Column Filter in the column edit mode.
Column Sets
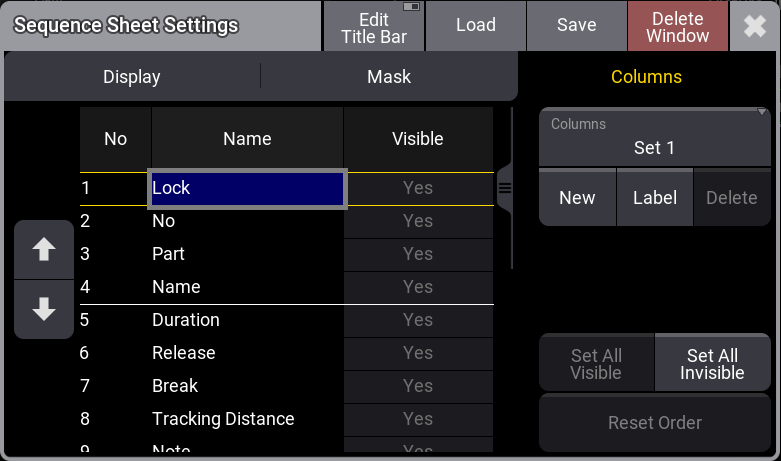
In certain windows and sheets (see above), columns can be adjusted and saved as column sets. This can be done in a column set editor. The editor can be found in the Columns tab of the corresponding window settings.
In the title bar of the corresponding window, the created column set can be selected. For more information about how to make the column selector visible in the title bar, see Title Bar Configuration.
The Column editor is divided into a scrollable grid on the left side and a menu of buttons on the right side.
The following video provides a basic overview of how to customize columns using the column set editor.
To open the Column set editor follow these steps:
- Open a window via the add window dialog, for example, the Sequence sheet.
- Tap MA in the title bar of the window. The window settings open.
- Tap the Columns tab. The Column set editor is open.
or
- Tap and hold Columns in the title bar. A temporary column set editor opens.
To create a new column set:
- Tap, hold, and swipe Columns. A pop-up opens.
- Drag and drop your finger over New at the bottom of the pop-up. A new column set is created.
or
- Tap New. A new column set is created
|
|
Hint: |
|
The currently selected column set is used as a template for a new column set.
|
|
|
Important: |
|
The Column Set Editor offers only columns that were visible in the sheet at the time.
|
To enable or disable columns in the window:
- Two-finger edit Yes/No in the Visible column.
- Tap Set All Visible to enable all columns.
- Tap Set All Invisible to disable all columns.
To change the order of the columns:
- Select a specific column in the grid on the left.
-
Tap
 or
or  to move the column up or down in the grid.
- Reset Order will reset the order.
|
|
Restriction: |
|
A horizontal white line divides the grid into two areas. It is not possible to move a column to the other area.
|
To select an existing column set:
- Tap, hold, and swipe Columns. A pop-up opens.
- Drag and drop your finger over the corresponding column set. The column set is selected.
To label a column set:
- Select a column set.
- Tap Label. The label editor opens.
- Enter a name. Tap Please. A column set is named.
or
- Enter label into the command line.
- Tap Columns in the title bar of the corresponding sheet.
- The label pop-up for the selected column set opens.
To delete a column set:
- Select a column set
- Tab Delete. The column set is deleted.