Tracking Shield
|
grandMA3 User Manual » Cues and Sequences » What is Tracking » Tracking Shield
|
Version 2.1
|
Tracking Shield is a system that can protect tracked attributes that are used in future cues. The function can be applied when storing or copying attribute values into cues. It is relevant if the new values will change the look of future cues. It uses the dimmer attribute to detect if the shield can be applied.
The function can be applied when the new attribute values are stored or copied into cues. It is a store mode available in all the pop-ups related to store and copy functions.
When the shield function is selected, there are two modes:
-
↑0:
Protects attributes in the next cue where the dimmer value increases starting from zero.
-
>0:
Protects attributes in the next cue where the dimmer value is above zero.
Examples
Example 1
The starting point for this example is a sequence with five cues. Fixture 1 is stored at 100% on a center position with a blue color in Cue 1. The fixture turns off in Cue 2 and On again in Cue 5. The position and color are not stored in Cue 5. They are tracked values, and the desire is that the fixture has the same position and color in Cue 5 as the currently tracked values.
![]()
Now, the fixture is selected and given a new position, color, and dimmer value. These new attribute values are stored in cue 3. This opens a pop-up like this:
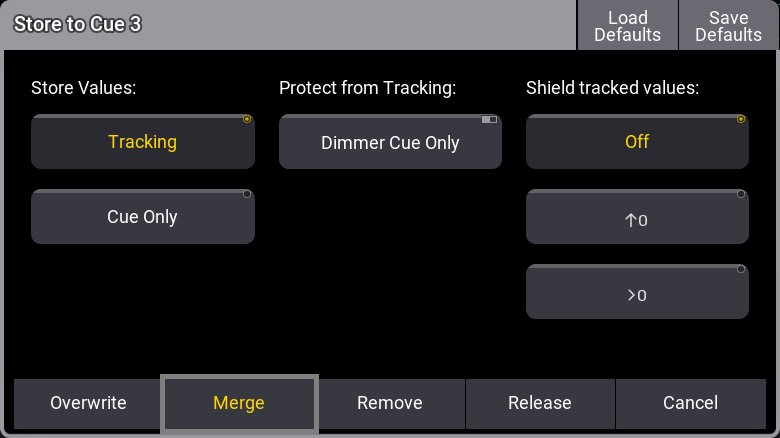
Here, we have the "Shield tracked values" options.
This is the result if the cue is stored using merge with "Off" selected:
![]()
The new attribute values are tracked into Cue 5, and the result is that Cue 5 will look different.
This is the result if the cue is stored using merge with the "↑0" selected:
![]()
The Tracking Shield function saves the previously tracked attribute values in Cue 5, and the cue looks the way it should. The result in this example is the same if the ">0" option is selected.
Example 2
This second example uses almost the same sequence as a starting point.
![]()
The difference is that the fixture is at 10% in Cue 2 instead of 0%.
This example uses the same new attribute values as example 1, and the new attributes are also stored into Cue 3.
This is the result if the cue is stored using merge with normal "Tracking" and the shield setting "Off":
![]()
The new attribute values are tracked into Cue 5, and the result is that Cue 5 will look different.
The result shown above is the same result if the cue is stored using merge with the "↑0" mode. This mode is only effective when the dimmer attribute comes from 0% and goes to a value above 0%.
However, this is the result if the cue is stored using merge with the ">0" mode:
![]()
Here, the new attributes are stored into Cue 3, and the previous tracked values are stored in Cue 4, where the dimmer attribute was above 0%.
Similar results could be achieved using Tracking Distance and Break. Tracking Shield is another useful programming tool applied with the store action.