Interfaces and IP
|
grandMA3 User Manual » Networking » Interfaces and IP
|
Version 2.1
|
The Network Interface menu lists the available interfaces, and in the grandMA3 hardware, it can be used to change the settings.
Open the Network Interface Menu
-
Press Menu.
- Opens the menu select pop-up. -
Tap Network.
- Opens the Network menu. -
Tap My Interfaces.
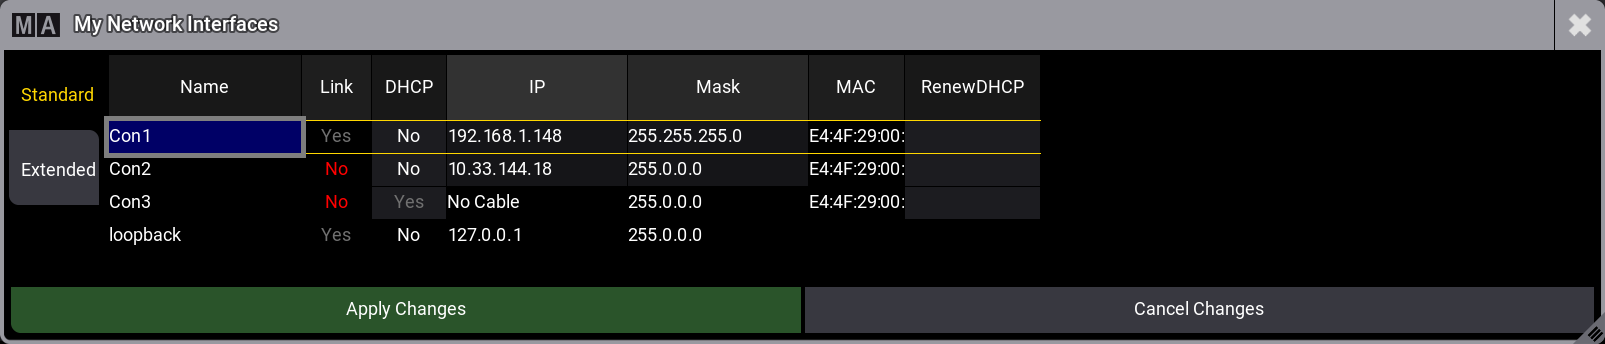
- Opens the Network Interfaces pop-up:
|
|
Restriction: |
|
If you see an interface with "imx6" then it is for internal communication inside the console. Do not make any changes to this interface.
|
The pop-up has two versions: Standard and Extended. The screenshot above shows the Standard version. The Extended version has more settings, but otherwise, it is the same. It is possible to toggle between the two versions by tapping the tabs on the left.
The Extended version looks like this:

Every cell with a light gray background can be edited.
The grandMA3 consoles have three network interfaces, with connectors on the rear panel, that can be used to connect with external equipment. The connectors are named Con1, Con2, and Con3 in the Network Interface menu.
In the grandMA3 onPC, it is not possible to edit the IP addresses in the Network Interface menu. This needs to be done in the computer operating system.
Short Description of All the Available Columns
-
Lock:
Changing the value to Yes in this cell locks the interface from being edited. -
No:
This is the interface number. -
Name:
This is the name of the interface. -
Link:
This cell says Yes if there is an active connection on the connector. It says No in red if there is no connection. -
DHCP:
This cell says Yes if DHCP is activated for the interface. No means that DHCP is turned Off, and it is possible to manually set a static IP address information. Read about DHCP and Choosing an Address Range below. -
Slow:
This cell says Yes if the detected network speed is below 1 Gbit/s. -
IP:
This is the IP address for the interface. If DHCP is set to "No", this cell can be edited on the console to change the IP address for the interface. CIDR notation is accepted as input to also set the subnet mask. It says "No Cable" if it is disconnected. Read about Choosing an Address Range below. -
Mask:
This is the subnet mask for the interface. If DHCP is set to "No", this cell can be edited on the console to change the subnet mask for the interface. -
Gateway:
This is the gateway address for the interface. If DHCP is set to "No", this cell can be edited on the console to change the gateway address for the interface. -
MAC:
This is the MAC address for the interface. This is information only and cannot be edited. -
DHCP Timeout:
This sets the timeout for the software to wait for a response from a DHCP server. If the timeout is reached, then the software automatically sets an IP from the Link-local address block. Read about DHCP and Choosing an Address Range below. -
DNS:
This is the DNS (Domain Name Server) address. -
RenewDHCP:
This can be set to "Yes". When the pop-up is closed with Apply Changes, then the software will make a new request to a DHCP server. The next time the pop-up is opened, then the field will be empty again. Read about DHCP and Choosing an Address Range below.
What is DHCP
DHCP is a system where IP addresses are distributed from a DHCP server. If this is On (the field says "Yes"), it is impossible to set the IP address locally.
Edit the field to turn On or Off DHCP on the console.
Choosing an Address Range
It is recommended that an active choice regarding what IP address range to use be made. The grandMA3 system is built to connect to the Internet (through a properly set up router) to get access to the world server and fixture shares. With this in mind, choosing an IP address range that falls into the private address space of IP Addresses is recommended. The private address spaces are ranges of IP addresses that are reserved for use on local LAN networks, and there should not be any servers on the Internet using these ranges. Communication between private IP addresses is usually not routed to the internet.
The IPv4 addresses can be separated into classes (A, B, C, E, and E). The first three of these classes contain the IP addresses that we can use for setting an address. Each of these three classes has a private address space.
| RFC 1918 Name | IP Address Range | Number of Addresses | Largest CIDR Block (subnet mask) | Host ID Size | Mask Bits | Classful Description |
|---|---|---|---|---|---|---|
| 24-bit block | 10.0.0.0 - 10 .255.255.255 | 16 777 216 | 10.0.0.0/8(255.0.0.0) | 24 bits | 8 bits | Single class A network |
| 20-bit block | 172.16.0.0 - 172.31.0.0 | 1 048 576 | 172.16.0.0/12(255.240.0.0) | 20 bits | 12 bits | 16 contiguous class B networks |
| 16-bit block | 192.168.0.0 - 192.168.255.255 | 65 536 | 192.168.0.0/16 (255.255.0.0) | 16 bits | 16 bits | 256 contiguous class C networks |
Source: Wikipedia - Private_network
The ranges above are often limited further. For instance, a range using 24 mask bits (or a subnet mask of 255.255.255.0).
Another range option is using the link-local range. The valid IPv4 unicast range is 169.254.0.0 - 169.254.255.255 (or 169.254.0.0/16). This range is best known for automatic addressing processes. The link-local range should not be limited by a smaller subnet mask, so the potential number of devices in the same subnet is quite large (65 536 - 256 - 256 = 65 024).
The network interface card assigns the link-local address when a static address is not set and there is no response from a DHCP server.
The link-local range can be used, but it might be better to set a static IP address using one of the ranges in the private address space.
|
|
Important: |
| The most important part is that the grandMA3 devices must be in the same IP address range to communicate with each other. |
Set the IP Address in the Console
|
|
Restriction: |
|
The IP address range 192.168.33.x is not allowed to be used for the network interfaces Con1, Con2, or Con3.
|
- Navigate to the Network Interfaces menu (read above).
- Make sure DHCP is turned Off (the cell says "No") for the network connector (read above).
- Edit the IP cell and write the new IP address (IPv4 only). The CIDR notation can be used to set the subnet mask while typing the IP address. For example, 192.168.101.11/24 gives the subnet mask to 255.255.255.0.
- Edit the Mask cell and write the subnet mask.
- Optionally edit the Gateway cell to set a gateway address if needed.
- Tap Apply Changes to use the new settings.
The changed IP address is used without the need for a reboot.
|
|
Hint: |
| For more information about the Auto option of the MA Net interface, see Session. |