RDM (Remote Device Management)
|
grandMA3 User Manual » RDM (Remote Device Management)
|
Version 2.1
|
Remote Device Management is a protocol that allows bi-directional communication between a grandMA3 device and RDM-ready devices attached to it (= RDM-ready fixtures) over a standard DMX line. RDM protocol allows grandMA3 devices to send commands and receive messages from specific moving lights for device configuration and status monitoring. For example adjusting the DMX starting address. This is especially useful for devices installed in a remote area. The parameters of each fixture determine which commands can be send and which messages can be received between the fixture and the grandMA3 device.
ANSI E1.20 - 2010 by PLASA specifies the RDM standard as an extension of the DMX 512-A protocol (ANSI E1.11).
RDM is integrated in DMX without influencing the connections. The RDM data is transmitted via the standard XLR-poles – new DMX cables are not required. RDM-ready and conventional DMX devices can be operated in one DMX line. The RDM protocol sends its own data packages in the DMX512 data feed and does not influence conventional devices.
Enable RDM
To use RDM, it has to be enabled in two different spots:
- Globally within the show file:
- Press Menu - Network: Enable the RDM button in the Stations tab.
-
Or Press Menu - Network: Enable the RDM button in the Station Control tab.
- Or press Menu - Live Patch: Enable the RDM button in the RDM tab.
- Or press Menu - Connector Configuration: Enable the RDM button on the bottom right.
All four RDM buttons are linked to each other and RDM is enabled globally.
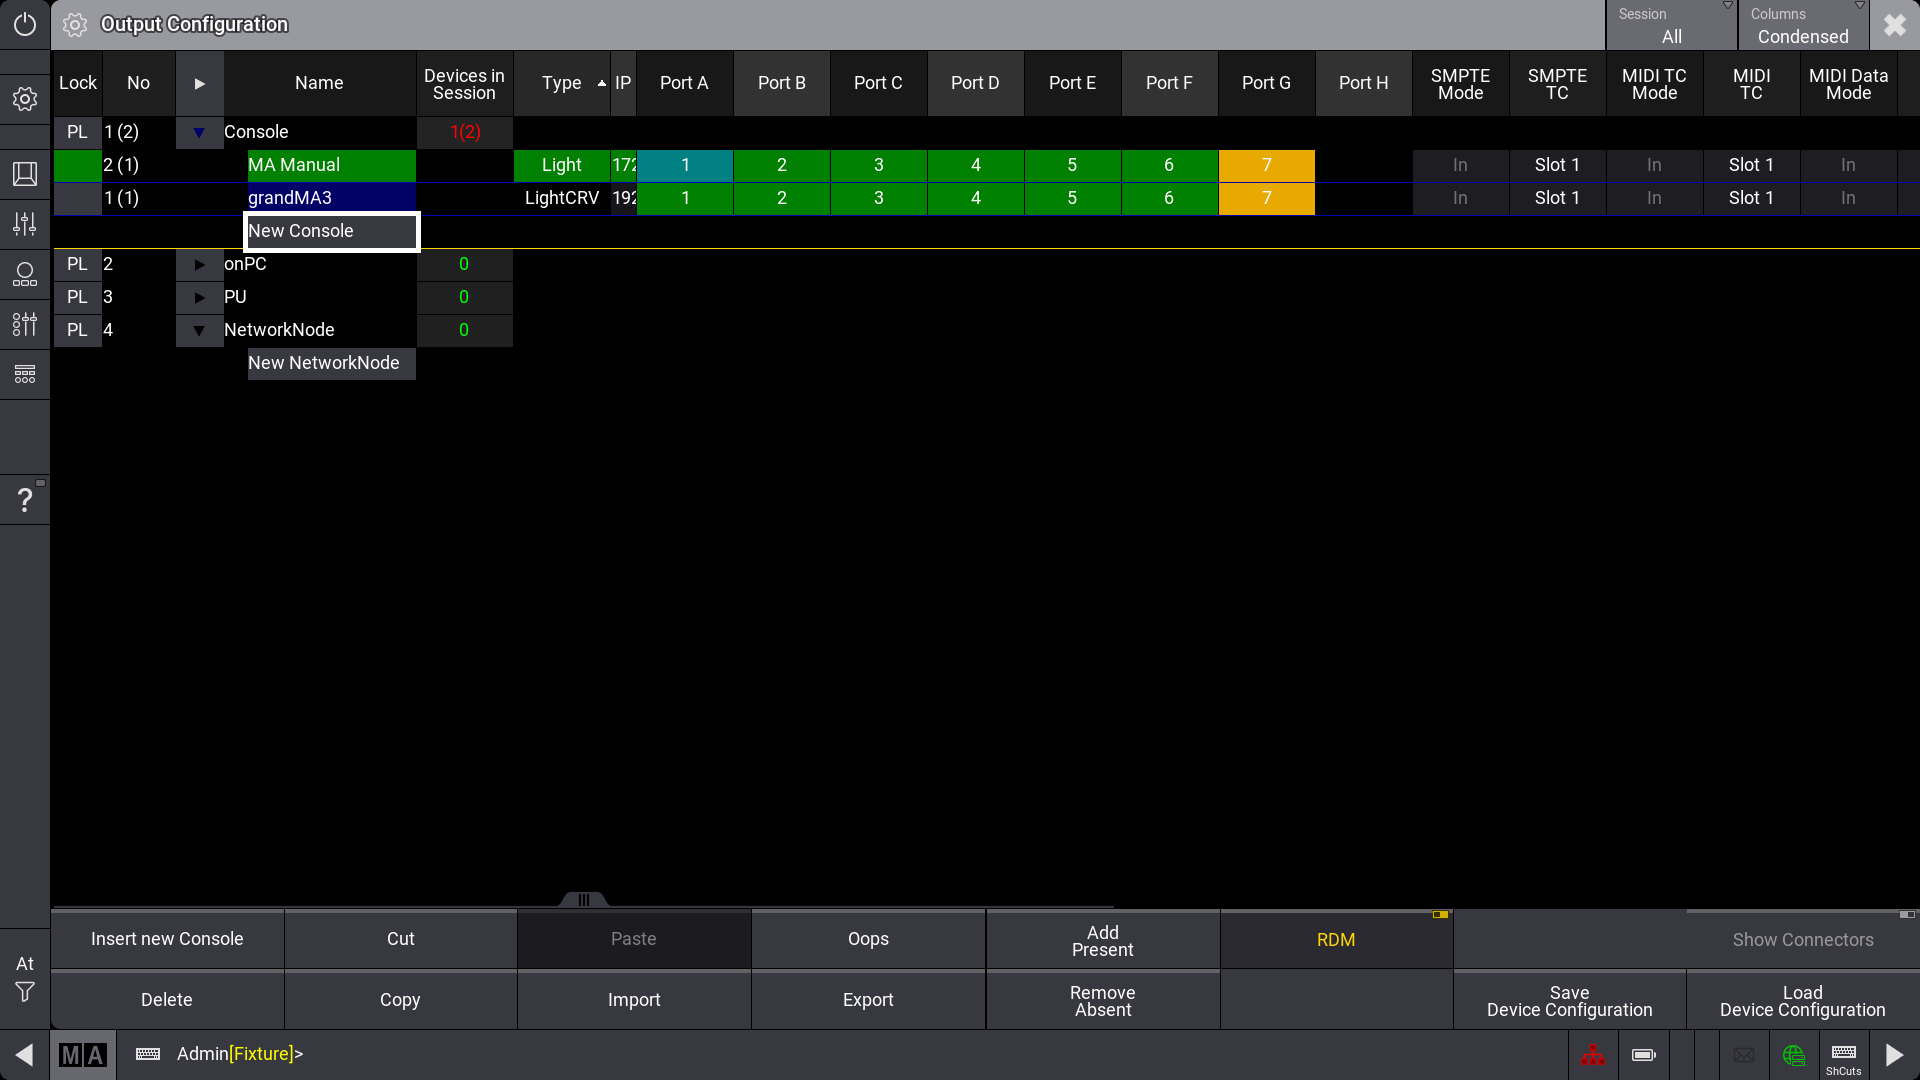
- Per XLR port that shall use RDM. Therefore, the mode of an XLR Port in the Connector Configuration needs to be set from Out to RDM. Tap and hold in the cell of the desired Port. An editor opens:
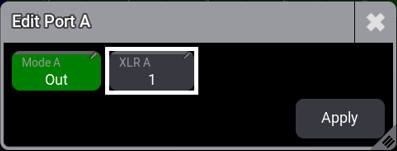
Tap Mode A and change it to RDM. Confirm the changes by tapping Apply. The background color of the port turns to turquoise:
In RDM mode, DMX data is only sent when there are changes of DMX values. In addition, every 500ms a refreshing packet will be sent so that DMX fixtures will not switch into DMX fail mode.
This RDM output mode allows more time on the DMX line for RDM configuration.
RDM Devices Window
Open the RDM devices window via the Add Window dialog in the Tools tab.
The RDM Devices window lists all devices that are discovered through RDM. The same list is also displayed in Menu - Live Patch - RDM.
When an RDM device is detected on an XLR port, a section called RDMPorts will be included in the list of RDM devices. Within each RDMPort, all fixtures that are detected via RDM on this physical XLR port are listed. An RDM port is labeled with the IP of the device and the XLR port of the device, e.g., 192.168.0.4 - XLR D. If the device is not detected anymore, the font color turns red.
The RDM devices window with RDMFixtureTypes and RDMPorts detected could look like this:
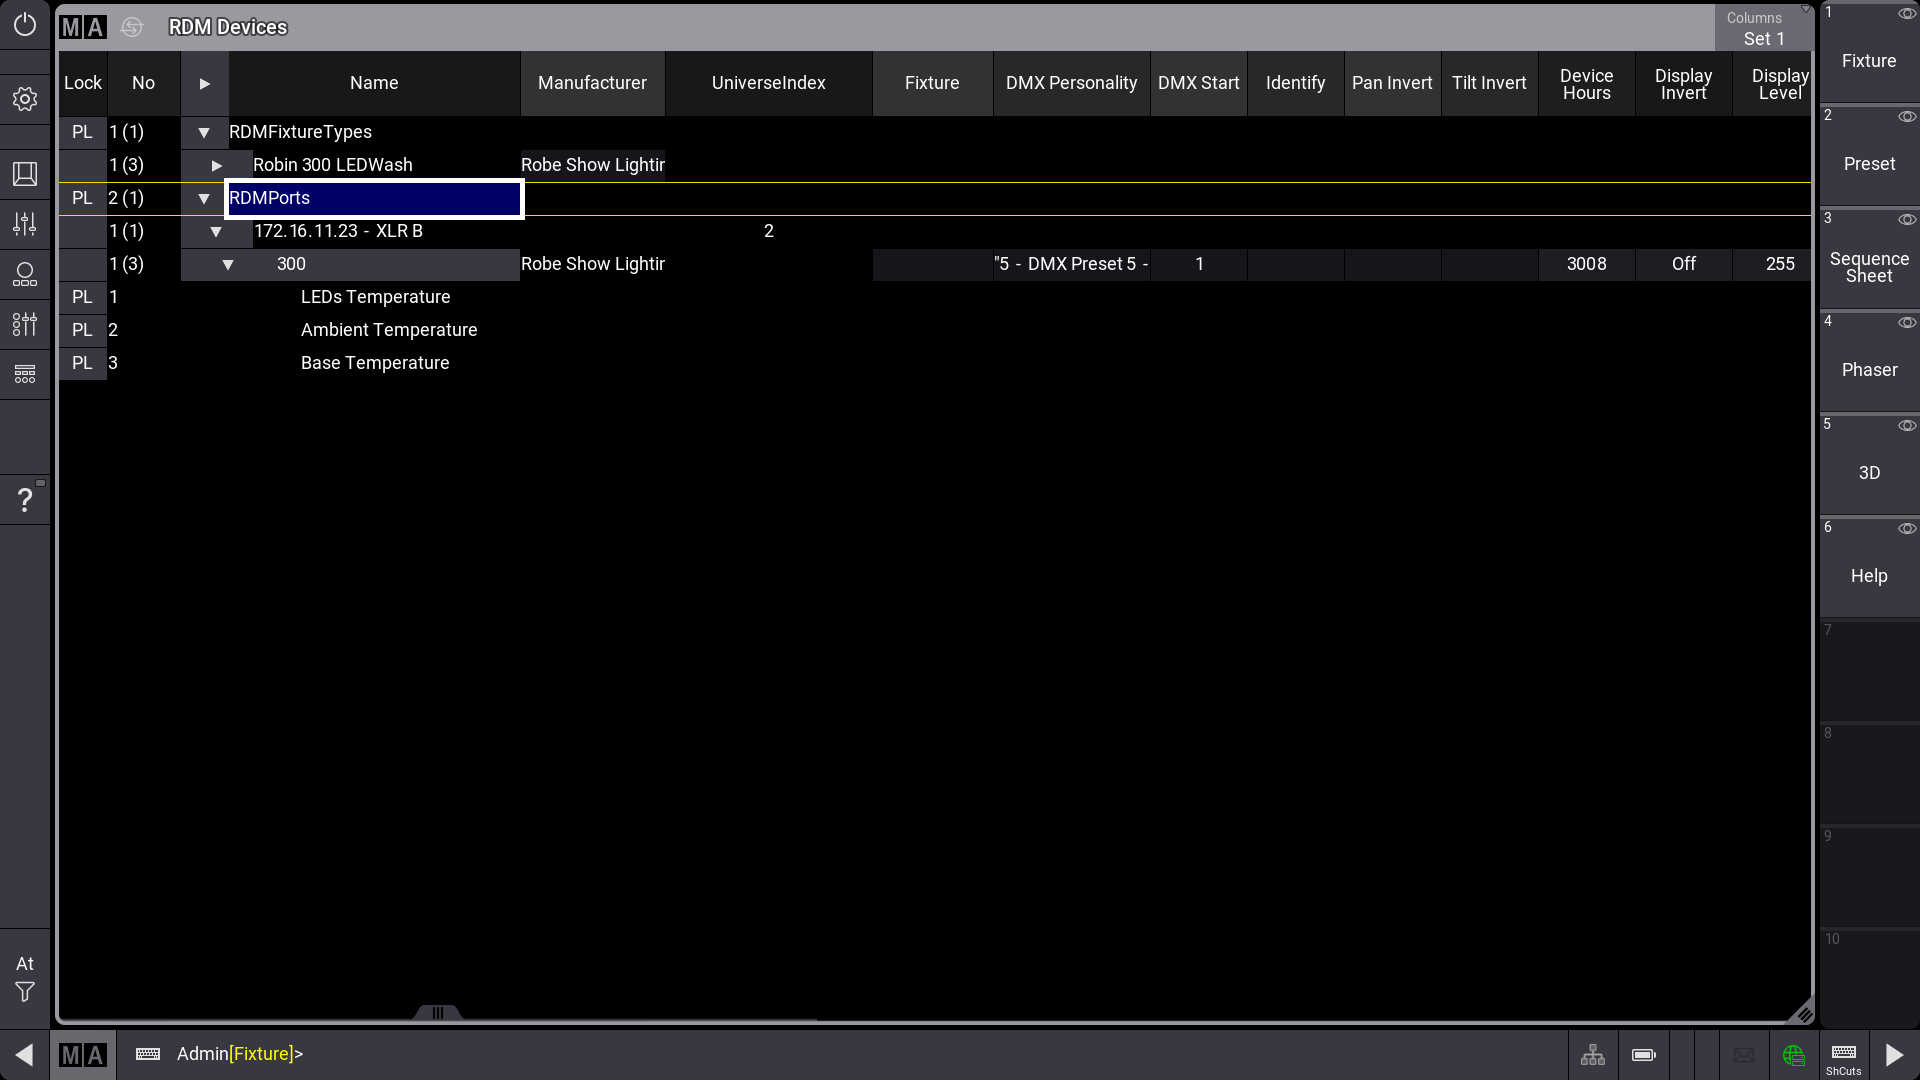
For every fixture type identified by RDM, a new child will be added to the RDMFixtureTypes in the RDM Devices window. Each RDMFixtureType contains general information of the RDM fixtures, that is similar to all fixtures of the same product, e.g., the parameter description, or the available DMX personalities.
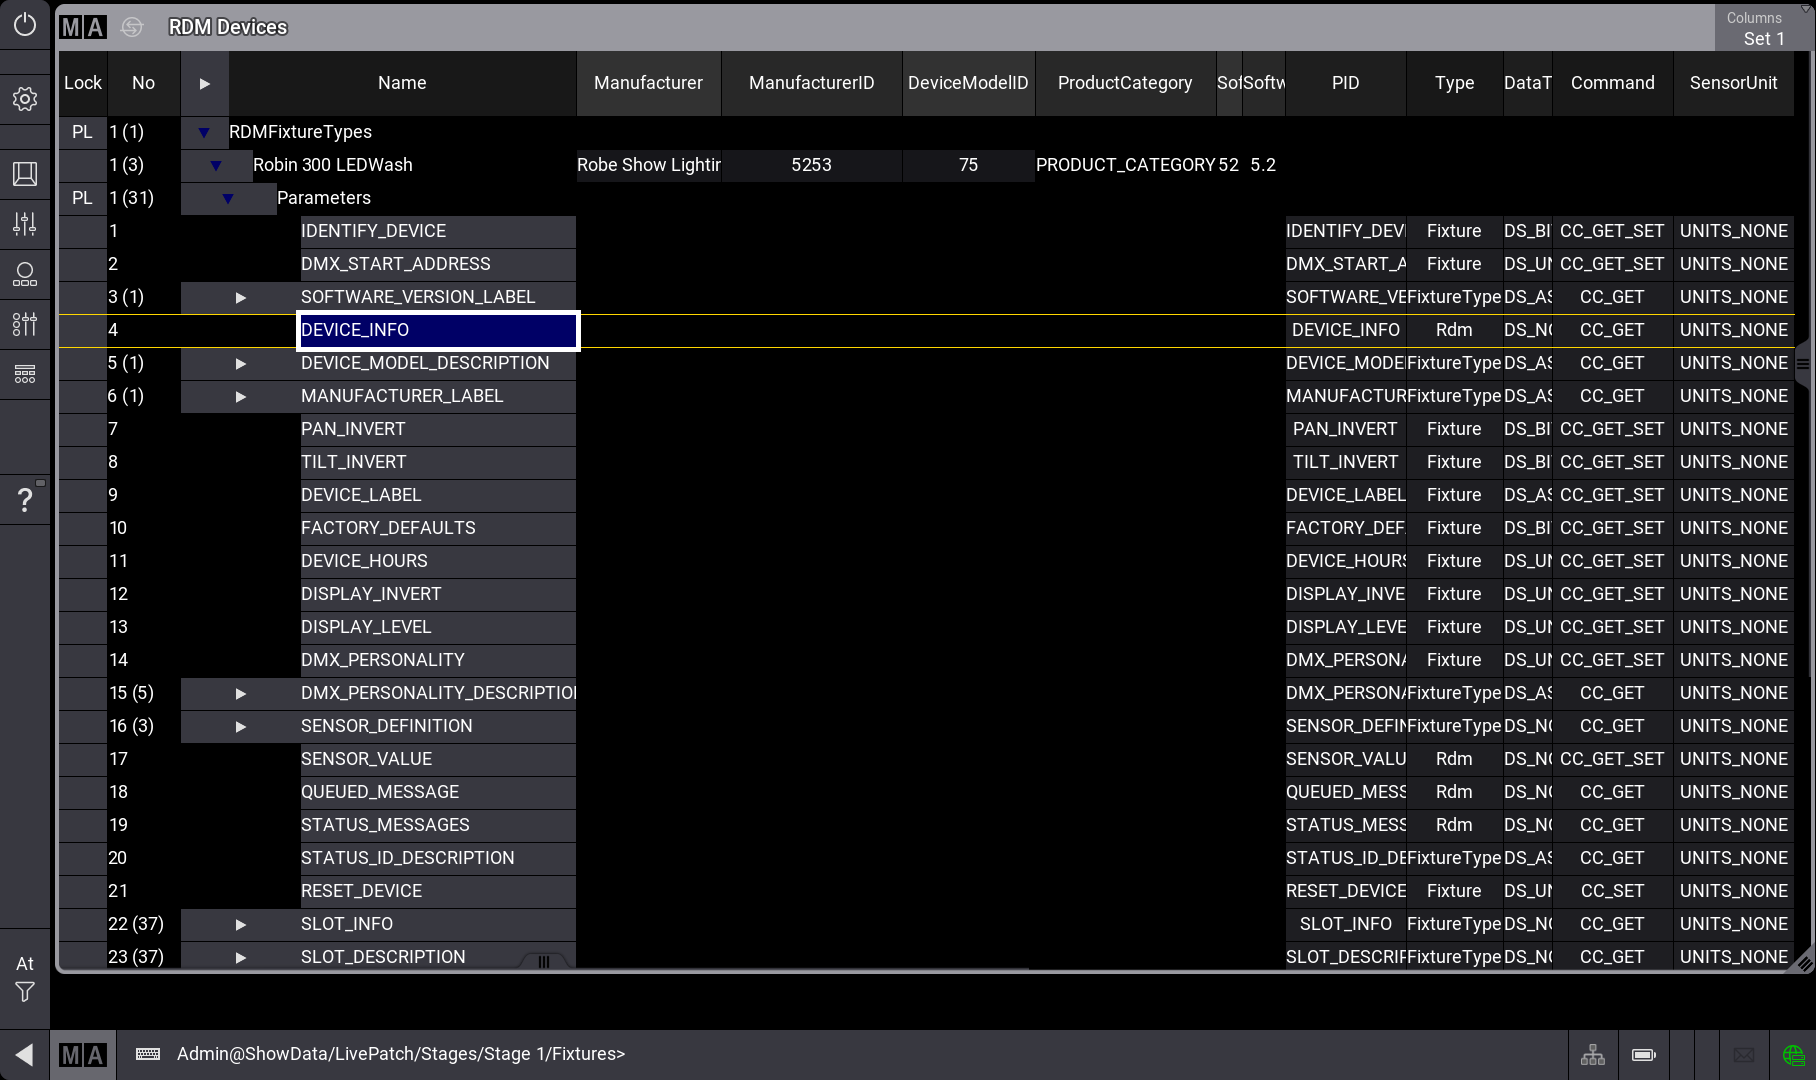
Expanding with  next to the RDM fixture shows all the different parameters of the fixture:
RDM Parameters
The grandMA3 creates RDMFixtureTypes by itself depending on these three parameters: ManufacturerID, DeviceModelID, and SoftwareID.
As soon as the same physical type of lighting fixtures have different software IDs due to different firmware versions, different RDMFixtureTypes are created.
Only the cells of properties that an RDM fixture provides as set-able can be edited in the RDM devices window. Not all RDM parameters can be set by the user.
There are three different kinds of commands for each Parameter:
- Set: Parameters that are adjustable on the console.
- Get: Parameters that are only receivable.
- Set and Get: Parameters that can be sent and also received by a device.
|
|
Hint: |
|
The RDM devices window also displays all Parameters individual commands under a specific column called Command.
|
The following RDM parameters are supported by grandMA3:
| Parameter | Parameter ID | GET | SET |
SET/ GET |
|---|---|---|---|---|
| PROXIED_DEVICES | 0x0010 | X | ||
| PROXIED_DEVICE_COUNT | 0x0011 | X | ||
| LANGUAGE_CAPABILITIES | 0x00A0 | X | ||
| SOFTWARE_VERSION_LABEL | 0x00C0 | X | ||
| BOOT_SOFTWARE_VERSION_ID | 0x00C1 | X | ||
| BOOT_SOFTWARE_VERSION_LABEL | 0x00C2 | X | ||
| SLOT_INFO | 0x0120 | X | ||
| SLOT_DESCRIPTION | 0x0121 | X | ||
| DEFAULT_SLOT_VALUE | 0x0122 | X | ||
| SENSOR_DEFINITION | 0x0200 | X | ||
| SENSOR_VALUE | 0x0201 | X | ||
| RECORD_SENSORS | 0x0202 | X | ||
| DEVICE_HOURS | 0x0400 | X | ||
| LAMP_HOURS | 0x0401 | X | ||
| LAMP_STATE | 0x0403 | X | ||
| LAMP_STRIKES | 0x0402 | X | ||
| LAMP_ON_MODE | 0x0404 | X | ||
| DEVICE_POWER_CYCLES | 0x0405 | X | ||
| DEVICE_MODEL_DESCRIPTION | 0x0080 | X | ||
| DEVICE_LABEL | 0x0082 | X | ||
| POWER_STATE | 0x1010 | X | ||
| IDENTIFY_DEVICE | 0x1000 | X | ||
| DMX_PERSONALITY | 0x00E0 | X | ||
| DMX_START_ADDRESS | 0x00F0 | X | ||
| PAN_INVERT | 0x0600 | X | ||
| TILT_INVERT | 0x0601 | X | ||
| PAN_TILT_SWAP | 0x0602 | X | ||
| DISPLAY_INVERT | 0x0500 | X | ||
| DISPLAY_LEVEL | 0x0501 | X | ||
| RESET_DEVICE | 0x1001 | X | ||
| FACTORY_DEFAULTS | 0x0090 | X |
Proxy Devices
A proxy device is a device that receives DMX from the console and sends it to several devices that are connected to the proxy device. For example, a Radio DMX Link containing of Transmitter and Receiver devices.
The column of Proxied Devices displays the number of RDM devices handled by the specific proxy module. This number also includes the proxy device itself.
|
|
Important: |
|
Connect RDM devices directly to a corresponding radio DMX receiver device. Fixtures with built-in radio DMX modules that use a wireless connection to a radio DMX transmitter are not detected by the controlling device. |
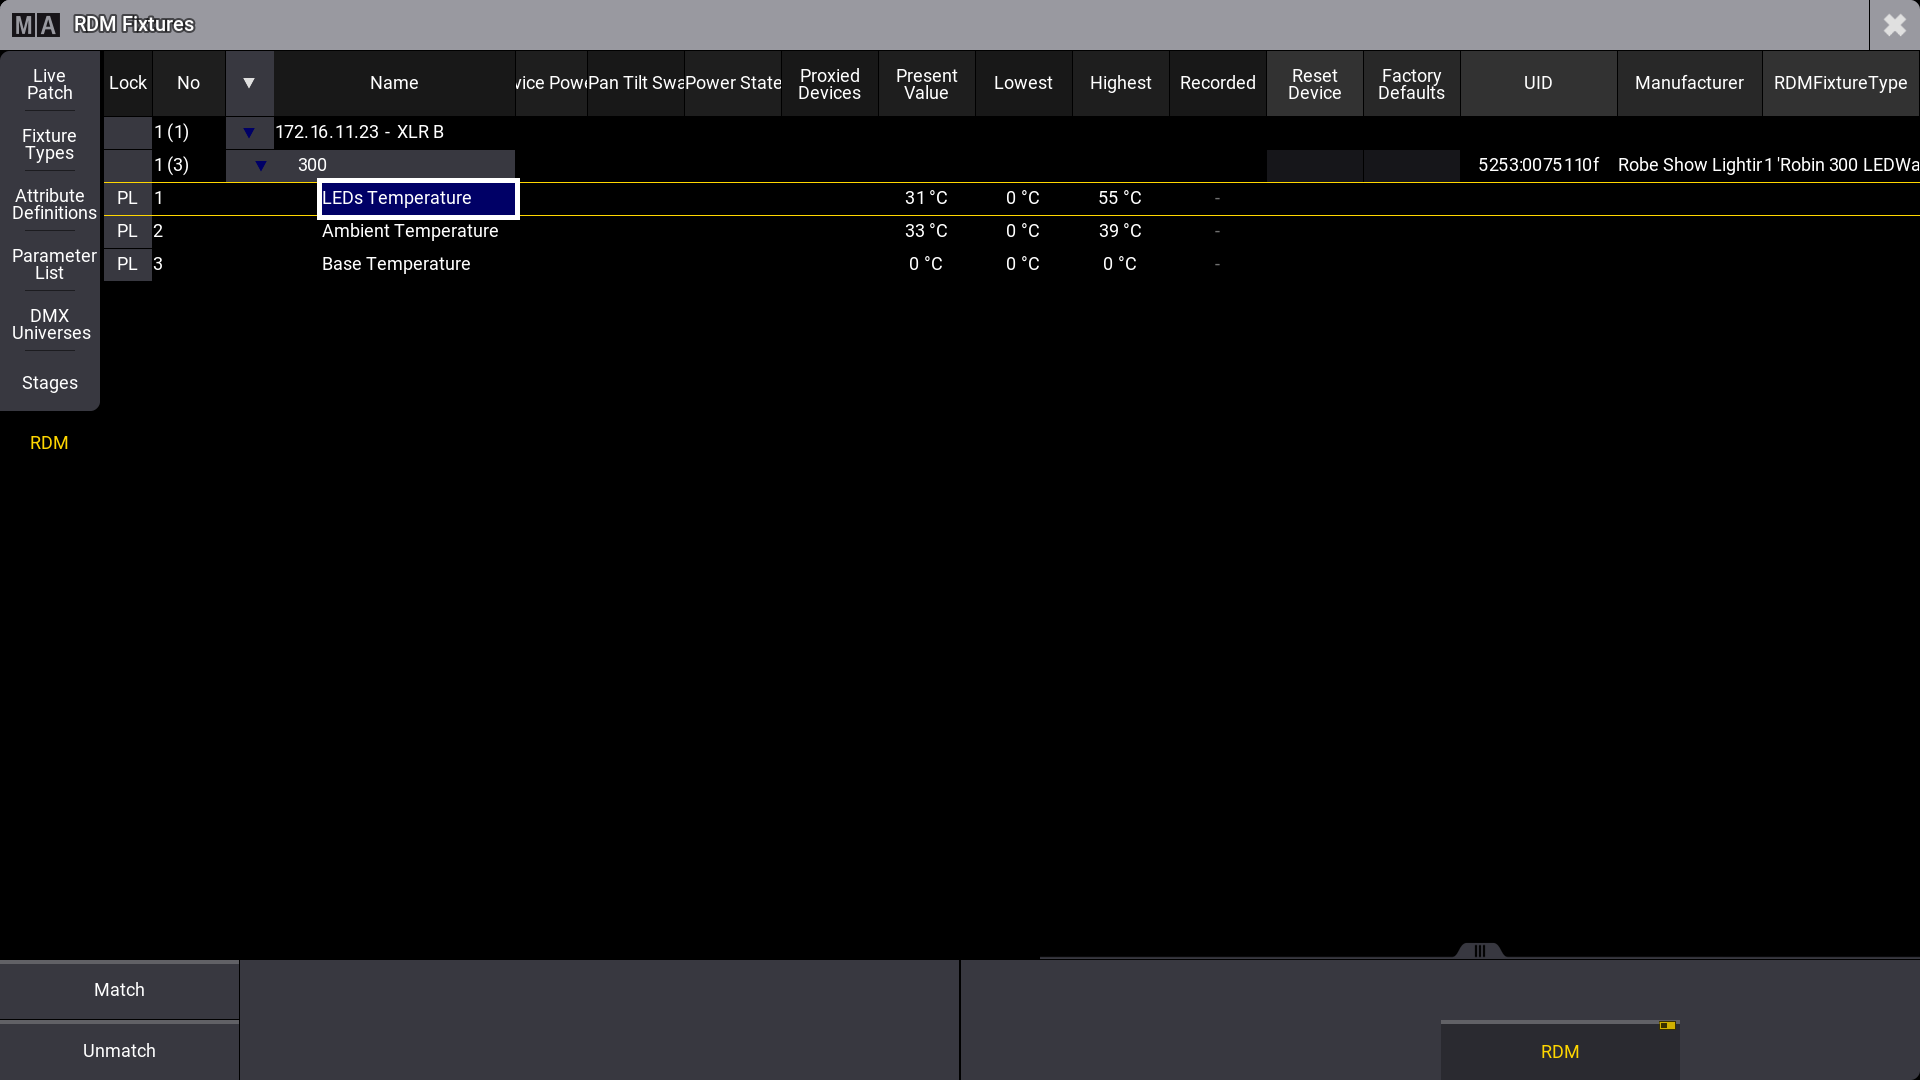
Sensors
Sensors and their values are also displayed in the RDM devices window. Tap next to the desired RDM fixture. Each sensor is shown in a separate row. Four different columns are displayed on the far right side for each sensor.
To see the actual values of the sensor, go to Menu - Live Patch - RDM. Tap next to the fixture to see the four sensor columns:
- Present Value: The current value of the sensor.
- Lowest: The lowest value the sensor can reach.
- Highest: The sensor's highest value.
- Recorded: The stored value of the fixture, when RECORD_SENSORS, 0x0202 was executed.
|
|
Hint: |
|
RECORD_SENSORS needs to be executed by a different RDM controller in order to display a value.
|
RDM Communication Process
In grandMA3 the RDM communication follows this process:
-
Discovery for new RDM fixtures.
- Check if detected fixtures are still available.
- Check for new RDM fixtures.
- Get parameter and sensor data.
- 1s Pause
- Start again at 1.
Parameters that are not changing during the runtime of a fixture, e.g., Device Info, are only pulled via RDM once when creating the corresponding RDMFixtureType. All other parameters and sensors are pulled every time in step 2.
As soon as an RDM fixture is not available for 3 discoveries in a row, it will be displayed in red in the list of RDM fixtures.
It is possible to match an RDM fixture with a fixture of the grandMA3 patch. To do so, edit the fixture cell of the desired RDM fixture in the RDM devices window. A pop-up opens and offers all fixtures of the current show file.
In addition, it is also possible to match fixtures within the RDM window in the live patch. In the live patch, it is possible to open the fixture list in the same way as described above, and by selecting any cell of a fixture then tapping Match at the bottom of the window.
To remove a match between an RDM fixture and a grandMA3 fixture, it is possible to tap Unmatch in the RDM window in the live patch or to tap Clear in the match pop-up.
|
|
Hint: |
|
It is recommended that RDM be turned off for universes that are not used, or for universes including fixtures without RDM functionality. To do so, follow step 1 and 2 vice versa.
|
Example
Identifying (IDENTIFY_DEVICE) a fixture with RDM: