Highlight forces the selected fixtures into a bright identifiable state. In conjunction, Lowlight dims the sub-selection so the selection stands out. Solo suppresses all non-selected fixtures to zero intensity. Highlight, Lowlight and Solo Masters can be used to alter the intensity of these states. Highlight, Lowlight and Solo do not write values into the programmer. They do not get stored into cues. They do not change fixture data. They are temporary visualization overrides. These tools are commonly used to identify fixtures in a crowded rig, confirm selection order, build or troubleshoot groups, or check fixture focus and alignment. As soon as they are toggled off, the fixtures return to their previous output.
Master 2.3 'Highlight'
The typical behavior for Highlight temporarily forces the selected fixtures to their Highlight values while the non-selected fixtures remain unchanged. Programmer values are not overwritten. If Lowlight is active, the remainder of the selection will be forced to their Lowlight values while the non-selected fixtures will not be affected.
Common default highlight values might include:
• Dimmer At 100.
• Color At Open/White.
• Shutter At Open.
• Gobo At Open.
These values are defined in the Highlight column of the FixtureTypes Editor.
The basic workflow for using Highlight could look like this:
User name[Fixture]>Fixture 1 Thru 10
then press Highlt.
This lets you visually confirm what you have selected.
To toggle off Highlight, press Highlt again or type:
User name[Fixture]>Highlight Off
To confirm group selection order, you can use this example.
1. To select the group "DS_Spots", type:
User name[Fixture]> Group "DS_Spots"
2. Press Highlt.
3. Press Next several times.
4. Confirm selection order.
You can now visually confirm selection order, fixture orientation, or stage layout correctness. If an unexpected fixture lights up, then the group or selection order can be reorganized.
Master 2.4 'Lowlight'
Lowlight is the inverse concept. Lowlight dims or modifies the sub-selection so your current selection stands out in conjunction with Highlight. Programmer values are not overwritten.
Lowlight values commonly include:
• Dimmer At 20 %.
• Color At dark blue.
Highlight and Lowlight Together
Lowlight only works in conjunction with Highlight. When both are active, selected fixtures go to their Highlight state while the sub-selection go to to their Lowlight state. This creates a clear visual isolation effect, which is useful for large rigs.
To put fixtures 101 - 120 to their bright Highlight state and the sub-selection to their Lowlight state, you can use this example:
User name[Fixture]>101 Thru 120
Press Highlt to toggle it on.
MA + Highlt toggles on Lowlight.
Editing Highlight / Lowlight Behavior
Both functions are controlled by values inside the fixture type.
1. Press Menu.
2. Tap Patch in the menu pop-up.
3. Select the desired fixture. 4. Tap Edit DMX Mode in the menu at the bottom.
5. Scroll over to Highlight or Lowlight columns.
6. Highlight / Lowlight values can be edited in the window.
7. Close the editor and the patch and save the changes.
These states can be edited for different use-cases.
You can also define these states through keywords:
Solo is a temporary output isolation tool. When activated, it forces all fixtures except the fixtures selected to zero intensity, allowing you to focus on a subset of the rig without modifying programmer data, cues, or playbacks. Think of it as a live “spotlight mode” for programming and troubleshooting. When Solo is On, selected fixtures output normally while un-selected fixtures are temporarily suppressed (dimmer forced to 0). Solo does not write values into the programmer. Solo does not change cue data. Solo does not alter playbacks. It is a temporary output filter. When Solo is turned Off, the full rig returns to its original state.
Solo sits very high in the output priority stack. It does not change priorities like HTP, LTP, Super, or Programmer. Instead it simply blocks output from other fixtures.
For fixtures 1- 12 to remain visible while forcing all unselected fixtures to zero intensity you can use this example.
1. To select fixtures 1 thru 12, type:
User name[Fixture]>Fixture 1 Thru 12
2. Then press Solo.
3. Confirm results.
To exit Solo press Solo again or type:
User name[Fixture]>Solo Off
Solo vs Highlight vs Lowlight
Highlight forces selected fixtures to Highlight state. Lowlight forces the sub-selection to their Lowlight state. Solo forces non-selected fixtures to zero intensity except selected fixtures.
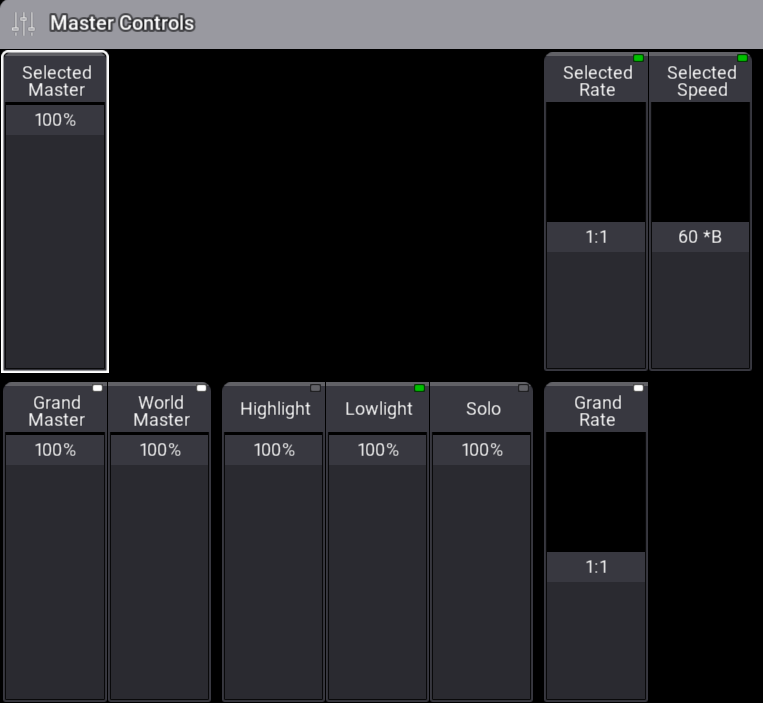
Highlight, Lowlight, Solo Masters
The Highlight Master controls the intensity level of the Highlight function in real time. Instead of Highlight forcing fixtures to a fixed intensity (like 100%), the fader lets you scale the brightness of highlighted fixtures while Highlight is active. This only affects fixtures that are currently in their Highlight state.
The Lowlight Master controls the intensity level applied to the sub-selection when the Lowlight function is active. The Lowlight Master then scales the intensity of those fixtures.
The Solo Master controls the intensity level of non-selected fixtures when Solo mode is active. The Solo fader determines how much of the rest of the rig remains visible when Solo is engaged. When Solo is on, the console normally isolates the selected fixtures. The Solo master then controls the brightness of all other fixtures. The Solo fader does not modify actual fixture intensity values. It does not change cue data, change programmer values or affect playback priorities.
The Highlight, Lowlight, and Solo Masters are typically found in the Master Controls section. These Masters are also assignable to executors.
Hint:
These Masters are different than the Selected Highlight, Lowlight, and Solo Masters found in the Selected Masters section.
Master Controls Overlay
Important:
Highlight, Lowlight, and Solo will not function as expected if a negative, scaling, or positive group master is affecting the output of the selected fixtures.
Important:
Solo only affects the dimmer values of the unselected fixtures. Non Dims that use an attribute other that dimmer will not be affected.