|
grandMA3 User Manual » Single User and Multi User Systems » Users and Profiles Configuration
|
Version 2.5 |
Many settings are associated with users and user profiles. User settings define login information, rights, and other properties of an individual user.
User profile settings define the programming preferences and interface behavior shared through the assigned user profile.
There are two places in the GUI where user settings can be viewed and edited.
User Settings
The first place is the Users pool. Editing a pool object opens an editor where the settings can be changed. For more information about the Users pool, see Create User.
The second place is the User Configuration menu. Navigate to it using these steps:
- Press the Menu key.
- Tap the Settings button.
- Tap the User Configuration button.
The User Configuration menu can also be opened using this command Menu "UserConfiguration".  Paste to Command Line
This opens the list of users in the show. Edit any field to change the setting.
The following user settings are available:
-
Name:
This is the name of the user. This is the login name used with the LogIn Keyword. -
Scribble:
A user can have a scribble assigned. The scribble is only used in the User pool. -
Appearance:
A user can have an appearance. The appearance is used in the user pool and when the station is locked. - Note:
A note can be added to the user. - Tags:
Tags can be assigned to the user. -
Password:
This is an optional password that can be assigned to the user. It needs to be provided when the user is logging in. -
Profile:
Each user has a User Profile assigned. Read more below. -
Screen Config:
Different screen configurations can be created. This input field defines the selected screen configuration. The selected screen configuration is called when the user logs in. For more information, see Screen Configuration. -
Rights:
Defines the user’s access level. For more information, see User Rights below. -
Keyboard:
The on-screen keyboard can have different layouts. This setting can be used to select one of the available layouts. -
Privacy Policy (Only in the User Configuration menu):
This setting can be toggled between Yes and No. Yes means that this user has agreed to the Privacy Policy. The policy can be found in Menu - Settings - Software Update - Privacy Policy. - Web Remote Login (Only in the User Configuration menu):
This is information only. It indicates if the user can log in using the web remote.
User Rights
There are six user-right levels. Each level determines which operations and areas of the software are available to the user.
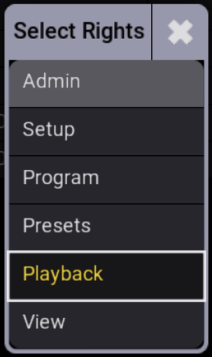
The user-right levels are:
- Admin:
This level allows the user to change all console, system, and show settings. - Setup:
This level provides access to setup-related settings but restricts access to some console functions.
- Program:
This level allows most programming operations but restricts major patch changes. The user can access the Live Patch but not the full Patch. -
Presets:
This level allows users to update existing presets and change the preset update mode of their user profile. This also allows the user to use Store /Merge.
However, the user cannot edit cue content, store new presets, store new objects, or edit recipes.Setup functions are not available in the Layout Viewer or 3D Viewer. - Playback:
This level allows the user to run a programmed show, but does not allow the user to store changes. - View:
This level does not allow the user to work in the programmer. The user can call views and log in as a different user.
This should clearly indicate that the list shows a hierarchy of rights levels, where Admin gives access to everything and moving down the list introduces more and more limitations.
User Profile Settings
User profiles contain most of the settings related to programming and operating the software. These include programmer information, views, selected elements, values, preferences, and other user-specific data.
Many elements are stored automatically as the software is used. Other profile settings can be edited in the Profiles tab of the User Configuration menu.
To open the Profiles tab:
- Press the Menu key.
- Tap the Settings button.
- Tap the User Configuration button.
- Tap the Profiles button on the left menu.
The user profile settings can also be opened using this command Menu "UserConfiguration" /Tab "Profiles". Paste to Command Line
Some of these settings can also be changed in relevant places in the software. For instance, the value readout setting can be changed in the Encoder Bar.
-
Name:
This is the name of the user profile. -
Note:
This is a note for the user profile. - Tags:
Tags can be added to the user profile. -
DMX Readout:
This is used to change the readout of DMX values. This is useful when editing Fixture Types. -
Normal Value:
This is the intensity value used when the Normal Keyword is used - typically by pressing the At key twice. It is a DMX value, so the DMX readout setting affects how to input a value in this field. -
Wheel Resolution:
This can be used to change the resolution of the wheels on the consoles. The options are: Coarse, Normal, and Fine. -
Wheel Mode:
This setting changes how the wheels work. Read more below. -
Knob UI Style:
This defines how on-screen rotating knobs can be adjusted. There are three modes:- None: This disables using gestures to adjust the values of knobs.
- Rotate: Change the value by rotating around the encoder or knob.
- Drag: This can open a special pop-up that can be used to edit the value. For more information, see Gestures.
- None: This disables using gestures to adjust the values of knobs.
-
Encoder UI Style:
This defines how on-screen encoders can be adjusted. There are three modes:- None: This disables using gestures to adjust the values of encoders.
- Rotate: Change the value by rotating around the encoder or knob.
- Drag: This can open a special pop-up that can be used to edit the value. For more information, see Gestures.
-
Precise Edit:
This function is used when editing values in sheets. It can be difficult to hit a field precisely in a sheet with fingers. Turning this Off makes it easier to select a field without accidentally creating a new selection. For more information, see Gestures. -
Screen Encoder:
When this option is enabled, the rightmost dual encoder becomes a screen encoder. Turning the inner encoder moves the focus in a vertical direction while the outer encoder scrolls in a horizontal direction. To create a lasso selection in a grid, like in the patch menu, press and hold the inner encoder while turning it. Press and release the inner encoder or the dual encoder key to edit the currently focused object.
The screen encoder label also indicates the display on which the encoder is currently active. This option is enabled by default. -
Time Key Target:
The Time key can have two different targets: Cue or Fixture. This defines if the key defaults to keywords relating to cue timing or fixture layers. - Encoder Bar Type:
This setting can be useful in grandMA3 onPC or the grandMA3 compact consoles. It changes the look of the Encoder Toolbar at the bottom of screen 1. See also the User1 and User2 keywords.- Default: The standard Encoder Bar is displayed.
- Exec: The Executor Bar is displayed with labels for the executors.
- Xkeys: The labels for the Xkeys are displayed.
-
TCSlot:
This displays the currently selected timecode slot. For more information, see Timecode Slots. -
Value Readout:
This is the default value readout. Many sheets can be set to show a readout, which can be a specific readout type or follow this default type. This setting can be changed in the Encoder Bar. -
Speed Readout:
This is the default speed readout. The options are Hertz, BPM, and Seconds. Speed is used in Phasers. -
Preset Readout:
This changes the way presets are displayed in Fixture and Sequence Sheets. The preset can be displayed with a combination of three elements:- ID: The ID number of the preset.
- Name: The name of the preset.
- Value: The values in the preset.
-
Help Popup Zoom Factor:
This is the default zoom factor in the help pop-up. -
Overlay Fade:
This time sets a fade time used by pop-ups and menus in the user interface. The default time is 250 ms. -
Time Readout:
This is the default time readout for the user profile. Read more about the readout below. -
Frame Readout:
This is the default frame readout for the user profile. Read more about the readout below. -
Color Readout:
This is the default color readout. This default is used in the Encoder Toolbar and most sheets - unless a different readout is selected for the sheet. -
Oops Views:
This setting toggles if view operations are oopsable. Create Oops needs to be enabled for this function to work. -
Oops Programmer:
This setting toggles if programmer operations are oopsable. Create Oops needs to be enabled for this function to work. -
Oops Selection:
This setting toggles if selection operations are oopsable. Create Oops needs to be enabled for this function to work. -
Create Oops:
This setting toggles if the Oops function in general is turned On or Off. "Yes" means that the Oops function is On. -
Oops Confirmation:
- Always: All oops actions need confirmation.
-
Main: This will require a confirmation for the following actions:
- Create
- Delete
- Exchange
- File actions while loading from a file.
- Insert
- Layout
- Move
- Remove
- Never: Actions are oopsed without confirmation.
-
Mirror Special Executor Pages:
This setting is for the custom section of the grandMA3 extension. If the setting is "Yes" then the extension has the same assignment as the custom section of the station the extension is connected to. If the setting is "No", then each extension can have its own assignments in the custom section. grandMA3 extensions with the same WingID are always mirrored - they are essentially defined as the same. Learn more about connecting grandMA3 extensions in Connect grandMA3 extension. -
Show Appearance In Cue Input:
This setting is used to define if the cue appearances are shown in pop-ups where cues can be selected. For instance, the pop-ups that appear using the Goto and Load commands without a specified target. -
Show Settings In Editors:
Toggling this shows or hides the settings in some editors. This setting is also in the title bar of the editors, where this can be toggled. -
Single Digit Input:
If this is set to "Yes", then all input integer dimmer values below 10 are multiplied by 10. The following rules apply:- Whole numbers from 1 to 9 are applied as values 10, 20, 30, 40, 50, 60, 70, 80, or 90.
- Digits with decimal places, for example, 1.5, are deemed as 1.5.
- When specifying any attribute in a command (Attribute "Dimmer" ...), single digit input is not applied.
-
When using the At command without any additional attributes being specified, the value is taken by the natural readout of the dimmer of the user profile.
-
Resolve Executor Assignments:
This setting is used in the Command Editor. When it is "Yes" and a command is edited by pressing executor buttons, then the handle of the object is used instead of the reference to the executor. - Preview Variables:
This setting changes how variables are previewed in the Command Editor. When this is "Yes", the command preview displays the specified variable's content. This only works if the variable already exists at that time. - Create Command Handle:
When this is set to "Yes", then Create Handle is active by default in the Edit Command pop-up. For more information, see Command Editor. -
Show Connectors:
This setting shows or hides the Connector image pop-up. For more information about the Connector image, see Output Configuration. -
DMX Tester Address Mode:
The following settings relate to the DMX Tester.- Uni: This splits the DMX address into universes and universe addresses.
- Abs: This shows the DMX address as an absolute DMX address.
-
DMX Tester Retain Mode:
Toggles the retained mode in the DMX tester. -
DMX Tester Mode:
- All: All DMX addresses are available for testing.
- Patched: Only patched addresses can be tested.
- Unpatched: Only unpatched addresses can be tested.
-
DMX Tester Test Value:
This is the test value used by the DMX tester. -
Move Grid Cursor:
This is the same setting as the one available in the Selection Grid window. For more information, see Selection Grid. - KnockIn MIB:
Learn details about this feature in Move In Black.- Off: The feature is not active and will not knock in any attribute values.
- Post: When pre-positioned fixtures (MIB state) are selected and the dimmer attribute is activated above 0, all the pre-positioned values of the selected fixtures are activated in the programmer.
User Attribute Preferences
To edit the attribute preferences of a user profile, select the profile and tap Edit Encoder Bar.
Resolution multipliers define the factor by which an encoder changes a value when the encoder is pressed or, in the case of the dual encoders, the difference between the inner and outer ring.
The following general settings are available at the top of the pop-up:
-
Time Layer Resolution:
Sets the encoder resolution for the time-related layers, including Fade and Delay. -
Phase Layer Resolution:
Sets the encoder resolution for the phaser-related layers, including Speed, SpeedMaster, Phase, Measure, NShot, Acceleration, Deceleration, Transition, and Width. -
Dual Encoder Factor:
This defines the multiplier the outer encoder ring uses in relation to the inner encoder ring. -
Dual Encoder Press Factor:
This defines the multiplier for the outer encoder ring when the dual encoder key is pressed while turning the outer encoder ring. -
Link Resolution:
This setting defines how the encoder resolution is linked between features. The options are Single and Feature Group. For more information, see Encoder Toolbar.
The rest of the pop-up lists all the attributes in rows.
The following settings can be changed for each attribute:
-
Natural Readout:
The Natural readout allows defining the desired readout type per attribute. For instance, dimmer values are best displayed in percentage readout. In contrast, pan or tilt values are better readable using the physical readout, which displays the pan and tilt values as degrees. This setting selects the desired readout when Natural is selected in sheets and encoders.
The user-defined readout has a higher priority than the readout defined for the attribute. The user-defined readout can be linked to the default (from the attribute definition). This option is called Default, and the actual readout is shown in angle brackets. -
Encoder Resolution:
The encoder resolution defines how big an attribute value change will be when turning a dual encoder by 1 click. This setting can also be changed by pressing MA and tapping the channel function area in the encoder toolbar. For more information, see Encoder Resolution. -
Encoder Press Factor:
This multiplier is used when the inner encoder is pressed and turned for this attribute. - Ignore Channel Functions:
When this is set to "Yes", the Channel Sets area displays the channel sets of all channel functions at the same time.
Learn more about the different resolutions available in Encoder Resolution.
Wheel Mode
The Wheel Mode setting defines how the level wheel changes multiple dimmer values. There are four wheel modes:
Additive:
Additive keeps the difference between dimmer values until they reach 0 % or 100 %, using the level wheel. After either limit is reached, the difference between the values is no longer maintained.
Example:
Fixture 1 has a value of 50, and fixture 2 has a value of 60. When the level wheel is used to take them both up to 100 and then back down, they both go down from 100 at the same time and at the same level.
Incremental:
Incremental always maintains the difference between the dimmer values, even after one or more values reach 0 % or 100 %.
Example:
Fixture 1 has a value of 50, and fixture 2 is at 60. When the level wheel is used to take them both up to 100 and then back down, fixture 1 will start coming down first, and then fixture 2 will follow when fixture 1 is at 90.
Prop.+ (Proportional positive):
When using the level wheel to turn up the dimmer values, the difference in the dimmer values will decrease. Turning up to 100 % will make all dimmer values reach 100 % at the same time.
Prop.- (Proportional negative):
When using the level wheel to turn up the dimmer values, the difference in the dimmer values will increase. Turning down the values will make all dimmer values reach 0 % at the same time.
Time and Frame Readout
The Time Readout and Frame Readout settings define how time values are displayed by default for the user profile. These defaults are used throughout the software unless they are overridden in an individual window. Window-specific settings take priority over the user-profile defaults.

|
Hint: |
|
The readout can be changed for individual sheets in the Common Window Settings.
|
Timecode is an example of an area with many layers in the hierarchy. For more information, see Timecode Show.
|
|
Hint: |
| The time readout defined in the user profile is always used in the Encoder Bar, even if a different readout is selected for an individual window, such as a Fixture Sheet. |
The timing calculator value indicator is aligned with the preselected frame readout.
For improved readability, trailing zeros are suppressed when Seconds is selected. When a frame unit is selected, trailing zeros are displayed.
To easily distinguish between fractions of a second and frames, fractions of a second are separated from seconds using a dot (.), while frames are separated from seconds using a colon (:).
The time options are:
-
10d11h23m45:
The time is separated into days, hours, minutes, and seconds using letters as separators. -
251h23m45:
This is separated into hours, minutes, and seconds using letters as separators. The hour number can become more than 24 if time is more than a day. -
10.11:23:45:
The time is separated into days, hours, minutes, and seconds using a dot and colons as separators. -
251:23:45:
This is separated into hours, minutes, and seconds using colons as separators. The hour number can become more than 24 if time is more than a day.
The frame options are:
- Seconds
- 24 fps
- 25 fps
- 30 fps
- 60 fps
fps: