Using Clone to Transfer Values
|
grandMA3 User Manual » Operate Fixtures » Clone » Using Clone to Transfer Values
|
Version 2.0
|
For more general information about Clone, read the Clone topic first.
Clone Window
To open the Clone window:
- Press MA + X1 | Clone and then press Please.
- Type clone into the command line and press Please.
- Type clo into the command line and press Please.
The Clone window opens.
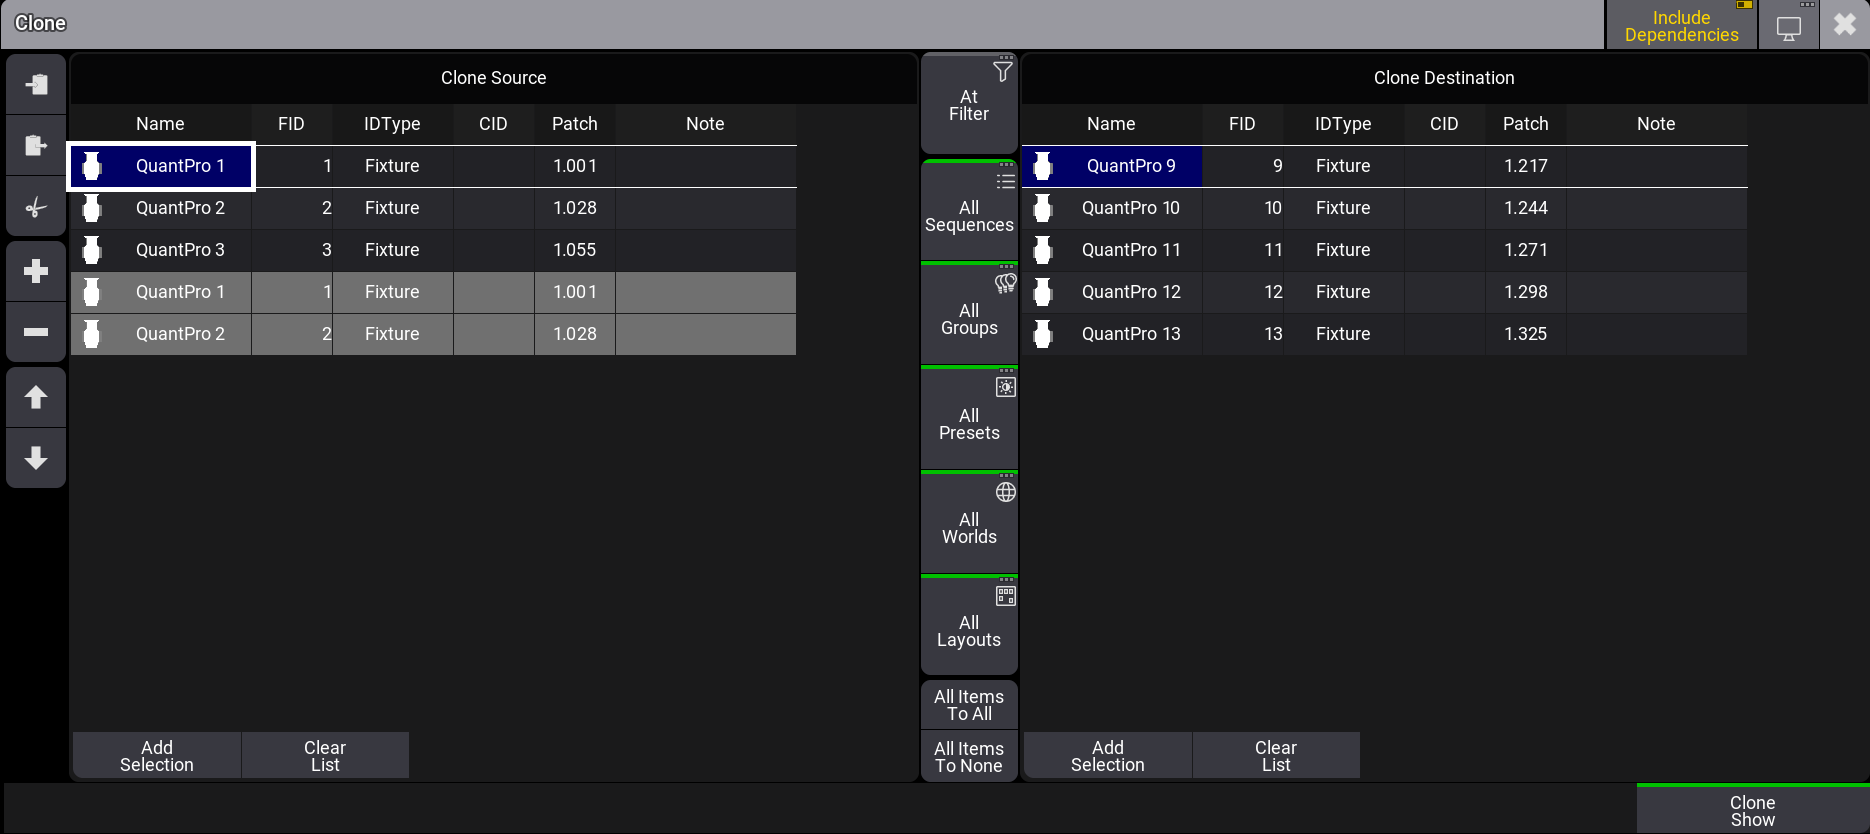
The Clone window is separated into the following areas:
- Left: Clone Source.
- Right: Clone Destination.
- Middle: Object button bar. For more information, see Cloning Show Data.
| Important: | |
|
Each area can be focused separately by tapping the screen in the corresponding area. A white frame indicates the currently focused area.
|
Adding Fixtures
To set fixtures into the Clone Source:
- Select fixtures in the programmer. For more information on selecting fixtures, see Select Fixtures.
- Tap Add Selection in Clone Source. Fixtures are set.
or
- Tap the source area. The area is focused.
-
Tap the
 in the tool area on the left. A pop-up opens.
- Select fixtures or groups in the pop-up.
- Tap Add. Fixtures are set.
|
|
Hint: |
| On console, use the 2 Finger Edit gesture to add fixtures. |
To clear the complete clone list:
- Tap Clear List.
To replace fixtures in the Clone Source:
- Tap, hold, and drag a finger over the fixtures you want to replace. The selected fixtures will be highlighted in blue.
- 2 finger edit the highlighted area. A pop-up opens.
- Select the replacing fixtures in the pop-up. The selected fixtures will be highlighted in blue.
- Tap Replace. The selected fixtures are replaced.
| Hint: | |
| The steps above work similarly for setting fixtures into the Clone Destination. |
To organize the fixtures in the selection, use the following tools located on the left side of the Clone window:
 : Copies the selected fixtures from the focused side.
 : Pastes the selected fixtures to the focused side.
 : Cuts the selected fixtures from the focused side.
- : Opens the Add Fixtures pop-up.
 : Deletes the selected fixtures from the focused side.
 : Moves the selected fixtures up from the focused side.
 : Moves the selected fixtures down from the focused side.
Example
In the image below, Fixture 1 is set as the clone source for Fixture 9 and Fixture 2 is set as the clone source for Fixture 10.
If one area has fewer fixtures than the other, the side with fewer fixtures is automatically adjusted. The adjusted fixtures are displayed with a grey background.
Cloning Programmer Values in the Clone Window
There are two methods for copying fixture values from fixture to fixture for programmer values only:
- You can use the At keyword in the command line input, for more information see At Keyword.
- Or use the Clone keyword in the command line input. Single attributes of a fixture source can be cloned as well. For more information, see Clone Keyword.
When executing the clone command using the clone keyword, the Clone window opens. For example, when entering Clone Fixture 1 At Fixture 2 in the command line.
- To execute the clone command directly, use the If keyword. For example, by entering Clone Fixture 1 At Fixture 2 If Programmer into the command line input. the Clone window will not open and the priority pop-up opens. For more information, see If Keyword.
- To execute the clone command without opening the clone window or the priority pop-up, use the /NoDependencies keyword. The command will be executed in low priority. For more information, see /NoDependencies.
Example
Requirements:
- The grandMA3 demo show file is loaded and the clone window is open.
To clone fixtures in the programmer using the Clone window:
- Add Fixtures to the Clone Source and Clone Destination areas as described above.
- Tap All Items To None, located in the object bar between both Clone areas. The button in the lower right corner switches to Clone Programmer and the object indicator bar turns grey.
- Tap Clone Programmer. The fixture values are cloned.
| Hint: | |
| Cloning only programmer values is indicated by gray-colored indicator bars above the object buttons and the Clone button. For more information on the colors, see Cloning Show Data. |
| Hint: | |
| When cloning only programmer values, Include Dependencies has no effect and therefore the button is grayed out. For more information, see Include Dependencies. |
Cloning Show Data
Tap the video below to see how to clone show data using the user interace.
Object buttons are displayed in form of a bar in the middle of the window. The object buttons use filters to restrict the current cloning process for the following objects:
- Sequences
- Groups
- Presets
- Worlds
- Layouts
- Additionally, the At Filter can be used. For more information about the At Filter, see At Filter.
Depending on the selected items of an object, the color of the indicator bar of the object buttons changes.
- Green: All object items will be cloned.
- Yellow: Only selected object items will be cloned. The Clone Show button changes to Clone Selected Objects.
- Gray: No object items will be cloned.
|
|
Hint: |
| If an object does not contain any items, the object's indicator bar will be colored in gray. |
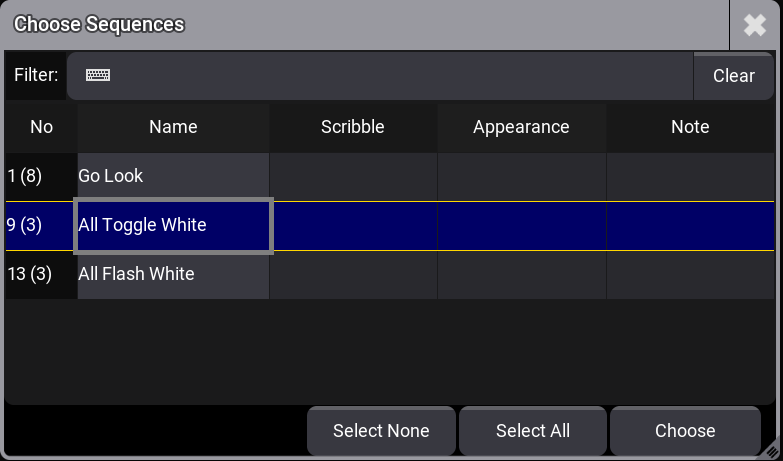
- Tap an object button., for example, All Sequences. A pop-up opens.
- Select a Sequence and then tap Choose. The pop-up closes.
The cloning process has been restricted to the selected object.
- To disable all items for a specific object, tap Select None in the pop-up.
- To enable all items for a specific object, tap Select All.
- To select all items for all objects, tap All Items To All in the Object bar. Tap Clone Show to execute the clone command.