The fixture sheet shows all the patched objects in the show file with an FID or a CID. This is usually every object that needs to be controlled in the show. Read the Patch and Fixture Setup topic to learn how to add objects to the patch.
The fixture sheet is a window that can be created like any other window. For more information, see Add Window.
Filters, worlds, and the selection can be assigned to the fixture sheet. This will, for example, reduce the amount of displayed fixtures in the sheet. Information about the filter is displayed in the title bar. For more information, see Use a World or Filter.
|
|
Hint: |
| Press Assign Fixture Fixture and then tap the title bar of the Fixture Sheet to display only the selected fixtures. |
The sheet has four modes: Fixture, Channel, Dimmer+, and Sheet/Filter. These modes can be set in the Window Settings.

|
|
Hint: |
|
The sheet uses system colors. For more information, read the System Colors topic.
|
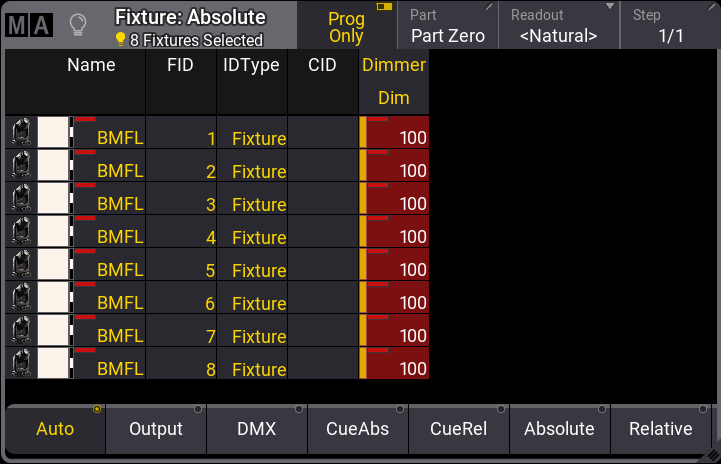
The Channel mode shows all objects with an ID and an intensity attribute. It shows only the ID and its intensity values. The Fixture mode shows the same objects, but it shows the values of every available attribute. The Dimmer+ mode is similar to the Channel mode but additionally displays the attributes of the selected feature group. The Sheet/Filter mode is similar to Dimmer+ but additionally displays all attributes unless there is a defined filter in the Mask tab of the sheet settings.
The active world filters the sheet. If this world is different than world one, then the world name and number are displayed in the title bar.
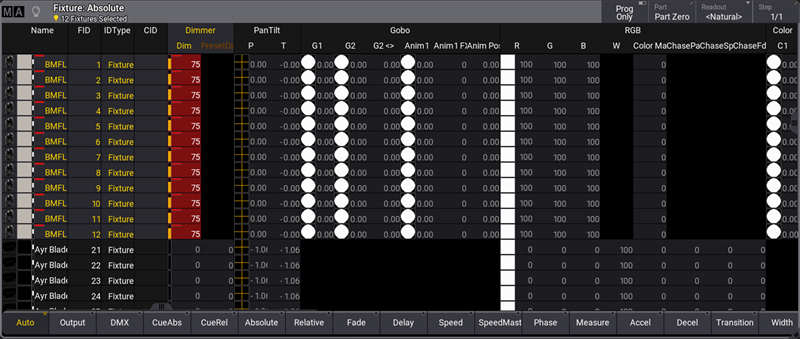
The fixture sheet is divided into rows and columns. In the Fixture mode, each row represents a fixture or a sub-fixture.
The first column is the fixture name. To see the sub-fixtures for the current fixture, tap on the arrow on the left side of the fixture name column.
The second column is the FID (Fixture ID). Every fixture patched in the showfile must have a unique FID, CID, or both. If a fixture contains sub-fixtures, these IDs will be the fixture number, a dot, and a sub-number.
The next column shows the IDtype of the fixture. Learn more about the ID types in the What are Fixtures topic.
The next column is the CID (Channel ID / Custom ID depending on the ID type). This is the other ID a fixture can have.
The next columns display the values for the fixture's different attributes, depending on the mask and display settings. Some attributes might have symbols next to them, showing the selected gobo or the result of the color attributes.
Channel mode only shows the ID (it prioritizes the CID if available), the intensity value, and a small square showing the current color and intensity combination.
In the title, there are four buttons.
-
Prog Only:
Displays only the programmer data. -
Part:
This is the Programmer Part - read more about it in the What is the Programmer topic.
When the programmer has values from different parts, all cells of attributes that are not part of the selected programmer part are displayed in the fixture sheet with a darker background color.
-
Readout:
The readout defines how the attribute values are displayed. The options are:- Auto - This makes the sheet follow the readout set in the encoder toolbar. Notice that the button in the title bar does not say Auto; it displays the selected readout in angle brackets.
- Natural - For more information, see Patch and Fixture Setup - Attribute definitions.
- Percent - This displays the value as a percentage from 0% to 100%. It is a whole number. Percent Keyword.
- PercentFine - This also displays the value in percent. The range is the same, but the resolution is higher. The value has two decimal numbers. PercentFine Keyword.
- Physical - These are the physical values defined in the fixture type definition. Physical Keyword.
- Decimal8 / Decimal16 / Decimal 24 - This displays the value in a decimal number in the three available resolutions (256, 65 536, or 16 777 216). Decimal8, Decimal16, and Decimal24 keywords.
- Hex8 / Hex16 / Hex24 - Displays the value in a hexadecimal number in the three available resolutions (FF, FFFF, or FFFFFF). Hex8, Hex16, and Hex24 keywords.
-
Step:
This is the step number - learn more about steps in the Phaser section.
|
|
Hint: |
| There is a user profile setting called Value Readout. The Auto option uses this setting, and the encoder toolbar changes it. |
To read more about all the other different settings and masks, read the Window settings topic.
|
|
Hint: |
| It is possible to select fixtures by tapping on them in the Fixture Sheet. |