|
grandMA3 User Manual » Patch and Fixture Setup » DMX Curves
|
Version 2.0
|
Attributes use DMX curves. As a default, they use a linear transition from 0% to 100%. Other DMX curves can be created and assigned to parameters.
There are three types of DMX curves: MinMax, Switch, and Custom.
|
|
Restriction: |
| A show file can contain 9 999 DMX curves. |
Importing fixture types that use special DMX curves adds the curves to the list.
Curve values can be seen and edited in different readouts. These can be changed in the menu at the bottom by tapping the DMXReadout button.
Other buttons at the bottom give access to Cut, Copy, and Paste the curves in the list. There is also a button that deletes a curve. If the curve is used, it might be impossible to delete it.
The curves are displayed, created, and edited in the DMX Curves menu found in the patch.
Open the DMX Curves Menu
- Press Menu.
- Tap Patch.
- Tap DMX Curves on the left side.
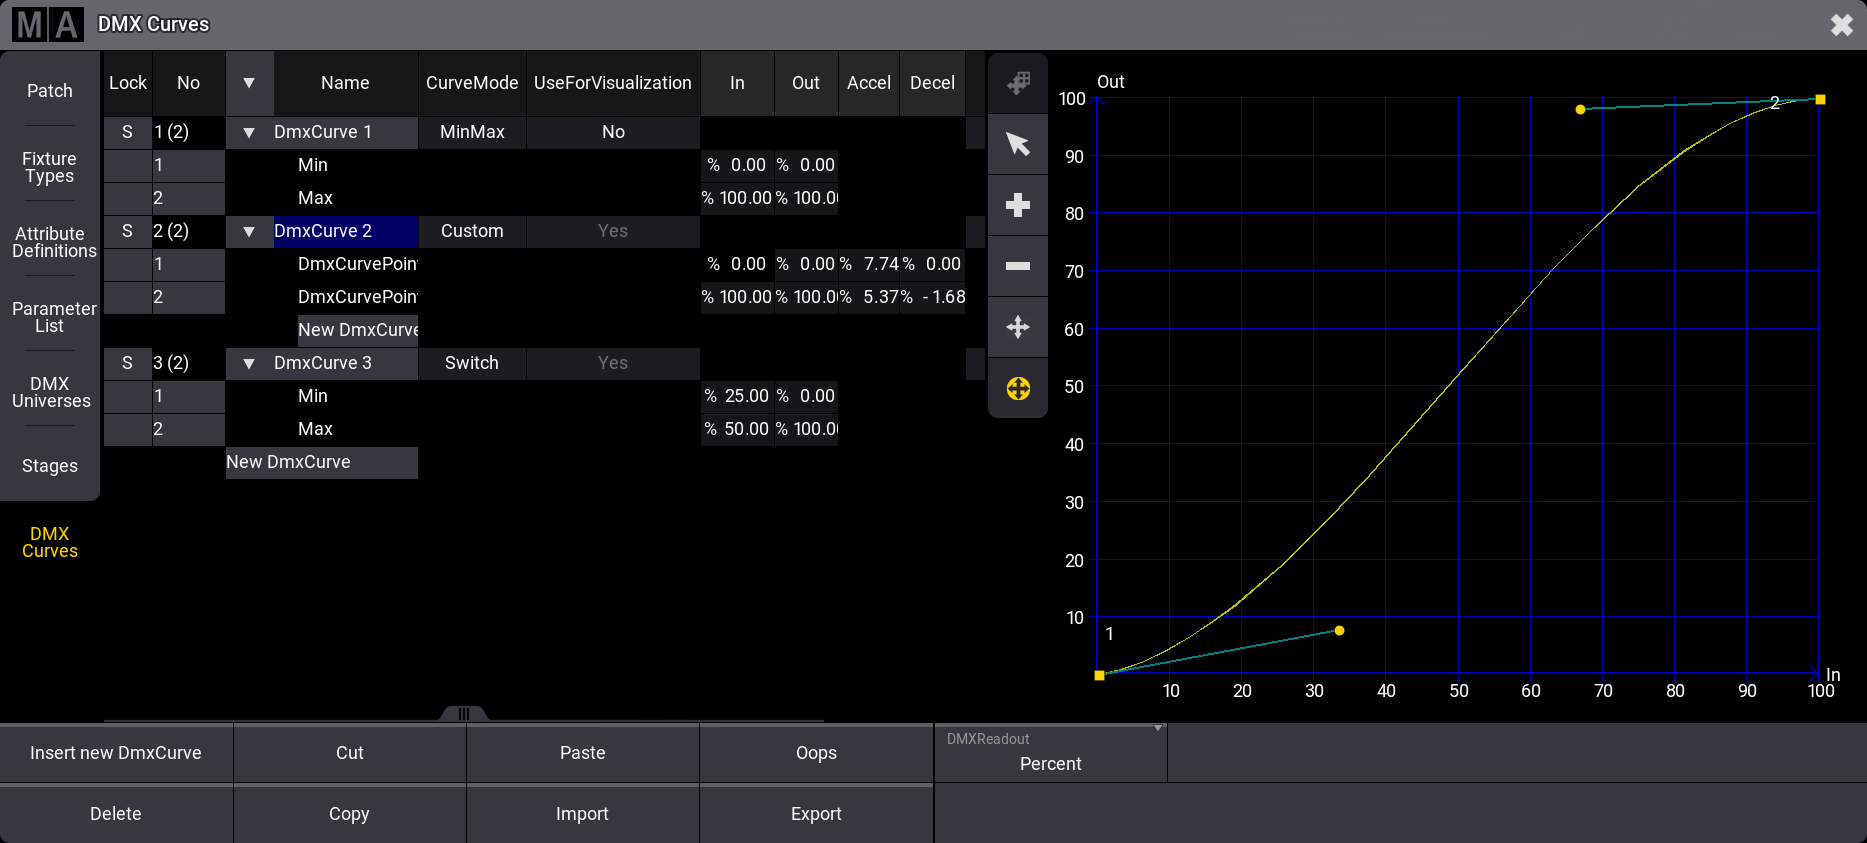
The DMX Curve menu is split into left and right sides. The left side lists the curves, and the right displays the selected curve.
The curve settings are listed on the left side list. The curves can be unfolded (tap the white right-pointing triangle), and the different points on the curves can be seen and edited in the table mode. In and Out show the relationship between the incoming value and what it is translated to in the curve.
The right side can also be used to edit curves. It has a standard toolset for selection (![]() ), addition of point (
), addition of point (![]() ), removal of point (
), removal of point (![]() ), move point (
), move point (![]() ), and move point handle (
), and move point handle (![]() ). Not all tools not available for all curve modes.
). Not all tools not available for all curve modes.
The column called UseForVisualization defines whether the DMX output, as defined by the DMXCurve, shall be visualized in the 3D Viewer.
|
|
Important: |
| When enabling this property for DMXCurves created by color-calibrated fixtures, the colors in the 3D Viewer will not match the actual output on stage! |
All DMX curve changes are made inside the patch menu. This means that the menu needs to be closed and changes saved for changes to take effect. Finish all DMX curve changes by leaving and saving the patch changes. Or exit without saving to cancel any changes.
Create a New MinMax Curve
MinMax curves are linear DMX transitions from a minimum to a maximum value. These can be useful to limit output values in, for instance, dimmers or the pan and tilt movements of fixtures.
- Open the DMX Curves menu.
- Tap a location in the curves list on the left side where the new curve should be.
- Tap Insert new DmxCurve at the bottom - the default curve mode for a new curve is MinMax.
- Edit the name to give it a custom name.
- Edit the Min and Max values to match the needs.
Create a New Switch Curve
Switch curves use two points to create a switch point where the output value instantly changes from one output value to the other.
- Open the DMX Curves menu.
- Tap a location in the curves list on the left side where the new curve should be.
- Tap Insert new DmxCurve at the bottom.
- Edit the CurveMode value to open the small Select CurveMode pop-up.
- Tap Switch in the pop-up.
- Edit the name to give it a custom name.
- Edit the Min and Max values of the two points to match the needs.
Having two points in the switch allows for setting a value needed for switching on and another value for switching down. This can help with hysteresis.
Example:
- Create a new switch curve.
- Set the Min point to In = 70% Out = 0%
- Set the Max point to In = 80% Out = 100%
This creates a switch that needs a value of 80% and above to turn On (output 100%) and a value of 0% to 70% to turn Off (0% output)
Create a New Custom Curve
Custom curves can be used for many different things, for instance, to match the emitter output of LED fixtures.
- Open the DMX Curves menu.
- Tap a location in the curves list on the left side where the new curve should be.
- Tap Insert new DmxCurve at the bottom.
- Edit the CurveMode value to open the small Select CurveMode pop-up.
- Tap Custom in the pop-up.
- Edit the name to give it a custom name.
- Points can be added using the Add tool on the right side or by creating a New DMXCurvePoint in the table view on the left side.
To create a point using the tools:- Tap the Add tool (+)
- Tap in the curve where the point should be added
- Edit the Min and Max values and the Accel (acceleration) and Decel (deceleration) of the points to match the needs. This can be done in the table or by using the graph editor on the right side.
|
|
Important: |
A curve might give a warning if the output at some point is lower than a previous output value. Curves with a warning have the name displayed with a red text color. |
Export and Import Curves
Curves can be exported to a drive.
- Select the desired drive.
- Tap Export.
- Select the desired drive.
- Write a name in the name input field.
- Tap Export in the pop-up.
Curves can be imported to the show.
- Select a location in the curve list.
- Tap Import.
- Select the desired source drive.
- Select the desired curve.
- Tap Import in the pop-up.
Assign Curve to a Parameter
The curves can be assigned to parameters in the Parameter List.
- Open the Parameter List in the menu on the left side.
- Locate the parameter that needs to use the custom curve.
- Edit the DMXCurve field and select the custom curve in the small select pop-up.
Assign Curve to a Fixture Type
DMX Curves can be assigned to an attribute in a Fixture Type.
- Open the Fixture Types in the menu on the left side.
- Select the desired fixture in the list.
- Tap Edit in the menu at the bottom.
- Tap the DMXModes tab at the top.
- Edit the DMX Curve field for the desired attribute.
- Select the wanted curve in the pop-up.
- Close the FixtureType editor pop-up by tapping the X in the upper right corner.