|
grandMA3 User Manual » Patch and Fixture Setup » Parameter List
|
Version 2.0
|
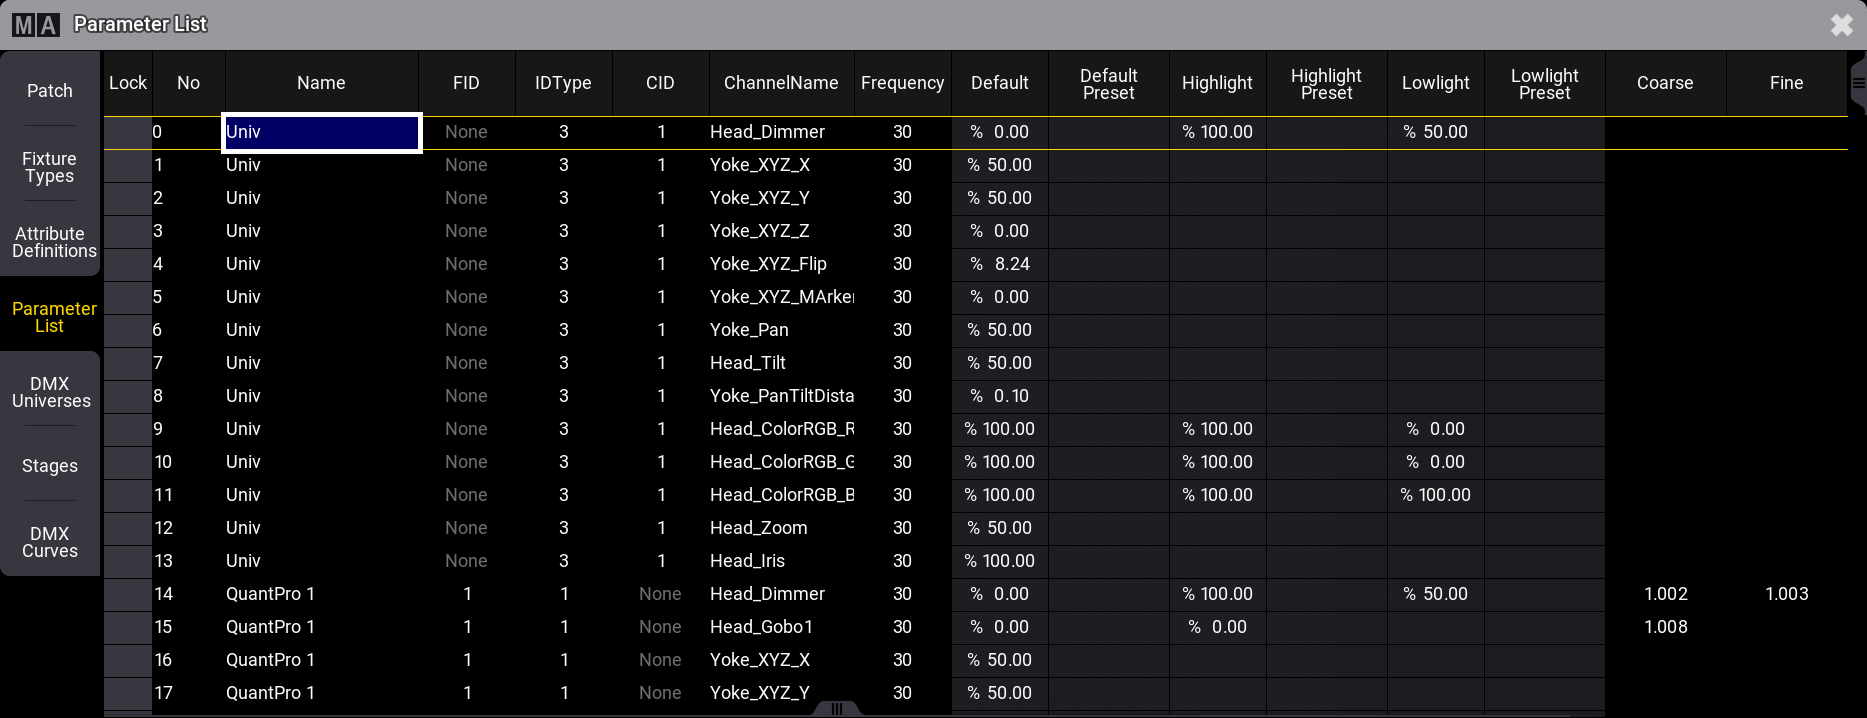
The Patch menu gives access to the list of all the parameters by tapping the Parameter List button in the menu on the left of the Patch Menu.
These parameters are also called RTChannels (Realtime Channels).
This menu lists all the parameters in the show.

The menu is a big table with the parameters in rows. This is a short explanation of the different columns:
- Lock:
This indicates a "Yes" if the row is locked. - No:
This is the parameter number. - Name:
This is the name of the fixture. - FID:
This is the FID of the fixture using the parameter. - IDType:
This is the ID number of the fixture ID type. - CID:
This is the CID for the fixture using the parameter. - ChannelName:
This is the name of the channel in the fixture definition. - Frequency:
This is the DMX output frequency. - Default:
This is the default value for the parameter. - Default Preset:
If the default value is referencing a preset, then the preset number and name are shown here. - Highlight:
This is the highlight value for the parameter. - Highlight Preset:
If the highlight value is referencing a preset, then the preset number and name are shown here. - Lowlight:
This is the lowlight value for the parameter. - Lowlight Preset:
If the lowlight value is referencing a preset, then the preset number and name are shown here. - Coarse:
This is the DMX address for coarse control of the parameter. - Fine:
This is the DMX address for fine control of the parameter. - Ultra:
This is the DMX address for ultra-fine control of the parameter. - DMX Curve:
This field can be used to select one of the existing DMX curves. Learn about DMX curves in the DMX Curve topic.
Only the default, highlight, lowlight values and presets, and the DMX curves can be changed in this list.
A filtered version of this list is also shown when a fixture is edited. It is filtered to only show the attributes (or RTChannels) for the fixture being edited.
Change the Default, Highlight, and Lowlight Values
The values in the Default, Default Preset, Highlight, Highlight Preset, Lowlight, and Lowlight Preset columns can be edited in this menu or when editing the fixture.
It is also possible to store the programmer's content to these elements. It automatically assigns presets that might be in the programmer into the preset column.
To reset any of the special values, set the corresponding attributes to remove values in the programmer and Store /Merge them to the desired type of special values. Or set any value for the corresponding attributes and do a Store /Remove.
It is done using the Default, Highlight, and Lowlight keywords and the /Remove and /Merge option keywords.
Examples:
Store a new default position for a group of fixtures.
- Clear the programmer for any existing values and selection.
- Select the desired fixtures.
- Give them the desired position for instance from a preset.
- Be careful to not have undesired values in the programmer (for instance, intensity values).
- Execute this command: Store Default.
- Clear the programmer and verify the new default position.
Remove the currently stored highlight values for a selection of pan and tilt attributes.
- Clear the programmer for any existing values and selection.
- Select the desired fixtures.
- Give the pan and tilt attributes some value - the actual value does not matter it only matters that there are active programmer values for the desired attributes.
- Be careful to not have undesired values in the programmer (for instance, intensity values).
- Execute this command: Store Highlight /Remove.
- Clear the programmer and verify the new highlight position.
For resetting the special values of default and lowlight, follow the example above but replace Highlight with Default, or Lowlight.
In addition, storing with the /Release option keyword to the special values will do the same as Remove.
|
|
Important: |
For which fixtures the special values will be changed when using the command line approach, the Use Selection setting and the If not empty setting of the Store Options are important. To learn more about the Use Selection setting and the If not empty setting, read in the Store Options topic. |
|
|
Restriction: |
| Presets with more than 1 step ("Phaser presets") will only use step 1 when using them as special values. |