Sequence with Multiple Cues
|
grandMA3 Quick Start Guide » 15 - Sequence with Multiple Cues
|
Version 1.9 |
Now, we are going to create a new sequence with multiple cues.
We will use the moving heads and some of the presets we created in Chapter 13.
Because of the differences in our preset, your result will look different than mine. That is okay. It is meant as a demonstration, and we will use the sequence to look at different functions with sequences.
Create the Sequence
We begin by getting some values into our programmer. Start by clearing the programmer. Now select Group 7 (all the Mega Pointe) and turn them to 100%. Select a position preset and color preset.
This is our first cue in a new sequence, so let us store it: Press Store and then the executor button 206.
Now we have a new sequence (number 5), and executor 206 controls the sequence.
Press Select Sequ 5 Please to select the sequence. This makes it easier when we are going to work with the sequence.
Have a look at the sequence sheet. Notice that the cue name gets the names from the presets.
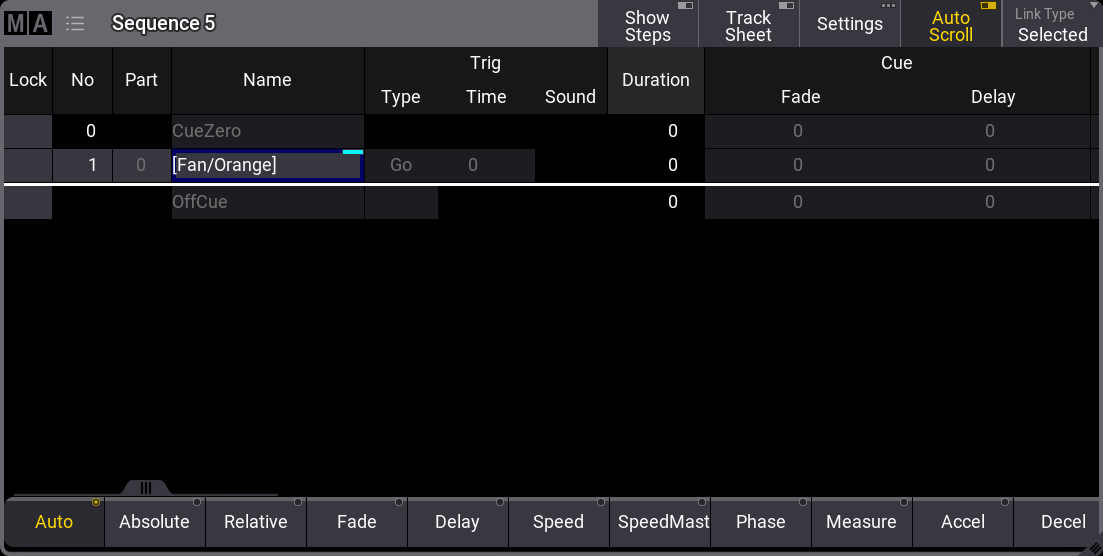
Press the Go+ key in the master section to run the cue. The master section can be opened temporarily by pressing F7 on a keyboard or be created as a window.
Turn off the Mega Pointes (0%) and Press Store Cue 2 Time 3 Please. This stores cue 2 with a cue fade time of 3 seconds.
Clear the programmer.
Now you are back to cue 1. Press Go+ in the master area to run the second cue.
Select all the Auras. Turn them On, and select a color and a position. Store this as cue 3 with a fade time of 4.
Give them a new position and adjust the color. Store this as cue 4 with a fade time of 3 seconds.
Clear the programmer and run the two new cues in the sequence.
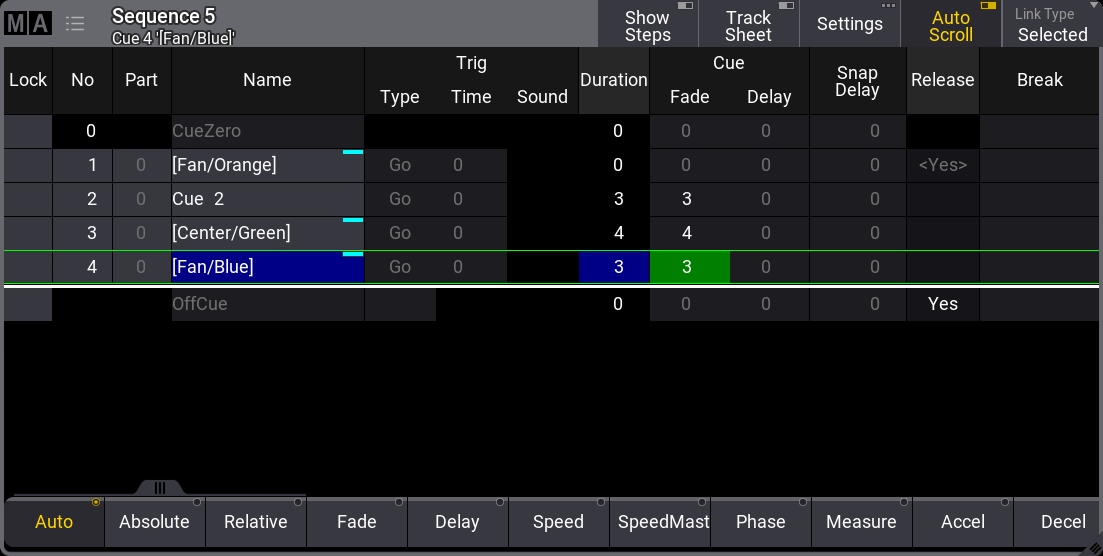
Select the X4 Bars. Give them a dimmer value, a color, and a position, and adjust the zoom. Store this as cue 5 with a fade time of 2 seconds.
Clear the programmer and run cue 5.
Select the Mega Pointe. Give them a new position, intensity, color, and add a gobo. Select the Auras and turn them Off. Store this as cue 6.
Run the cue and then clear the programmer. This allows you to go to the cue without any changes to the output when we clear the programmer.
Now, we are going to change the cue timing.
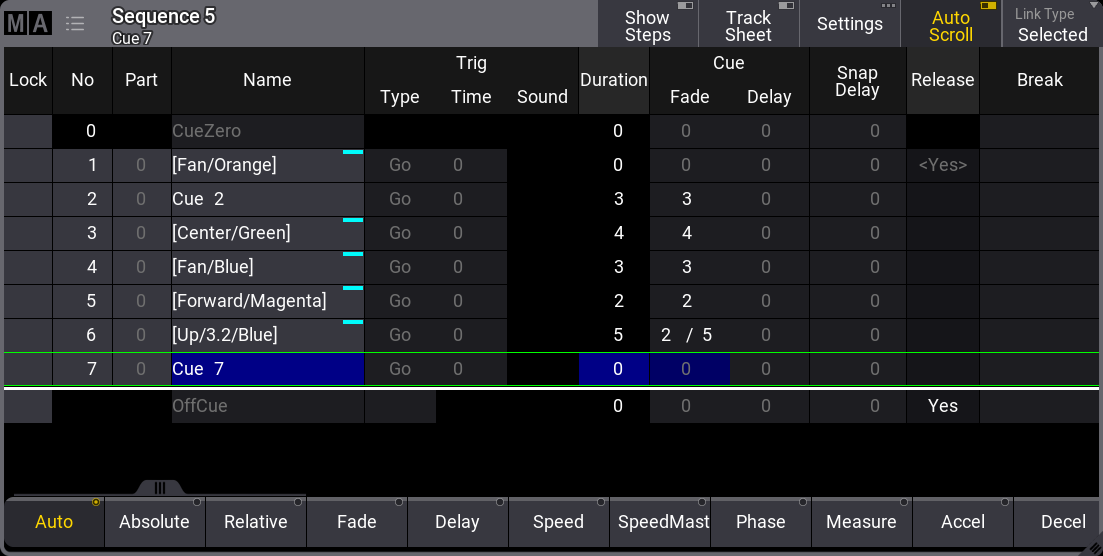
Press Time 2 / 5 Please. This changed the current cues time. We could have specified a cue number, and you can do this if you want to change a different cue than the current one.
We also specified two different numbers separated by a forward slash. This means that the cue now has fade and outfade times. The outfade time (5 seconds) will be used by the dimmer going down in value (the Auras). All other attributes change values using the normal fade time (2 seconds).
The final cue is going to be a blackout. Select the Mega Pointes and the X4 Bars and give them 0% intensity. Store this as cue 7 with a fade time of 0.
This was the sequence. Try to run through it a couple of times.
Edit the Sequence
Let us make some changes to the sequence using the sequence sheet.
We would like cue 4 to automatically run, shortly after cue 3 is done. This can be done by changing the trigger for cue 4. The default trigger type is "Go" as we saw in chapter 8.
Edit the field for cue 4, select Time, edit the time column, and give it a value of 6 seconds. These settings mean that when we trigger cue 3 with a Go, cue 3 runs with a fade time of 4 seconds and a timed countdown of 6 seconds is also started for cue 4. So, 6 seconds after we trigger cue 3, cue 4 starts the fading. There are other ways to achieve the same result. This is just one way to do it.
With cue 6, we created a cue where the Mega Pointes turn On, and the Auras turn Off. We know this because we just did it. If we return to this show after some time has passed, we might not remember that the Auras use the outfade time. So let us change this to a different solution that makes what is happening more obvious. We are going to create a part cue with the Auras.
Select the Auras and give them 0%. Press Store Cue 6 Cue 2 Time 5 Please. This might give you a popup asking you to select a store mode. Make sure "Cue Only" is Off, and then click Ok. This stores the Auras dimmer value to cue 6 part 2 with a cuefade of 5.
So now we can change the cue fade in cue 6 part 0 to 2.
Click Cue 6 Time 2 Please. If we do not specify a part number, the software assumes we mean part 0.
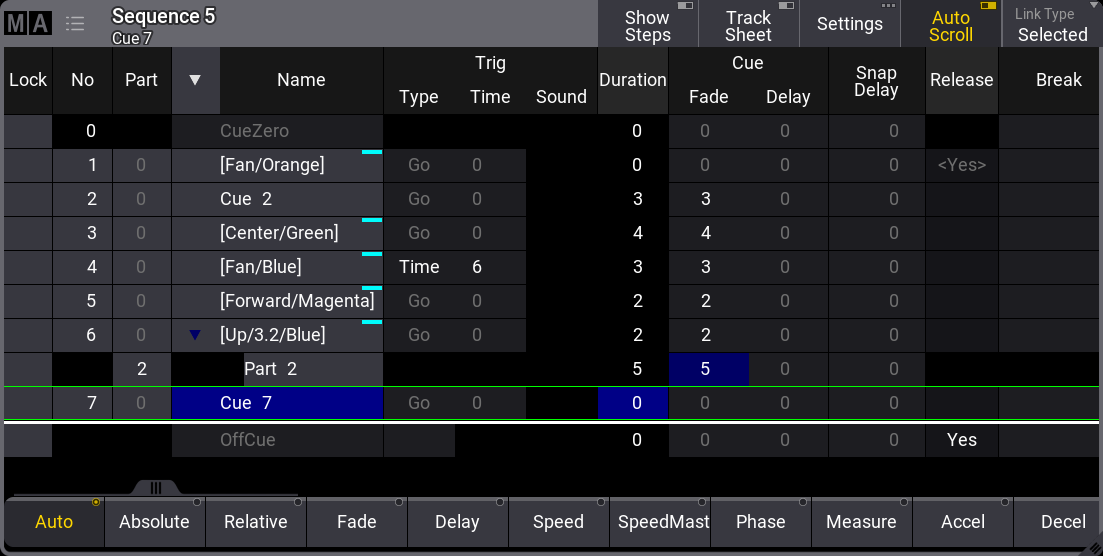
Separating the Auras in their own part instead of just using the outfade time can seem like extra work. In the end, it is a matter of personal programming style. I wanted to show you two ways this look could be achieved. I like to separate attributes that have different timing in part cues. It makes it easier for others to decode what is happening in the cue.
Now, we should name the part something that tells us what we put in the part. Let us give all the cues a name. You can rename them by editing the name field for each cue and cue part.
Here are the names I use:
| Cue | Part | Name |
|---|---|---|
| 1 | 0 | Entrance |
| 2 | 0 | Ready |
| 3 | 0 | Scene 1 |
| 4 | 0 | - - Auto - - |
| 5 | 0 | Scene 2 |
| 6 | 0 | Scene 3 |
| 6 | 2 | - - Aura 0% |
| 7 | 0 | BO |
We should also name the sequence. Click in the command line input and type Label Sequence 5 "My Show" and execute the command. If you, for some reason, have a different sequence number, then please adjust the command to reflect the correct sequence number.
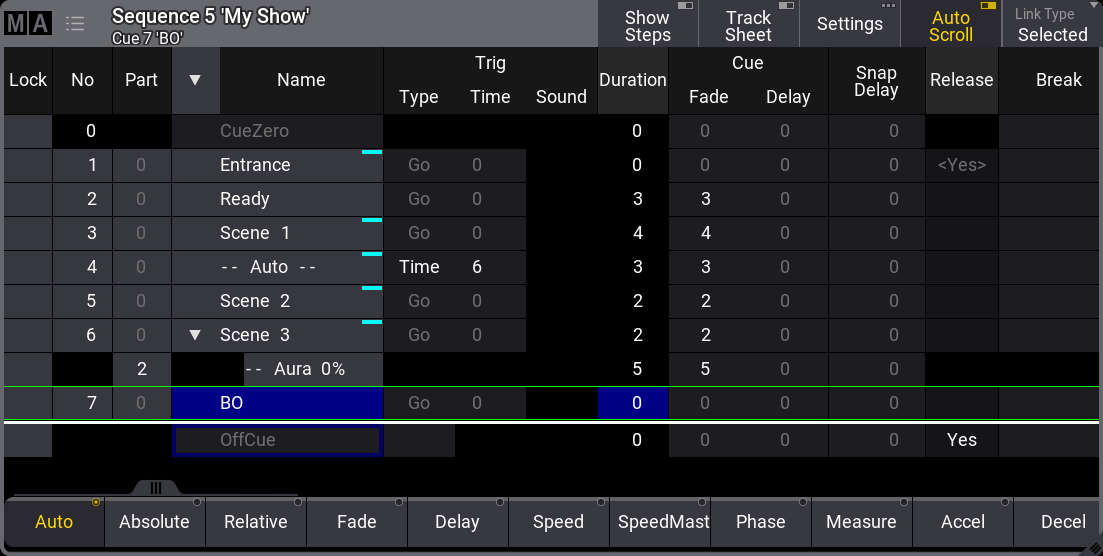
Another feature I would like to introduce is the appearance of the sequence and the cues.
We can give the sequence an appearance. This can give it a distinguished look on the executors and the sequence pool.
Let us start by creating the appearances we need.
Make an Appearance pool somewhere.
How you use appearance is all up to you. Maybe you do not like the way I do it, and that is, of course, completely OK. But try to follow what I do, and then you can always change it afterward.
We need to create 3 new appearances. Edit an empty pool object. You might need to scroll in the pool to get to some empty pool objects.
In the Background Color fader, set the "R" fader to 0%, the "G" and "B" faders to 100%, and the "Alpha" fader to 30% (it might not want to be exactly 30%). Name this appearance "30% Cyan".
The next appearance is named "40% Red". The faders are "R" = 100%, "G" = 0%, "B" = 0%, and "Alpha" = 40%.
The final appearance is named "50% Green". The faders are "R" = 0%, "G" = 100%, "B" = 0%, and "Alpha" = 50%.
Those were the appearances we needed.

Now we need to have a Sequence Sheet and the Appearance pool visible.
We are going to assign appearances to cues. To be able to see these, we need to adjust the Sequence Sheet Settings.
Click the MA logo in the upper left corner of the sheet. Click the Display tab to make sure it is the selected tab. There is a setting called CuePart Appearance. Set this to "Num+Name".

Close the settings.
The easiest way to assign the appearances to cues (or technically the cue parts) is by using the Swipey menu in the Appearance pool - if you forgot about the Swipey, please revisit chapter 6.
Use the assign option and assign the "30% Cyan" on cue 4 (part 0) and cue 6 part 2.
Assign the "40% Red" on cue 2 and cue 7.
The result should look something like this:
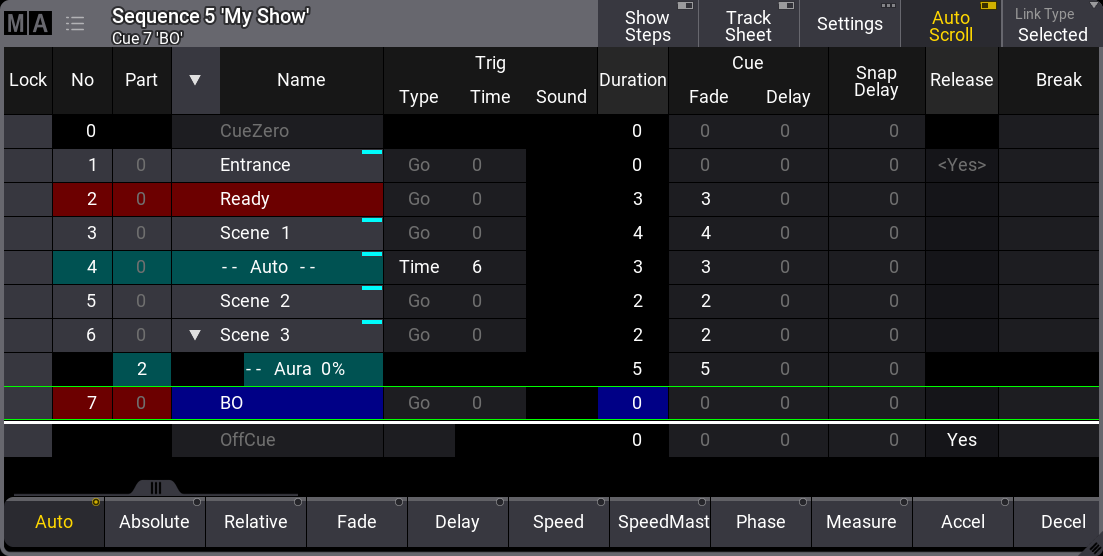
Marking the cues with colors can help you quickly distinguish special cues from others. I like to mark "dangerous" cues like blackouts and cues that I do not need to worry about, like those that run automatically.
Finally, let us give the sequence an appearance.
Click the Settings in the title bar of the sequence sheet. These are the settings for the actual sequence.
In the first column, there is a setting called "Appearance". Click this and select the "50% Green" appearance in the list.
This colors the sequence in the sequence pool and gives the executor the green color. This can make it fast to identify the sequence on the executors.
Below this setting, there is another setting called "Prefer Cue Appearance". Turning this On will give the executor, and the sequence pool object the color from the active cue (part 0) if there is one. Otherwise, it will use the sequence appearance.
Turn this On if you like, and then close the settings.
Tracking
We can see what is stored in the cues by changing the sequence sheet into a tracking sheet.
Do this by turning On the Track Sheet in the title bar of the sequence sheet.
It then looks like this (I have scrolled the sheet horizontally):
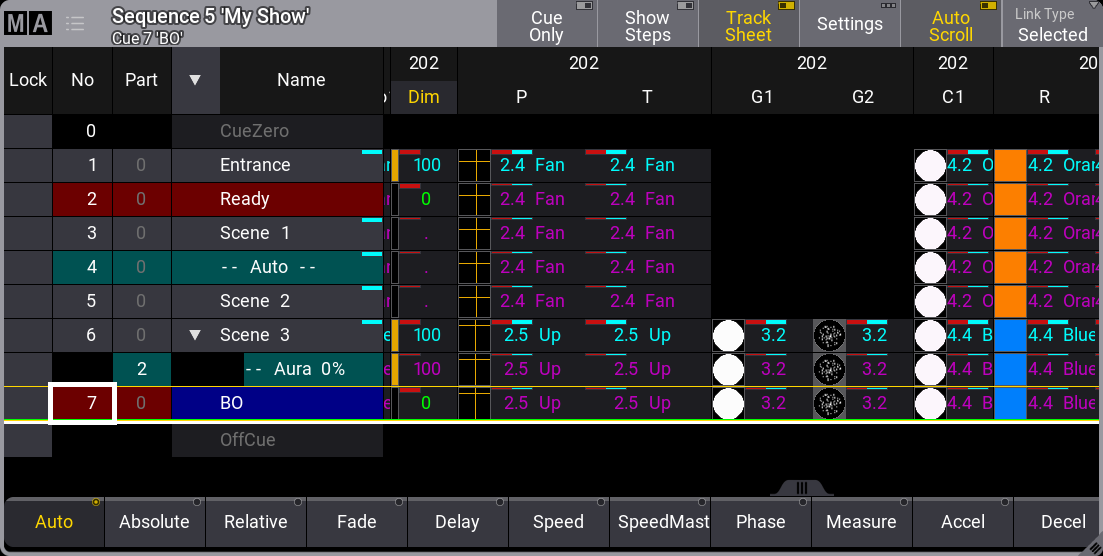
Here, we can see how an attribute changes through the cues. For instance, the dimmer value of fixture 201 is at 100% in cue 1 and then at 0% in cue 2. This then tracks to cue 6, where the value is back at 100% again.
There are some colors here that are a bit interesting for us.
The cyan text color shows us that there is a new value. This value will use the Cue In Fade time.
The green text color is dimmer values going to a lower value, and they will use the Cue Out Fade to change the value. The Cue Out Fade is the same as the Cue In Fade unless you specify a different time.
The magenta text color indicates tracking values. This means that the value is not stored in the cue, but it is the value that the sequence will output.
Another text color that can be on the tracking sheet is white. This indicates values stored in the cue at the same value as they would have if it were a tracking value. So, in essence, it does not need to be stored in the cue.
We can edit a value directly in the tracking sheet. Let us try this. We will make a change for only one cue, so the first thing we want to do is turn On the Cue Only button in the title bar.
There is another setting we would like to change. Open the settings for the Sequence Sheet and turn On "Feature Sort". This orders attributes of the same type next to each other.
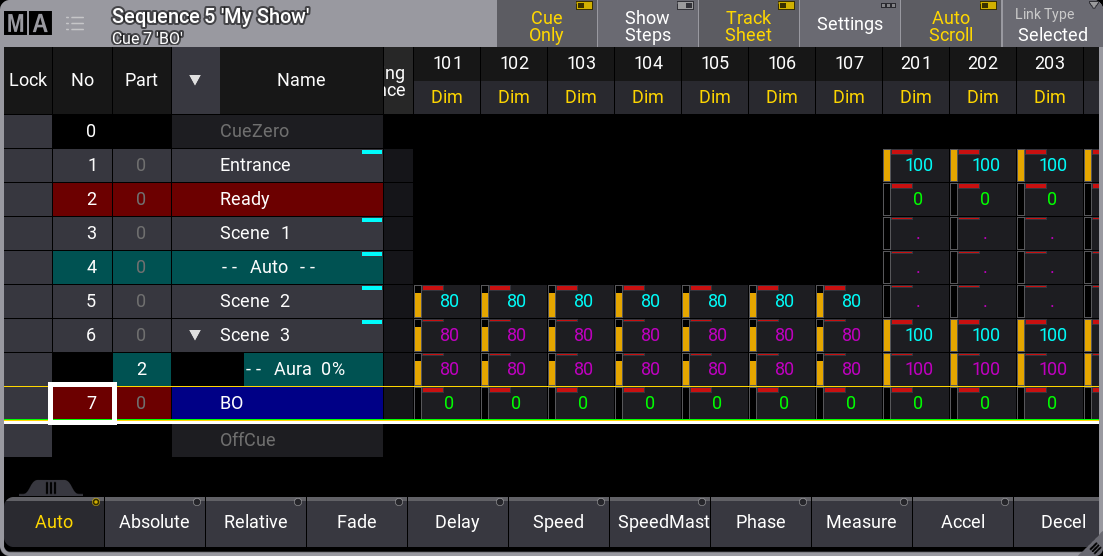
Now, use the mouse to click and drag through all the cells for fixtures 101 to 107 in cue 5 to mark them with a blue frame. Next, you want to right-click (Edit) the selected cells. This opens the calculator.
We can select valid presets by clicking the Presets button around the middle of the calculator. For now, we just want to change the dimmer value to a different value. Click 5 0 Please (if they already were at 50%, then select a different new value).
Now it looks something like this:
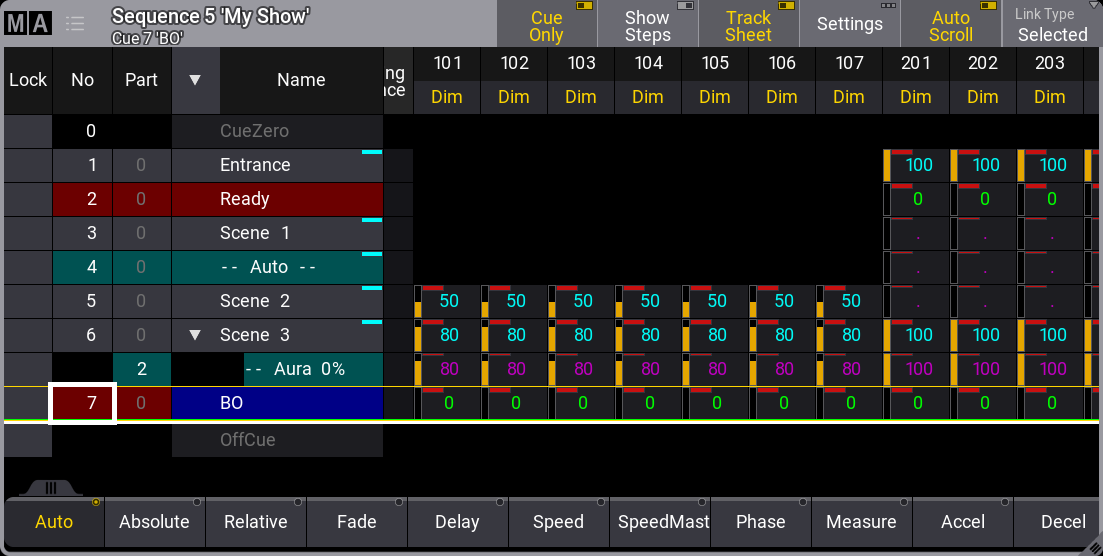
If we did not do this as "Cue Only", the new value would have been tracked through cue 6.
Move In Black
You might have noticed when running the cues that the fixtures faded to a new position and a new color, together with the dimmer values. If we want the fixtures to already be at the next position and with the color ready, then you could store the color and position values in the previous cue, but we can also make the software do this for us. It is a function called MIB (Move In Black).
To use MIB, we must turn off the Track Sheet again (toggle the button in the title bar). Scroll the sheet horizontally until you see columns called something with MIB. You can see the MIB Mode is set to "<None>". Values inside <> are usually values set in a setting somewhere else.
We can change this value in four of the cues. These are the cues where dimmer values go from 0% to a value above 0% while other values also change. These cues can have attributes auto-pre-positioned. Change the MIB Mode to "Early" for cue 3 by editing the cell in the sheet.
We might want a different default than "None". Click Settings in the title bar of the Sequence Sheet. On the right side, there is a setting called MIBMode. Change this to "Late" and close the settings.
You can see that cue 3 still has the mode we specifically selected, but all the other cues use a different default MIB mode.
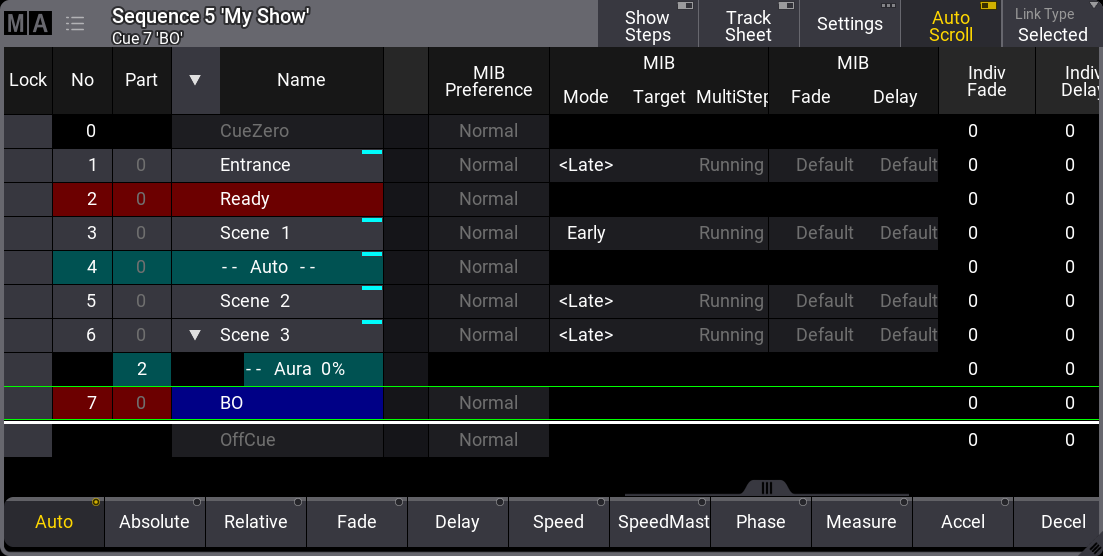
The result on the output is that we do not see fixtures move while dimmers are On except cue 4, where we have stored a new position and color while the fixtures are On.
Again, there are other ways to achieve the same look. This was one way to solve this.
There are more details and things to know about tracking, but it is outside the scope of this quick start.
Recap
In this chapter, we created a sequence with multiple cues. We edited two cues using the standard programmer, looked at the tracking information, and edited the values in the tracking sheet.
There is a whole section of the manual dedicated to the cues and sequences. I have linked to it in chapter 8, but here it is again - Cue and Sequences section. This also has a topic about Tracking.
We had a short look at MIB. There are many settings related to this, which can be quite complex when Phaser steps are included. If you want to, you can read more about it in the Move In Black topic.
The next chapter explores how we can output DMX from the system.