Calculator
|
grandMA3 User Manual » Workspace » Calculator
|
Version 2.0
|
When editing a field that accepts numeric values, the calculator appears. This includes pressing one of the dual encoders while it is displaying an editable value.
The calculator is a dynamic window, and its appearance changes depending upon the edited item and the type of value to be entered.
Example
- Edit a dimmer attribute
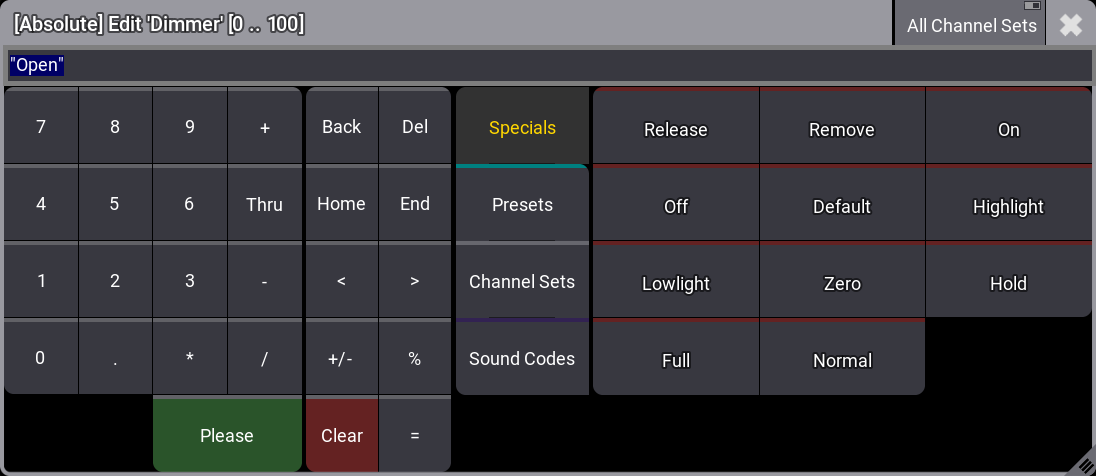
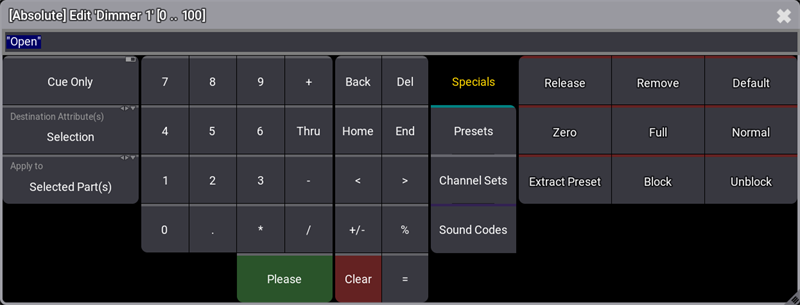
The title bar displays several useful pieces of information about what the calculator is currently editing:
- Layer: If applicable, the first set of brackets contains the value layer.
- Attribute or parameter: The name of the attribute or parameter appears after the word "Edit."
- Value Range: The last set of brackets contains the allowed range of input values.
All Channel Sets: Shows the channel sets of all channel functions per attribute. For more information, see Encoder Resolution.
![]() : A filter icon in the title bar indicates a filter selection.
: A filter icon in the title bar indicates a filter selection.
Input Field
The input field appears below the title bar. When the calculator opens, the input field displays the current value of the edited object. The text of this value is completely selected so that any immediate entry will replace the existing value. Alternatively, the text can be deselected and retained as part of the entry.
Entering values with a percentage sign (%) in front of the value scales the former value by the new value. For example, the old value is 50, and entering % 50 results in a value of 25.
Standard Buttons
The following buttons appear in all calculators.
Number Pad
The calculator displays a number pad on the left. These buttons share the same functions in the calculator as the number keypad in the command section of the console.
Function Buttons
Function buttons appear to the right of the number pad. These buttons include:
- Back: Tap to delete characters to the left of the cursor.
- Del: Tap to delete characters to the right of the cursor.
- Home: Tap to set the cursor at the beginning of the input field.
- End: Tap to set the cursor at the end of the input field.
- <: Tap to move the cursor to the left.
- >: Tap to move the cursor to the right.
- +/-: Tap to insert a negative or a positive value. For more information see - [Minus] Key or the + [Plus] Key.
- %: Tap to enter the percent sign.
- =: Tap to enter the equals sign.
- Clear: Tap to delete the entire entry.
- Please: Tap to confirm and apply the value. The calculator closes.
|
|
Hint: |
| Input from a standard keyboard, whether integrated under the console armrest or connected via USB, also populates the input field of the calculator. With one exception, keyboard shortcuts are disabled when entering text into a calculator. The exception is that T will enter the Thru keyword. |
|
|
Hint: |
| When the input readout is set to one of the hexadecimal options, an additional row of buttons appears below the number pad, allowing entries of hexadecimal values A, B, C, D, E, and F. |
Additional Input Options
Four tabs of additional input options appear to the right of the function buttons.
Specials
To open the special buttons tab, tap Specials.
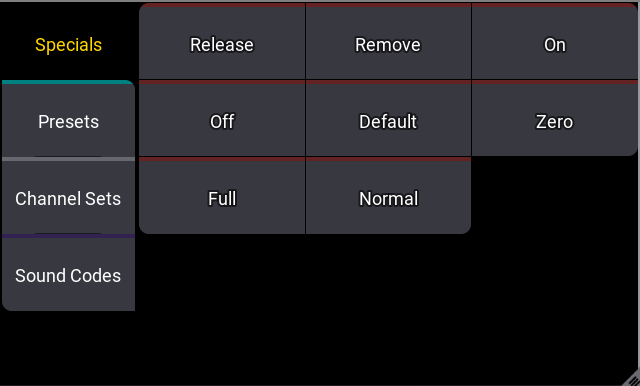
Use these buttons to enter special commands for attribute values:
- Release: Tap to enter a release value. For more information see the Release Keyword.
- Remove: Tap to enter a remove value. For more information see the Remove Keyword.
- On: Tap to activate values in the programmer without changing the value.
- Off: Tap to clear the values in the programmer.
- Default: Tap to enter the default value defined for the fixture type. For more information see the Default Keyword.
- Zero: Tap to set the values to 0. For more information see the Zero Keyword.
- Full: Tap to set values to 100%. For more information see the Full Keyword.
- Normal: Tap to set the normal value stored in the user profile. For more information see the Normal Keyword.
The at overlay in the control bar also offers quick access to limited versions of these special values. For more information, see the Control Bar topic.
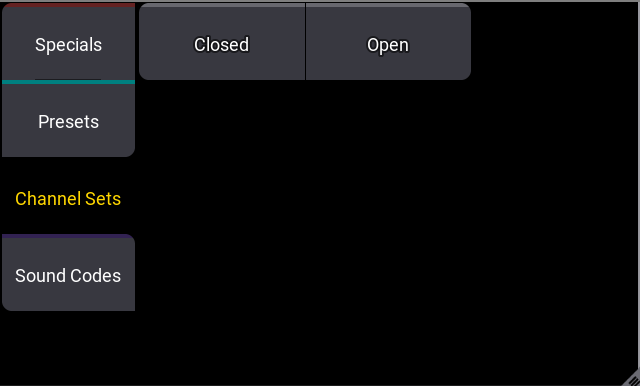
Presets
To open the presets tab, tap Presets.
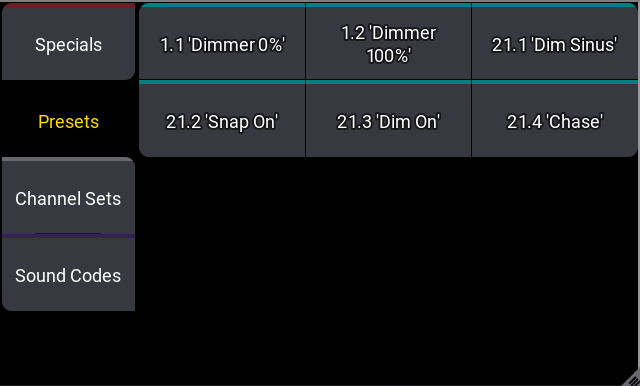
Use these buttons to call presets for attribute values. This tab displays any preset from any preset pool in the currently selected data pool, which contains data that can be applied to the attribute currently edited by the calculator. Each button displays the preset number, using the format: [Feature Group].[ID], as well as the preset label. For more information on presets, see the Presets topic.
|
|
Important: |
| Only the buttons in the preset tab recall presets in the calculator. All other value sources in the calculator produce unlinked values that may be more difficult to reproduce or update. |
Channel Sets
To open the channel sets tab, tap Channel Sets.
Use these buttons to enter attribute values based on channel sets defined for the fixture type. The channel sets displayed in this tab are the same as those displayed in the smart window. For more information on the smart window, see the Smart View topic.
|
|
Hint: |
| When editing attributes with multiple channel functions, a button for each channel function appears between the title bar and the input field of the calculator. Selecting a channel function shows only the relevant channel sets within the channel sets tab. |
Sound Codes
To open the sound codes tab, tap Sound Codes.

Use these buttons to link the attribute values to an incoming audio signal. Values can reference the total volume of the audio input or they can reference smaller frequency bands within the signal. The available options include:
- All: Use for the total volume of the incoming signal.
- Bass, Mid, and High: Use to reference one of three broad frequency bands.
- Band1 through Band7: Use to reference one of seven narrower frequency bands.
- Inv…: Use to reference the inverse value of any of the above options.
|
|
Hint: |
| Use the SoundIn and SoundFade masters to adjust how the console reacts to incoming audio signals. |
For more information about using sound input, see the Sound Window topic.
Track Sheet Calculator
When editing an attribute within the sequence sheet with the track sheet option enabled, the calculator appears with additional options to the left of the number pad. To edit attributes in the track sheet, drag the cursor across the desired attributes and up or down over the desired cues or cue parts. Then, use a 2-finger tap to edit the highlighted cells.
Example
- Edit a dimmer attribute in the track sheet
Cue Only
The cue only toggle appears at the top of the additional options to the left of the number pad. Toggle Cue Only off to allow changes to track forward. Toggle Cue Only on to prevent changes from tracking beyond the range of cues defined by the edit options. For more information on cue only, see the Store Cues topic.
Destination Attribute(s)
Tap Destination Attribute(s) to cycle through the available attribute destination options, or tap and swipe to see a menu of all available attribute destination options.
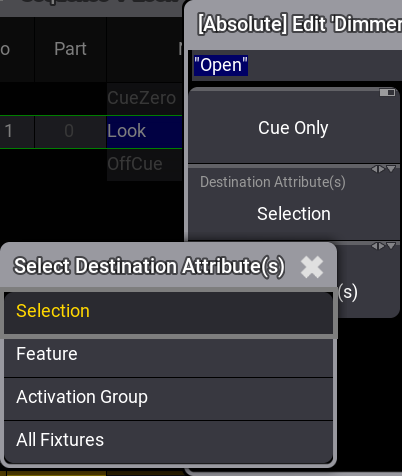
The select destination attributes menu includes the following options:
- Selection: Edits will only apply to the selected attribute cells.
- Feature: Edits will apply to all attributes within the feature group of the selected attribute cells, staying within the selected fixtures.
- Activation Group: Edits will apply to all attributes within the activation group of the selected attribute cells, staying within the selected fixtures.
- All Fixtures: Edits will only apply to all attributes of all fixtures within the cue part.
|
|
Hint: |
| Think of this option as expanding the effect of the edit horizontally within the track sheet. |
Apply to
Tap Apply to to cycle through the available cue and part options, or tap and swipe to see a menu of all available cue and part options.
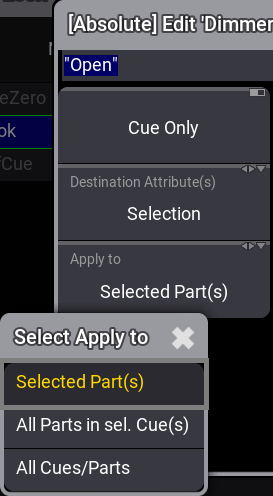
The apply to menu includes the following options:
- Selected Part(s): Edits will only apply to the selected cue part cells.
- All Parts in sel. Cue(s): Edits will apply to all parts within the selected cues.
- All Cues/Parts: Edits will apply to all parts of all cues within the sequence.
|
|
Hint: |
| Think of this option as expanding the effect of the edit vertically within the track sheet. |
Time Calculator
When editing times, the calculator appears with different readout options and additional buttons.
Example
- Edit the wait time for a line in a macro
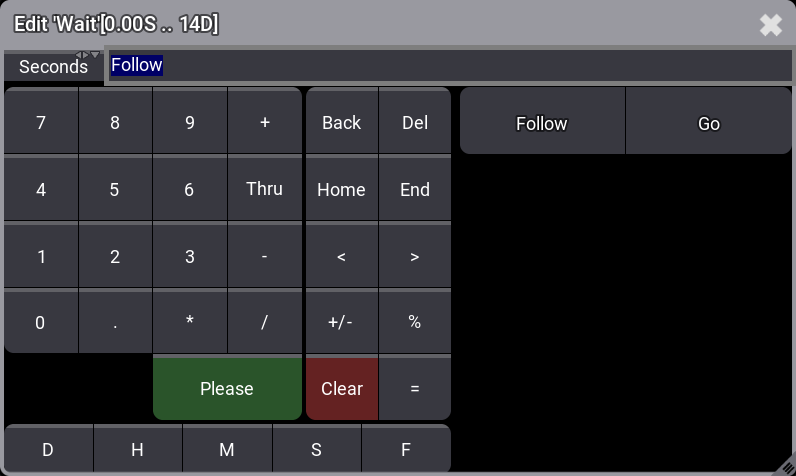
Additional buttons appear below the number pad. These buttons allow for quick entry of time units:
- D: Day
- H: Hour
- M: Minute
- S: Second
- F: Frame
Additional Input Options
Additional input options appear to the right of the function buttons. When editing a cell that can also contain triggers, this area displays trigger options.
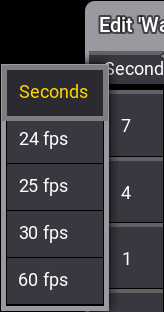
Time Readouts
The readout selection appears to the left of the input bar. Tap the readout to cycle through the available readout options, or tap and swipe to see a menu of all available readout options.