Using the Shapers Dialog
|
grandMA3 User Manual » Operate Fixtures » Special Dialog » Using the Shapers Dialog
|
Version 2.1
|
The Shapers dialog is part of the Special Dialog window and provides a graphical user interface for controlling shaper attributes in fixtures. The values that are used to visualize the shapers come from the DMX layer. For more information, see Fixture Sheet and Layouts.
Watch the following video to get an overview of the Shapers dialog feature.
Requirements:
- A fixture type with a shaper is selected in the programmer, for example, Ayrton Eurus. For more information, see Import Fixture Types and What is the Programmer.
To open the Shapers Dialog window:
- Open the Add Window dialog.
- Tap Common and Special Dialog. The Special Dialog window opens.
- Tap the Shapers tab on the left. The Shapers dialog opens.
The title bar of the Shapers Dialog provides the following options for controlling blades and shapers of fixtures. For more information about how to edit the title bar, see Title Bar Configuration.
- Reset Bar: When enabled, tapping Reset Shaper resets blades and rotation. Tapping Reset Blades resets the blades only.
- Show POV: Displays a fader to manually rotate the Point of View (POV) of the fixture. When enabled, a Reset POV button is also displayed.
-
Mini Faders: Changes the number of faders that are displayed. Can be accessed by tapping and holding Mini Faders.
- None: No faders are displayed.
- Full: The faders for blades and rotation are displayed depending on the value of Control.
- Blades: The faders for blades are displayed depending on the value of Control.
- Rotation: A fader for the shaper rotation is displayed.
-
Link: Defines how the movement of one or more blades works together.
- None: Each blade can be controlled individually.
- All: Moving one blade moves all other blades proportionally.
- Parallel: Moving one blade will also move the opposite blade.
- Mirrored: Moving one blade will mirror the opposite blade.
-
Control: Changes the control mode.
- Ins+Rot: The depth of insertion (1-4 -"I") and the blade rotation (1-4-"R") can be defined.
- A+B: The blade corners (A,B) can be defined.
|
|
Hint: |
| The software converts different types of shaper engines to the correct DMX values so that all modes can be used regardless of the fixture type. Blade misconfigurations are shown in the Conflicts in Fixture Types. |
|
|
Important: |
| Depending on the fixture type, there may be inaccuracies when converting from one control mode to another. |
-
View: Changes the display mode.
- Graphical: Shows a shaper visualisazion.
- Faders: Shows only faders.
When the focus is on the Shaper Dialog, the encoder bar displays the Shaper Encoder Bar. Depending on the selected control mode, the encoders display the corresponding functions.

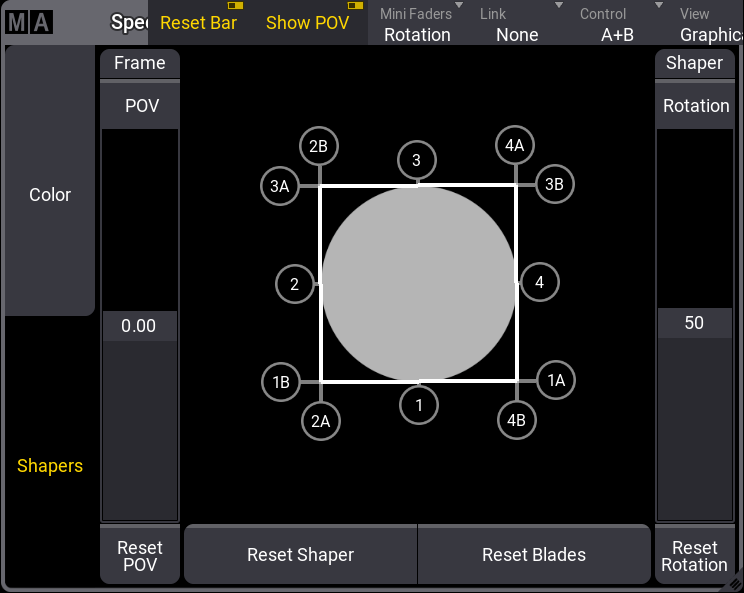
Graphical View Mode
The graphical view mode shows a visualization of a fixture beam. This beam is colored light gray.
The insertion of blades can be changed with the movable handles. Handles labeled 1 through 4 are blades. Handles labeled with additional A and B are corners of the blades.
Four white lines show the actual insertion into the beam. The covered part of the beam is shown in dark gray.
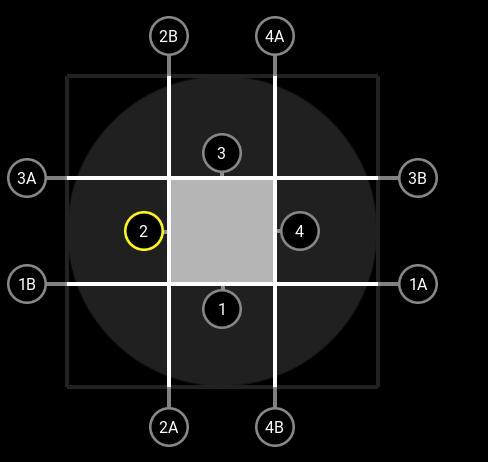
Example
- Patch a blade fixture, for example, Ayrton Eurus.
- Select the patched blade fixture.
- Open the Shapers Dialog window.
- Tap and hold Link in the title bar. A dropdown menu opens.
- Select All. The dropdown menu closes.
- Tap and hold handle 2. Handle 2 turns yellow.
- Drag handle 2 to the inside of the cycle. The beam becomes a square.
|
|
Hint: |
| Tap and hold anywhere in the visualization to select the nearest handle. |
Using the Faders
With faders, it is possible to change the insertion of the blades.
Values from 0.00 - 1.00 define the insertion of the blade. 0.00 does not cover the beam and 1.00 covers the beam completely.
To reset single blades, Reset 1-4 can be used. To reset the rotation of the shaper unit, Reset Rotation can be used.
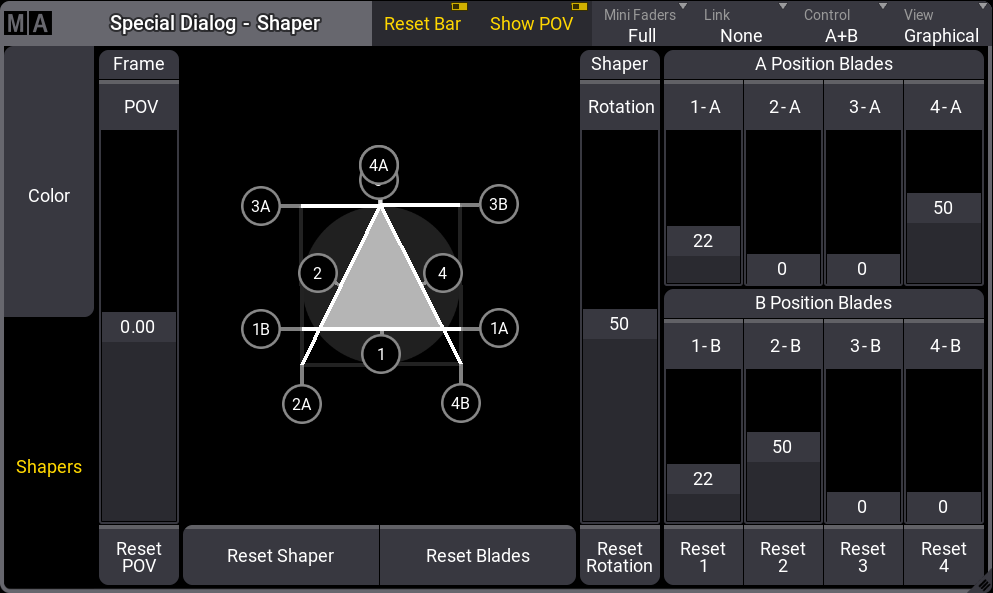
Example:
To create a triangle shape:
- Select a blade fixture.
- Tap and hold Mini Faders in the title bar of the Special Dialog window. A dropdown menu opens.
- Select Full. The dropdown menu closes.
- Tap and hold Control.
- Select A+B in the dropdown menu.
- Drag the faders to the following values: 1-A 0.22, 4-A 0.50, 1-B 0.22, 2-B 0.50.
- A triangle shape is created.
|
|
Hint: |
| The graphical representation of the Shaper Dialog may differ from the shaper of the real fixture due to the technical conditions of the fixture. |
|
|
Hint: |
| The faders are grayed out for fixtures with less than 4 blades or fixtures without a full set of attributes to control a blade. The handles for missing blades are adjusted accordingly in the graphical view. |