grandMA3 User Manual Publication
PSN (PosiStageNet)
|
grandMA3 User Manual » Remote In and Out » PSN (PosiStageNet)
|
Version 2.1
|
grandMA3 stations can receive PosiStageNet (PSN) data. PSN is a protocol designed to communicate the position of identified points in a 3D space; it is an open protocol that can be used to transmit tracking information between servers and hardware systems.
For a detailed description of PosiStageNet, see the external link to the PosiStageNet Protocol description v2.0 PDF.
To open the PSN menu, Menu - In & Out - PSN.
The following is a description of the specific parameters that can be set in the PSN menu:
- Sender IP: Adds the IP of the PSN Source.
- Requested: Set to Yes to request the PSN Source.
- Port: Sets the Port for the PSN Source.
- Mulitcast IP: In case of sending the PSN data to a multicast address, the user has to manually add the multicast IP of the PSN system
- MapX, MapY, MapZ: Maps each axis to a different axis. A drop-down opens to choose the target axis.
- InvX, InvY, InvZ: Inverts the incoming data per axis. Toggles the cell between No (=empty cell) and Yes (= data will be inverted).
- Merge Mode: The merge mode can be selected in a dropdown. For more information, see DMX Port Configuration.
- DMX Priority: The priority is used for merging DMX inputs. For more information, see DMX Port Configuration.
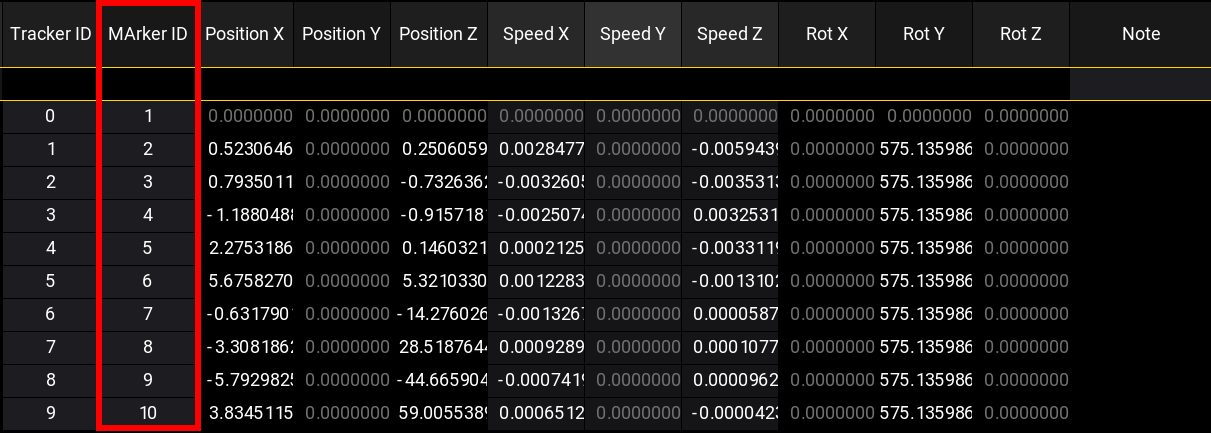
- Tracker ID: Sets the ID of the Tracker.
- MArker ID: Sets the ID of the Marker Fixture.
- Position XYZ: Shows the position of the tracker.
- Speed XYZ: Shows the speed of the tracker.
- Rot XYZ: Shows the speed of the tracker.
|
|
Hint: |
| As soon as an axis is mapped or inverted, the individual trackers display their values according to the settings made by the user. |
|
|
Hint: |
| If the sender is transmitting the data via Unicast to the selected Interface in the PSN
menu, the PSN system automatically detects the data. |
|
|
Hint: |
| The basic Port configuration is 56565 and the standard
Multicast IP is 236.10.10.10. |
Example
Requirements:
- Your external hardware system, such as a tracking system, is set up correctly.
- The grandMA3 console and the external hardware system share the same network.
- The Simple Show demo showfile is loaded.
To connect a tracking system with a grandMA3 device:
- Open the PSN menu.
- Enable Enable Input.
- Tap Insert new System. A new configuration line is created.
- Set Requested to Yes. The connection is set.

To enable XYZ on the fixtures for the follow spot:
- Open Menu - Patch - Fixture Types.
- Tap MAC Encore Performance CLD and then tap Edit. The Fixture Type Editor opens.
- Set the corresponding XYZ configuration line to Yes.
- Close the editor. XYZ is enabled.
To patch MArkers:
- Open the Patch menu.
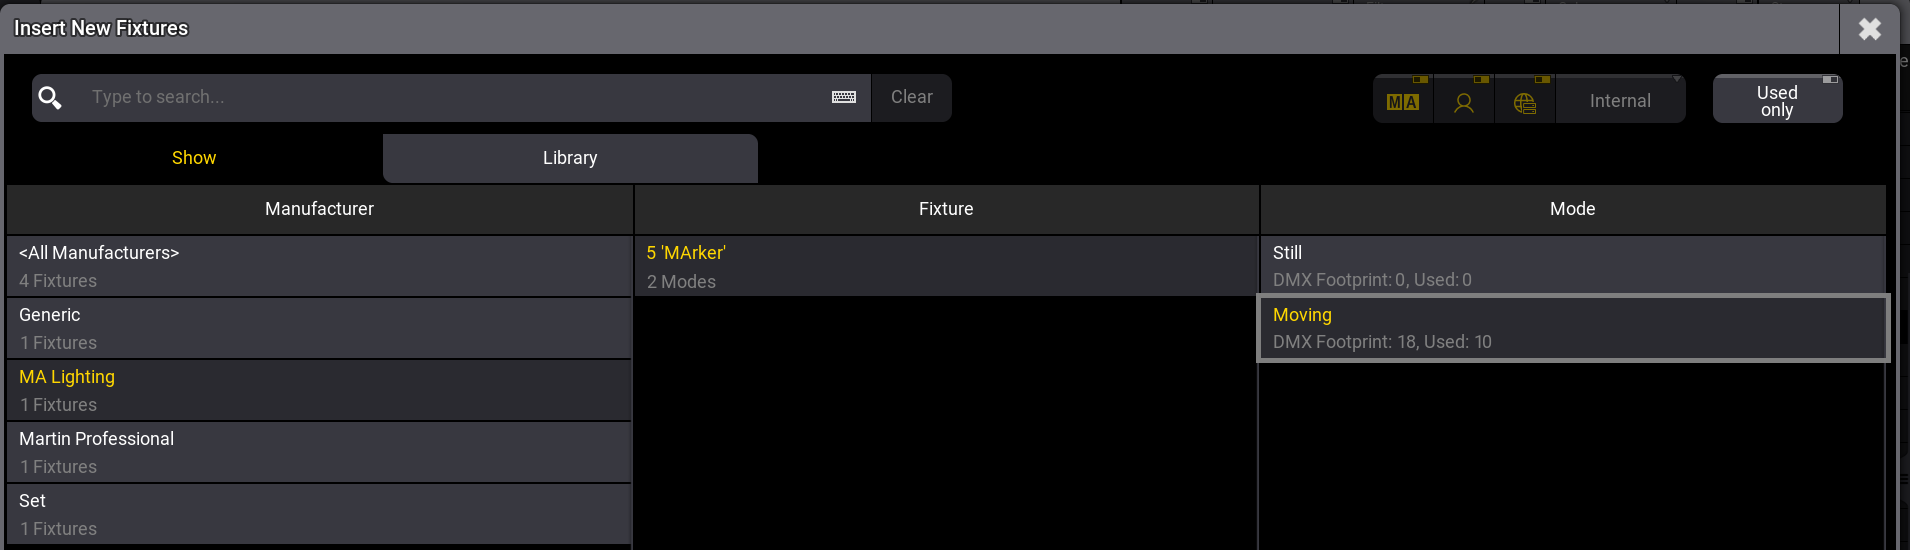
- Tap Insert new Fixture. The fixture library opens.
- Insert 10 MA Lighting MArker Moving fixtures with CID 1 Thru 10.
Patch Menu - MArker Fixtures - Save and Exit the Patch Menu. The MArkers are patched.
|
|
Hint: |
| For more information on MArkers, see the MArker
Fixture topic. |
To allow the fixtures to follow specific markers:
- Open the PSN menu.
- Set the configuration lines for the MArker ID. For example:
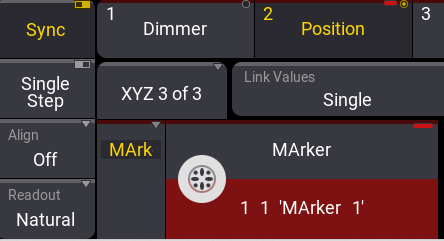
PSN menu - MArker ID - Press Fixture 1 Thru 10 Please. The fixtures are selected.
- Tap Position in the Encoder Bar.
- Tap and hold the Encoder Page.
- Select XYZ 3 of 3.
- Rotate the first Encoder 1 click. The fixtures are following the first Marker 1 1'MArker 1'.