DMX Port Configuration
|
grandMA3 User Manual » DMX In and Out » DMX Port Configuration
|
Version 2.1
|
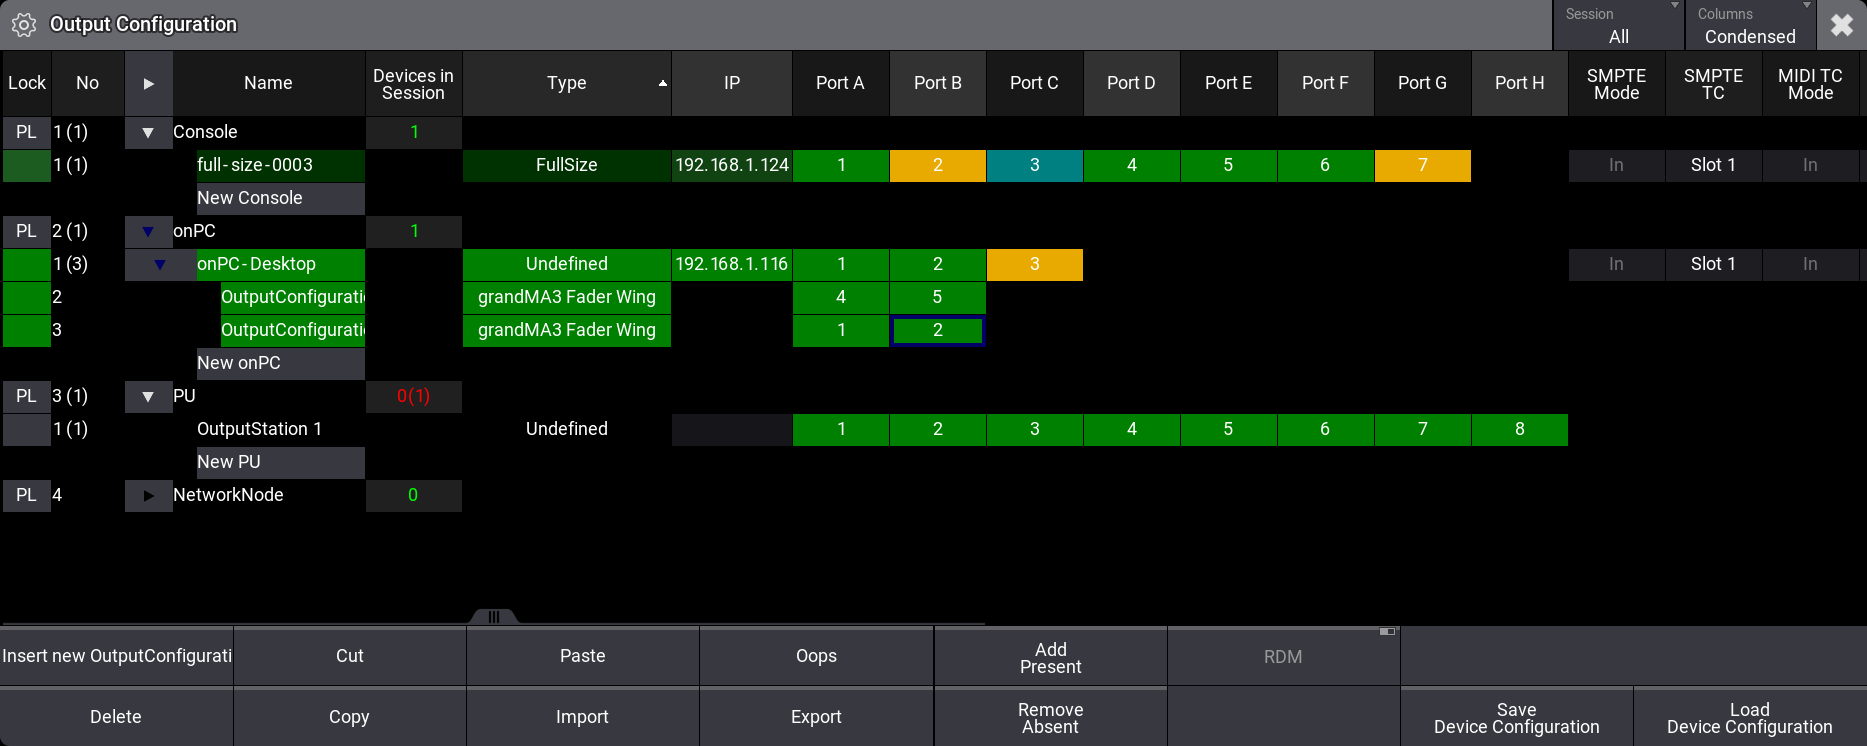
The DMX outputs and inputs are configured in the Output Configuration menu. They are labeled from A and alphabetically upwards.
There are many columns for SMPTE, MIDI, DC, and Ethernet interfaces, but these elements are not described in this topic. Please read about them in the Timecode section, Remote In and Out topic, and Ethernet DMX.
Access the menu by pressing the Menu key and then tap Connector Configuration.
-OR-
Use the command line to open the menu:
|
|
User name[Fixture]>Menu "ConnectorConfig" |
|
|
Hint: |
| See Ethernet DMX for how to send and receive DMX using Ethernet. |
The menu lists grandMA3 devices. There is a button in the title bar called Session. This filters the list to show All devices in the network or only the ones In Session.
The devices are organized in Console, onPC, PU, and NetworkNode sections that can be unfolded to see the devices in each category. Real hardware devices are matched to devices in this list by IP addresses.
There is a Devices in Session column. It shows the number of each device type in session with the current device in green. If a device is missing, the number is red, and the expected number is in parentheses next to the actual number of devices.
The menu has different modes for displaying columns. There is a button in the title bar called Columns. This has three modes:
- Full:
This shows all columns. - Condensed:
This mode condenses the XLR columns to one for each port and displays all other columns. - XLR Only:
This only shows the XLR ports in a condensed version.
|
|
Hint: |
Read the What are Timecode Slots topic to learn about the SMPTE and MIDI settings. Read the DC Remotes topic to learn about the DC Start setting. Read the Ethernet DMX topics to learn about the Art-Net and sACN settings. |
DMX Ports
Each DMX port has four different settings (only visible when in Full mode):
Mode:
Each port can have four different modes:
- Off (gray background color in the cell):
The port is turned Off. - Out (green background color in the cell):
DMX is sent out without RDM traffic. The universe is defined in the XLR field. This is the default mode.
DMX refresh rate is a constant at 30 Hz.DMX refresh rates define how many times a DMX universe is sent per second. Learn more about refresh rates in the DMX In and Out Topic.
- RDM (dark sea green background color in the cell):
DMX is sent out, and RDM is active. The universe is defined in the XLR field.
DMX refresh rate is variable and can change between 1 Hz to 30 Hz.DMX refresh rates define how many times a DMX universe is sent per second. Learn more about refresh rates in the DMX In and Out Topic.
- In (yellow background color in the cell):
DMX is received and merged into the universe specified by the XLR number. The merge uses the priority defined in Prio.
XLR:
This is a number that defines what universe the port relates to. Fixtures can be patched in universes 1 to 1 024.
Merge:
This option is only visible when the port mode is In.
The options are:
- Off:
The incoming DMX is not merged. - Prio:
The priority set in the Prio column is used. The highest priority wins. - HTP:
The highest DMX value is used. - LowTP:
The lowest DMX value is used.
Prio (Priority):
The priority is used for merging DMX inputs. It is only used and can only be edited when the port mode is In, and the merge is set to Prio.
Editing this field opens a small select pop-up with the options.
The options are (from highest priority to lowest):
- Super:
This priority is the LTP priority above any other playbacks and even above the programmer. - Prog:
The Programmer priority is between Super and the other priorities. - Highest:
Highest LTP priority - like LTP but higher than both LTP and High. - High:
High LTP priority - like LTP but a higher priority than normal LTP. - LTP (Latest Takes Precedence):
This is the normal LTP priority. The newest attribute value is prioritized over the old value. - Low:
Low LTP - This is a lower LTP priority. - Lowest:
Lowest LTP - This is a lower priority than both LTP and Low.
|
|
Important: |
| The port configuration is stored in each device where it is set. |
Import and Export of Entire Device Configuration
The device configuration for all the devices in the list can be stored in a single configuration file. This configuration can then be loaded again to restore the settings based on the file. This makes storing and loading configurations for different shows or setups easy.
|
|
Hint: |
| The device configuration file includes the Output Configuration and the DMX Protocol (Ethernet DMX protocols) settings. |
Save Device Configuration
- Make sure the configuration is as desired.
- Tap Save Device Configuration. This opens the Save Device Configuration as: pop-up.
- Type a name for the configuration and ensure the desired drive is selected in the title bar of the pop-up.
- Tap Save.
Load Device Configuration
- Tap Load Device Configuration. This opens the Load DeviceConfiguration from: pop-up.
- Select the desired configuration file.
- Tap Load.
Import and Export of Output Configuration for Single Devices
Each device keeps its own output configuration. The configuration of single devices can be exported to a file and then imported again.
Export an Output Configuration
- Select the devices that need to be exported.
- Tap the Export button -> a file browser opens.
- Select the desired drive.
- Give the file a name and tap enter/please.
A file can contain the configuration for one or multiple devices. It is just a matter of selecting one or several devices before the export.
Import an Output Configuration
- Select the desired devices.
- Tap the Import button -> a file browser opens.
- Select the desired drive.
- Select the files that have a configuration for the selected devices.
Add and Remove Devices
The list of devices is automatically updated with new devices in the network.
Tapping Add Present updates the list with new devices.
Tapping Remove Absent removes devices from the list that are no longer in the network.
Devices can be added without being present in the network. Unfold the desired device type in the list and tap the New [device type] followed by Insert new [device type]. The grandMA3 onPC's can be expanded further by adding up to two grandMA3 Fader Wings to each grandMA3 onPC.
Show Connectors
On the light and full-size consoles, there is a button called Show Connectors. This can be toggled On and shows a connector overlay on the letterbox screens. This indicates where the different connectors are located on the back of the console. The XLR ports are labeled DMX A to DMX G in this overlay.

The overlay can also be toggled using the following command:
|
|
User name[Fixture]>Menu "ConnectorView" |