grandMA3 User Manual Publication
Quick Start
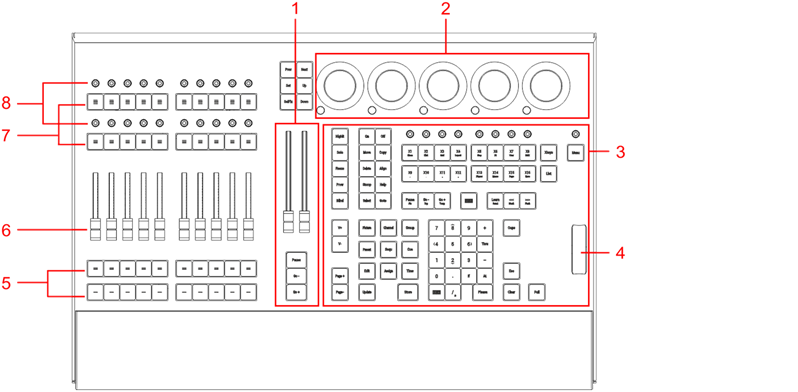
- Master area
- Dual encoder section
- Command area
- Level wheel
- Executor buttons 101-190 + 201-290
- Executor faders 201-290
- Executor buttons 301-390 + 401-490
- Executor knobs 301-390 + 401-490
For more information about executors, see Executor elements.
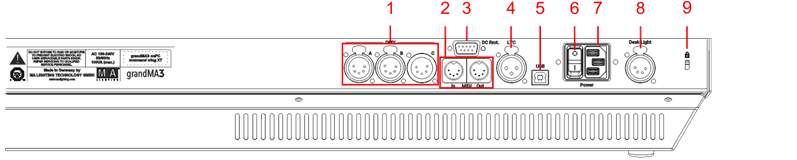
- DMX A, B, C
- MIDI In+Out
- DC Remote Control
- LTC
- USB
- Power switch
- IEC connector
- Desk light
- Kensington lock
Turn on the grandMA3 onPC command wing
- Unpack the device.
- Remove the packaging and cushioning material.
- Place the device indoors on a stable surface.
- Download the grandMA3 onPC software on www.malighting.com
- Install the software on your PC or laptop. For minimum requirements see System Requirements grandMA3 in the grandMA3 user manual.
- Connect the grandMA3 onPC command wing with your PC or laptop using a USB cable.
- Start the grandMA3 console or grandMA3 onPC software.
- Insert the power connector into the corresponding jack.
- Connect the power plug with the mains.
- Turn on the power switch on the rear panel.
The device starts booting.
To turn off the grandMA3 onPC command wing set the power switch to position O.
|
|
Important: -Show data is only saved in the grandMA3 onPC software. -For updates use the grandMA3 onPC software. |
|
|
Important: You can disconnect the grandMA3 onPC command wing using the grandMA3 onPC software. The DMX output will then be interrupted immediately. |
Different Combinations
| Device | Connected To | Parameters |
|---|---|---|
| grandMA3 onPC command wing + | PC/laptop | 4 096 |
| grandMA3 onPC command wing + | PC/laptop + grandMA3 onPC 8/4/2Port Node | 4 096 |
| grandMA3 onPC command wing + | PC/laptop + grandMA3 processing unit M/L/XL | 4 096 |
|
|
Important: Independent of the devices connected to the grandMA3 onPC software, the number of parameters can only reach a maximum of 4 096. |
For more information see: Expand the Amount of Parameters topic.