|
grandMA3 User Manual » Cues and Sequences » Content Sheet
|
Version 2.1
|
The Content Sheet is used to see the fixtures and values stored in cues. It looks much like the Fixture Sheet but has a masking function that only displays what is stored in cues and cue parts. It is like a combined Sequence Sheet in tracking mode and a Fixture Sheet.
Learn more in Fixture Sheet topic.
Learn more in the Sequence Sheet topic.
Learn more in Fixture Sheet topic.
It could look like this:
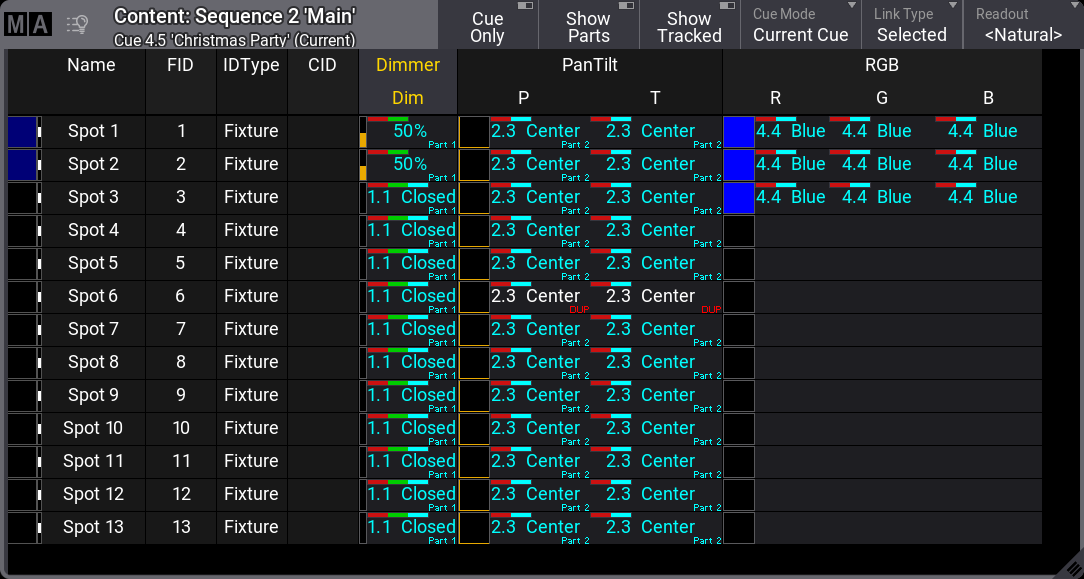
The Title Bar shows the sequence ID and the cue ID of the cue being shown. If a world other than the default Full world is selected, it is also displayed in the title bar (Small World icon with a name and number next to it).
The values displayed in the sheet can be edited directly in the sheet, just like in the Sequence Sheet in Track sheet mode.
The look of the content sheet is very customizable. The content sheet settings control this. Read more about it below.
The example image above shows most of the pan and tilt values with a small note saying "Part 2". This indicates that the values are stored in cue part 2. A red "DUP" in the lower right corner means duplicate data is stored in a different part of the cue.
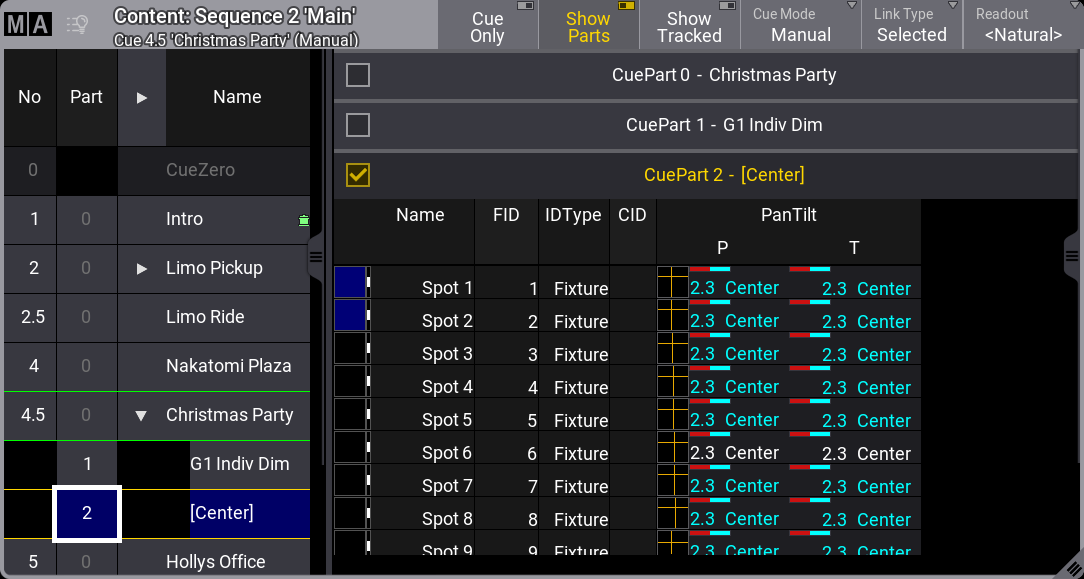
If Show Parts is turned On, the parts are separated into different frames. The same example cue would look like this:

Each frame with a cue part can be toggled On or Off by tapping the checkmark in the frame.
The content sheet can automatically follow the active cue being played back. The setting Cue Mode defines which cue to show in the sheet. Setting the mode to Manual makes it possible to select a specific cue instead of following the active cue. In manual mode, an extra section on the left displays a list of all the cues in the sequence.
The green frame around a cue indicates the active cue being output. The blue background indicates the selected cue being displayed in the content sheet.
Tapping a cue in the list makes it the selected cue.
Tapping the part number in the cue list automatically deselects the other parts if Show Parts is active.
Content Sheet Settings
The content sheet has a lot of settings. They can be accessed by tapping the MA logo in the upper left corner of the sheet.
The settings are divided into two different tabs - Display and Mask.
This is a short description of each of the display settings:
-
Show Parts:
Turning this On separates the cue parts into individual frames. Each frame can be turned On or Off by tapping the upper left corner of each frame. If this setting is Off, the cue parts are combined into one frame showing the cue part number in the lower right corner of each relevant attribute. -
Cue Only:
It defines if the cue only function is On/Off when editing values. -
Fixture Sort:
This On/Off button activates the sorting of fixtures. The fixtures are sorted in the selection order to the top or left hand side of the sheet showing the fixtures. -
Sheet Mode:
The sheet mode changes how the sheets look. There are four different modes:-
Fixture:
This shows a matrix with the fixtures in rows and the attributes in columns.
-
Channel:
This shows the fixtures as tiles with the dimmer attribute.
-
Dimmer+:
Looks similar to the Channel mode. However, it additionally displays the attributes of the selected feature group. Vertical gray separators are displayed when there is a jump in IDs and when the IDType changes for fixtures that do not have a fixture ID. This mode can display the Fixture Graphics, but does not display the Feature Graphics.
-
Sheet/Filter:
Similar to Dimmer+. However, it displays all attributes unless there is a defined filter in the Mask tab of the sheet settings.
-
Fixture:
-
Cue Mode:
Cue Mode has three different options:-
Current Cue:
This will make the sheet display the information related to the current active cue. -
Previous Cue:
This will display the values from the previous cue. This is the last active cue, even if the sequence order is jumped. -
Next Cue:
This displays the values for the next cue if a triggering action is performed on the sequence. If a cue is "Loaded", the loaded cue will be displayed. -
Manual:
This mode allows selecting a specific cue. When this mode is selected, a list of the cues appears on the left side. Tap the desired cue in the list to see the content.
-
Current Cue:
-
Feature Sort:
This On/Off button activates feature sorting. The selected feature is moved before the other features in the sheets showing features. -
Font Size:
This selects the font size in the window. It is a swipe button that opens a list of sizes from 10 to 32. There is also a Default property. The default is the same as size 18. -
Readout:
This selects the value readout for fixture attributes. It is a swipe button that opens a list of readout types with the following options:-
Auto:
This makes the sheet follow the selected readout in the Encoder Bar. -
Natural:
Each attribute has a defined Natural readout. This is defined in the Attribute Definition. Selecting this option will show the different readouts defined for the attributes. -
Percent:
This is a range from 0 to 100. -
PercentFine:
This is a range from 0.00 to 100.00. -
Physical:
This uses the physical range defined in the fixture type definition. -
Decimal8:
This is a decimal range from 0 to 255. -
Decimal16:
This is a decimal range from 0 to 65 535. -
Decimal24:
This is a decimal range from 0 to 16 777 215. -
Hex8:
This is a hexadecimal range from 00 to FF. -
Hex16:
This is a hexadecimal range from 0000 to FFFF. -
Hex24:
This is a hexadecimal range from 000000 to FFFFFF.
-
Auto:
-
#Columns:
This input button sets the number of columns a sheet should display (the settings Transpose and Adjust Columns must be switched On except in the DMX Sheet).The DMX Sheet shows all the DMX channels and their output values. Learn more in the DMX Sheet topic.
-
Layer Toolbar:
This On/Off button shows or hides a layer toolbar at the bottom with the different Layers. -
Fixture Appearance:
This defines how the appearance of the fixtures is shown in the sheets. There are three options:-
None:
The fixture appearance is not shown. -
Enabled:
The appearance of the fixture type is shown. -
Graphic:
The appearance is shown with a colored background to match the output.
-
None:
-
Preset:
This defines how the preset information is displayed in the sheets. There are six properties which are different combinations of these three elements:-
ID:
Shows the ID number of the preset. -
Name:
Shows the name of the preset. -
Value:
Shows the values stored in the preset.
-
ID:
-
Color Mode:
This switches the color readout between RGB and CMY. The default value is to follow the setting in the User Profile. The user profile setting is shown between "<>". -
Time Format:
This defines the time format for the windows. This can be used to select a different format than the default set in the user profile. -
Fixture Graphics:
This defines which graphics are displayed in front of the name column in sheets showing the fixture graphic. Resizing the name column to a very small size will hide the graphic.
This setting has the following options:-
None:
No graphic is shown. -
Flip:
Adds the flip indicator for fixtures with position attributes on the left side of the Name column. -
Simple:
Adds a simple square graphic indicating combined color and dimmer values next to the flip indicator in the Name column. -
Gobo:
Adds a gobo image on the simple graphic. It only displays the gobo of one gobo wheel at a time. Gobo wheels in ascending order define which gobo is displayed. For example, when Gobo 1 is set to open, then the gobo of Gobo 2 is displayed.
-
None:
-
Fixture Select:
When this is On, fixtures can be selected by tapping the name or ID in the sheet. -
Show Tracked:
This On/Off setting shows or hides all the values tracked from previous cues. Turning it Off hides the tracked values and only shows the values stored in the cue. -
Frame Readout:
This defines the frame readout for this window. It can be used to overwrite the default set in the user profile. -
Feature Graphic:
Shows or hides a small graphic next to each feature in the sheets showing the features. -
Channel Set:
This setting defines the readout of values that are part of channel sets. It has three options:-
Value:
Displays only the value. -
Value + Name:
Displays the value and channel set name. -
Name:
Displays only the channel set name.
-
Value:
-
Merge Cells:
Cells can be merged to show a value only once if the adjacent cell has the same value and belongs to the same feature or feature group. For instance, if all red, green, and blue values are "100", then "100" are only shown once.-
None:
Cells are not merged. -
Feature:
The values of a feature are merged to only be shown once if the two or more adjacent values are the same. -
Feature Group:
The values of a feature group are merged to only be shown once if the two or more adjacent values are the same.
-
None:
-
Link Type:
This setting defines which sequence is shown in the sheet.
There are three different link types. The options are:-
Fixed:
The sheet displays the information from a specific sequence. The selection is made in the Sheet Settings. Read about the Fixed Target setting above. It can also be set using the Assign and Sequence keywords and tapping the sheet's title bar. -
Selected:
The sheet displays information from the selected sequence. -
LastGo:
This automatically shows the latest sequence to receive one of the trigger commands (<<<, >>>, Go+, Go-, Goto, Load, On, Select, Top, Temp, Flash, Toggle On, Pause). This includes if the sequence is triggered from a running timecode recording. A sequence can be excluded from LastGo by turning Off the Include Link Last Go setting in the Sequence Settings. LastGo only shows sequences triggered by the same user profile.
-
Fixed:
-
Fixed Target:
This setting defines the sequence a sheet displays if the Link Type is Fixed. Tapping this setting opens an Assignment Editor pop-up where a sequence can be selected.
This is a short description of each of the mask settings:
-
Fixture:
This On/Off button defines whether fixtures using the Fixture ID Type are shown or hidden in the sheet. -
Channel:
This On/Off button defines whether fixtures using the Channel ID Type are shown or hidden in the sheet. -
Universal:
This On/Off button defines whether fixtures using the Universal ID Type are shown or hidden in the sheet. -
MArker:
This On/Off button defines whether fixtures using the MArker ID Type are shown or hidden in the sheet. -
Houselights:
This On/Off button defines whether fixtures using the Houselights ID Type are shown or hidden in the sheet. This is the default name for this ID type, it can be changed in the Patch. -
NonDim:
This On/Off button defines whether fixtures using the NonDim ID Type are shown or hidden in the sheet. This is the default name for this ID type, it can be changed in the Patch. -
Media:
This On/Off button defines whether fixtures using the Media ID Type are shown or hidden in the sheet. This is the default name for this ID type, it can be changed in the Patch. - Fog:
This On/Off button defines whether fixtures using the Fog ID Type are shown or hidden in the sheet. This is the default name for this ID type, it can be changed in the Patch. -
Effect:
This On/Off button defines whether fixtures using the Effect ID Type are shown or hidden in the sheet. This is the default name for this ID type, it can be changed in the Patch. -
Pyro:
This On/Off button defines whether fixtures using the Pyro ID Type are shown or hidden in the sheet. This is the default name for this ID type, it can be changed in the Patch. -
Show Recipes:
This On/Off button shows or hides the cue recipes at the bottom of the sheet. Read more about it in the Cue Recipes topic. -
Show Notes:
This On/Off button shows or hides the notes for the selected cue at the bottom of the sheet. Read more about it in the Notes topic. -
Show ID Type:
It shows the ID Type of the fixtures on the sheet. This setting is only relevant when the Sheet Mode is different than Fixture. -
Show Name Field:
It shows the name of the fixtures on the sheet. This setting is only relevant when the Sheet Mode is different than Fixture.