|
grandMA3 User Manual » Cues and Sequences » Sequence Sheet
|
Version 2.1
|
The different sequences are best seen in the Sequence Pool.
The best way to see the cues inside a sequence is the Sequence Sheet:
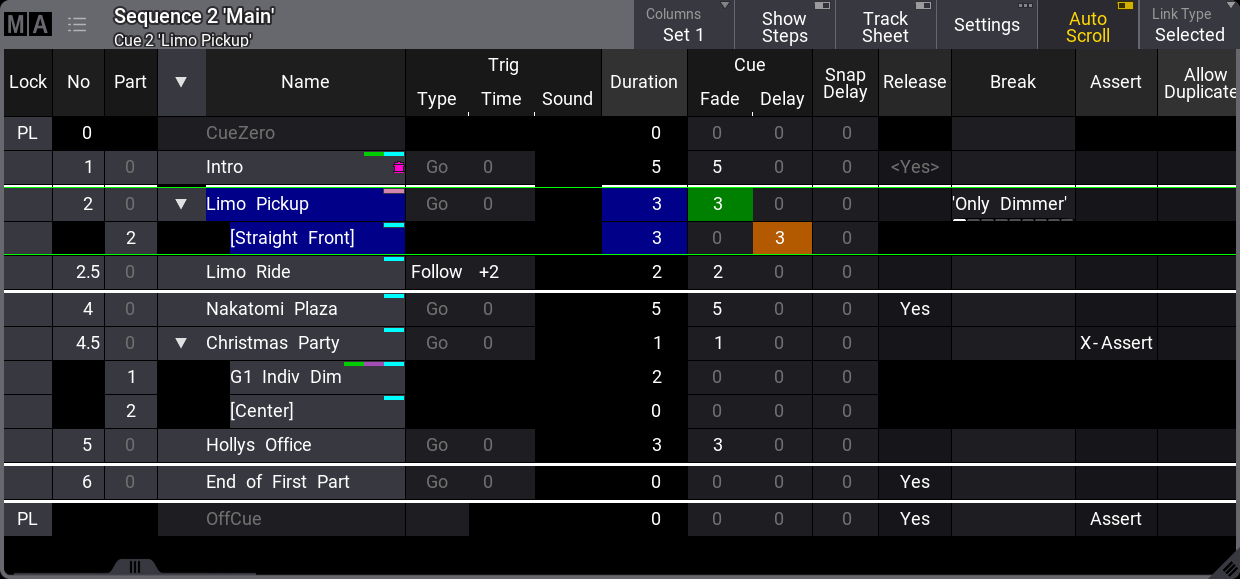
The sheet shows the cues and cue parts in rows. The different cue settings are in columns. Read below for a description of the different columns.
The purpose of this sheet is to see the cues in a sequence. It also shows the active cue with a green frame. Cue fades, and delays are visualized with moving bars while the fades are running.
The sheet can be created as a window in a view using the Add Window pop-up, or displayed as a temporary pop-up by editing a sequence pool object.
The sheet can show a lot of different markers and colors - read more about all these in the Markers topic.
The sheet can display a value tracking section. In this section, all the stored attribute values are displayed. This can be a very handy tool for seeing the flow of an attribute through the cues. These values can also be edited directly in the sheet.
Most other fields in the sheet can be edited directly. This can affect the look of the show. For instance, the cue fade and delay times are stored when the cue is created. The default timing is used if nothing else is defined. The cue timing can be edited in this sheet.
Tapping this sheet to give it focus changes the encoder toolbar to make it easy to edit the cue timings. Read more about the toolbar below.
When a trigger type is set for the OffCue of a sequence, Wrap Around will be disabled. Enabling Wrap Around for a sequence removes the trigger type for the OffCue.
Title Bar
The left side of the title bar has the MA logo. Tap this to open the settings for the sheet. Read about them below.
Next to the logo are the sequence number and name. Information about the active world (if different than world 1) is displayed below the Sequence number and name. Next to the world information is the number and name of the currently active cue.
Some buttons can be on the right side of the title bar. This can be defined by editing the title bar in the window settings. Learn more in the Title Bar Configuration topic.
Main Part of the Sheet
The main part of the sheet is below the title bar. Here is the sheet with rows and columns.
A sequence sheet setting defines how the cue timing is displayed in the sheet. The option is called Condensed Timing. The cue fade and delay are actually four different times because there are both fade and delay for values fading in (or up) and for dimmer values fading down. The condensed view shows this in two columns where the time can be separated by a slash (/). The value on the left is the InFade. the value on the right is the OutFade. The list below shows the uncondensed timing columns. Read more in the Cue Timing topic.
The order of the columns and which columns are visible can be changed and stored in Columns sets. It can also be edited dynamically. Learn more in the Adjustable Columns topic.
This is a short description of each of the possible columns in the sheet:
-
Lock:
Editing this cell adds or removes "UL". This means User Locked and protects the cue content and settings from being changed. -
No:
This is the cue number. -
Part:
This shows the cue part number. -
Name:
This is the cue (part) name. If the cue contains part cues, an arrow allows them to fold and unfold the parts. In the example above, there are cue parts in cues 2 and 4.5. It is unfolded so the parts can be seen. -
Trig Type:
There are five different trigger types. Editing this cell opens a small select pop-up with the five different options:-
Go:
The cue needs a valid command (Go+, Goto, Go-, >>>, <<<, Kill) to be triggered. -
Time:
The cue is triggered a set time after the previous cue is triggered. The time is set in the Trig Time column. -
Follow:
A follow cue is triggered when the previous cue is completely done with the cue transition (which includes all individual timing). -
Sound:
This will trigger the cue using a sound as the trigger. Choosing one of 22 different frequency areas in the Trig Sound column is possible. Learn more about sound input in the Sound Window topic. -
BPM:
This will trigger the cue using the beats in the sound input. This can become useful with several cues triggered by the BPM (beats per minute).
-
Go:
-
Trig Time:
The values stored here are only used if the trigger is Time.
If the trigger is Time, then the time in the cell will be used. The time starts counting down when the previous cue is triggered. If the previous cue uses a "Follow" trigger, then the cue's countdown is started when the follow cue is triggered.
-
Trig Sound:
This setting defines the sound used to trigger the cue when the Trig Type is sound. -
Duration:
This is the overall cue time transition time. It is a combination of the longest fade time and any delays. This is the time used with the Follow trigger. The cell cannot be edited. It always shows the complete transition time. -
CueIn Fade:
This is the fade time for all non-snap attributes and dimmer values that increase in value. -
CueIn Delay:
This is the delay or wait time between the trigger and the actual cue in fade begins. -
CueOut Fade:
This is the fade time for dimmer values that go down in value. The default values for this are the same as the CueIn Fade time - it is linked to the cue in fade with the None value. -
CueOut Delay:
This is the delay for the Out Fade (only dimmer values). Its default value is the same as the CueIn Delay value. -
Snap Delay:
This can be used to control when "snap" attributes change values. -
Release:
Changing the value to Yes in this cell makes the cue release tracked values. Learn more in the What is Tracking topic. -
Break:
A break blocks new values of attributes being tracked. Editing the cell opens an Assignment Editor pop-up where a filter or world can be selected. The selected filter or world defines what is blocked by the break. Learn more in the Break topic. -
Assert:
Assert can be used to make tracked values take precedence as if they are stored values in the cue. There are three options:-
None:
Tracked values are not asserted
-
Assert:
The tracked values take precedence as if they are stored values in the cue. Values are asserted using the timing from the cue where the values are originally stored. -
X-Assert:
Like assert, but the tracked values are asserted using the timing from the cue where the X-Assert is set.
-
None:
-
Allow Duplicates:
If several parts of the same cue are to contain values for the same attributes, use Allow Duplicates to enable this function. Absolute and relative values in multiple parts will use the value with the highest cue part number. -
Tracking Distance:
The tracking distance sets how many cues a value should track. If the cell is empty, it tracks until changed. Read more about tracking distance in the What is Tracking topic. -
Sync:
Synchronizes the fixtures of the phaser. For example, if fixtures join the already running phaser, they will be synchronized with the fixtures already running. Learn more about sync in the Phaser topic. -
Morph:
If the property is enabled and the phase of the fixtures changes from one cue to the next, they will stay on track and morph into their new phase value. If the option is disabled, the fixtures will take the direct way to their new position in the phase. -
Transition:
This can be used to select a transition path for the fade. The different options are described in the Cue Timing topic. -
"Preset type" Fade:
Each preset type has columns called the name of the preset type followed by "Fade". This uses the cue in fade as a default. It can be changed to give all values in the preset type a different fade time. All fixtures with new values in this preset type will use this timing for the attributes in the preset type. -
"Preset type" Delay:
Each preset type has columns called the name of the preset type followed by "Delay". This uses the cue in delay as a default. It can be changed to give all values in the preset type a different delay time. All fixtures with new values in this preset type will use this timing. -
Command:
Commands (like the ones written in the command line input) can be written in the cues. When the cue is triggered, they are executed on the GlobalMaster, IdleMaster, or Standalone station if Command Enabled allows it. Editing the cell opens the Command Editor. Learn more about this editor in the Create Macros topic. -
Command Enabled:
This can be toggled Yes or No if there is a command. If exclamation marks surround the option, then the sequence settings overwrite the setting. The overwritten option can be seen in the header of the column. -
Command Delay:
This will add a delay between the triggering of the cue and the execution of the command. See Command just above. -
Note:
This is a multiline text field where a note can be added to the cue. Learn more in the Notes topic. -
MIB Preference:
This defines whether the cue is good for the MIB function. Read more in the Move In Black topic. -
MIB Mode:
This sets the MIB mode. This can only be edited if MIB is possible. Read more in the Move In Black topic. -
MIB Target:
Defines a cue where the MIB should be performed if possible. This can only be edited if MIB is possible. Read more in the Move In Black topic. -
MIB MultiStep:
Defines what should happen with phasers in the MIB. This can only be edited if MIB is possible. Read more in the Move In Black topic. -
MIB Fade:
Sets the MIb fade time. This can only be edited if MIB is possible. Read more in the Move In Black topic. -
MIB Delay:
Sets the MIB delay time. This can only be edited if MIB is possible. Read more in the Move In Black topic. -
Indiv Fade:
This is "Individual Fade". It displays the time for attributes that have individual stored fade times. This cell cannot be edited. -
Indiv Delay:
This is "Individual Delay". It displays the time for attributes that have individual stored delay times. This cell cannot be edited. -
Indiv Duration:
This is "Individual Duration". It displays the overall time for attributes that have individual stored fade and delay times. This cell cannot be edited. -
Speed Master:
A Speed Master can be assigned to the cue or cue part by editing this cell. The speed of the cue or cue part is only controlled by the assigned speed master. A speed master assigned to the sequence has a lower priority and does not influence a cue or cue part with a different assigned speed master. -
Speed Scale:
This can be used to scale the speed of the cue or cue part. A speed scale assigned to a cue or cue part has a higher priority than a speed scale assigned to the sequence. -
Appearance:
An Appearance can be assigned to the cue or cue part. It is connected with a sequence sheet setting called CuePart Appearance, which defines how the appearance is displayed. Read more below.
All cells with a light or dark gray background color can be edited, and the field's value can be changed. Fields with a black background cannot be edited.
Track Sheet Mode
The sequence sheet can be in Track Sheet mode. This can be changed in the window settings - and the setting can be a button in the title bar.

This mode can use a different selection in the Columns setting in the sheet settings. The example image above also has the Columns setting in the title bar.
The track mode shows attribute data in columns on the right side of the sheet.
The attribute values and markers have different colors, indicating different statuses, like the tracking status. Read about the colors and markers in the Colors topics. Read about tracking in the What is Tracking topic.
The values can be edited in the sheet. The Cue Only setting can be activated in the settings, and it can be a button in the title bar that appears when Track Sheet is On. This makes edited values follow the cue only rules.
When cues with multiple parts are expanded to show all the parts, it is easy to see exactly what parts have stored which values. When the cues are collapsed to show only one row, the values from the parts are shown in this row with a small text in the lower right corner telling what part the values come from.
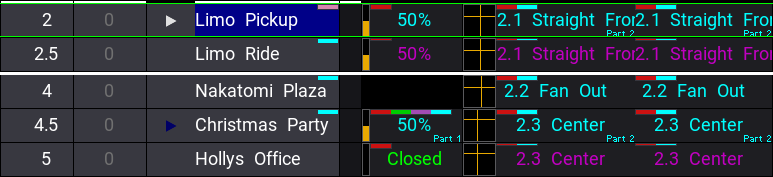
This example is the same cue 2 and 4.5 as the image above. The only difference is that the cue is collapsed to show only one row. Notice the small text showing that the pan and tilt values are from part 2 and in cue 4.5 the dimmer is from part 1.
The Layer Toolbar can be turned On in the settings. This can be useful when there is a desire to edit or look at values in other layers.
Editing a value opens the Calculator, where a new value can be selected from Presets, Channel Sets, Specials, or simply typed.
The calculator has some special functions in the track sheet that define what is changed, and there are special buttons that give access to block, unblock, and extract presets.
Extract presets will remove the link to a preset and store the current preset values directly in the cue.
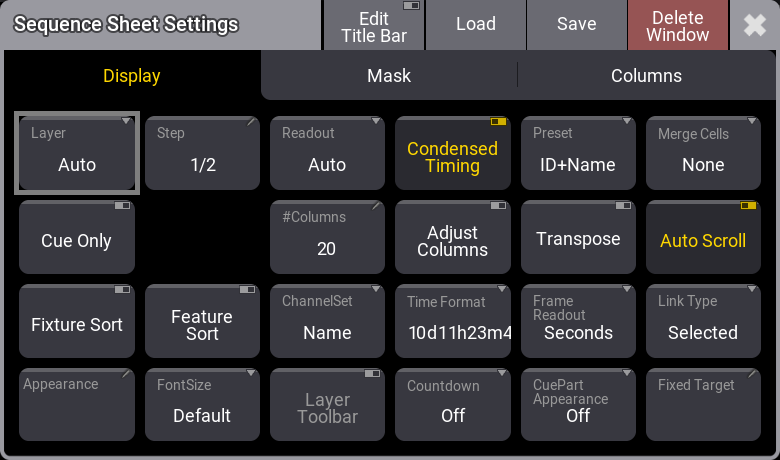
Sequence Sheet Settings
The sheets have a lot of settings. They are accessed by tapping the MA logo in the upper left corner of the window.
Some of them are general settings that are shared with other windows. Read about them in the Window Settings topic.
The settings have three tabs: Display, Mask, and Columns.
This is a short description of the display settings in the sequence sheet.
-
Layer:
It selects which layer is displayed in the window. It is a swipe button that opens a list of the layers. A special property is Auto. This property makes the window follow the selected layer in the Encoder Bar. - Cue Only:
It defines if the cue only function is On/Off when editing values. - Fixture Sort:
This On/Off button activates the sorting of fixtures. The fixtures are sorted in the selection order to the top or left hand side of the sheet showing the fixtures. - Appearance:
Tapping this button opens a Select Appearance pop-up that lists all the defined appearances and the possibility of creating a new appearance. Selecting one will apply that appearance to the window. - Step:
It selects which step to display. Steps are used with Phasers. It is a property input button that opens a calculator pop-up. - Settings:
This is only visible when editing the Title Bar. This setting determines whether there is a Settings button in the title bar or if it is hidden.
The actual Settings button can be tapped to open the settings for the object. For instance, tapping the Settings button in the title bar of the sequence sheet opens the settings for the sequence. - Feature Sort:
This On/Off button activates feature sorting. The selected feature is moved before the other features in the sheets showing features. - Font Size:
This selects the font size in the window. It is a swipe button that opens a list of sizes from 10 to 32. There is also a Default property. The default is the same as size 18. - Readout:
This selects the value readout for fixture attributes. It is a swipe button that opens a list of readout types with the following options:-
Auto:
This makes the sheet follow the selected readout in the Encoder Bar. -
Natural:
Each attribute has a defined Natural readout. This is defined in the Attribute Definition. Selecting this option will show the different readouts defined for the attributes. -
Percent:
This is a range from 0 to 100. -
PercentFine:
This is a range from 0.00 to 100.00. -
Physical:
This uses the physical range defined in the fixture type definition. -
Decimal8:
This is a decimal range from 0 to 255. -
Decimal16:
This is a decimal range from 0 to 65 535. -
Decimal24:
This is a decimal range from 0 to 16 777 215. -
Hex8:
This is a hexadecimal range from 00 to FF. -
Hex16:
This is a hexadecimal range from 0000 to FFFF. -
Hex24:
This is a hexadecimal range from 000000 to FFFFFF.
-
Auto:
- #Columns:
This input button sets the number of columns a sheet should display (the settings Transpose and Adjust Columns must be switched On except in the DMX Sheet).The DMX Sheet shows all the DMX channels and their output values. Learn more in the DMX Sheet topic.
- ChannelSet:
This setting defines the readout of values that are part of channel sets. It has three options:-
Value:
Displays only the value. -
Value + Name:
Displays the value and channel set name. -
Name:
Displays only the channel set name.
-
Value:
- Layer Toolbar:
This On/Off button shows or hides a layer toolbar at the bottom with the different Layers. - Condensed Timing:
This toggles if the cue timing columns are displayed condensed or if all four cue timing columns are visible. - Adjust Columns:
This On/Off button makes a sheet adjust the column width to match the window size and the number of columns. - Time Format:
This defines the time format for the windows. This can be used to select a different format than the default set in the user profile. - Countdown:
A cue timing countdown can be displayed while the fade is running. This setting has three options:-
Off:
There is no countdown in any of the timing columns. They always display the set times. -
Duration:
The duration column displays a countdown while the cue transition is running. -
All:
The duration and cue timing columns display a countdown while the cue transition is running.
-
Off:
- Preset:
This defines how the preset information is displayed in the sheets. There are six properties which are different combinations of these three elements:-
ID:
Shows the ID number of the preset. -
Name:
Shows the name of the preset. -
Value:
Shows the values stored in the preset.
-
ID:
- Transpose:
This On/Off button flips the columns and rows in windows. - Frame Readout:
This defines the frame readout for this window. It can be used to overwrite the default set in the user profile. - CuePart Appearance:
This defines how the cue part appearance is displayed in the sheet. The options are:-
Off:
Cue part appearance is not displayed. -
Number:
The appearance is only shown on the cue number column. -
Num+Name:
The appearance is displayed in the number and name columns. -
All:
The appearance is displayed on all columns.
-
Off:
- Merge Cells:
Cells can be merged to show a value only once if the adjacent cell has the same value and belongs to the same feature or feature group. For instance, if all red, green, and blue values are "100", then "100" are only shown once.-
None:
Cells are not merged. -
Feature:
The values of a feature are merged to only be shown once if the two or more adjacent values are the same. -
Feature Group:
The values of a feature group are merged to only be shown once if the two or more adjacent values are the same.
-
None:
- Auto Scroll:
This On/Off button activates the auto-scrolling function. This will keep the active object visible in the window by scrolling the sheet or grid. - Link Type:
This setting defines which sequence is shown in the sheet.
There are three different link types. The options are:-
Fixed:
The sheet displays the information from a specific sequence. The selection is made in the Sheet Settings. Read about the Fixed Target setting above. It can also be set using the Assign and Sequence keywords and tapping the sheet's title bar. -
Selected:
The sheet displays information from the selected sequence. -
LastGo:
This automatically shows the latest sequence to receive one of the trigger commands (<<<, >>>, Go+, Go-, Goto, Load, On, Select, Top, Temp, Flash, Toggle On, Pause). This includes if the sequence is triggered from a running timecode recording. A sequence can be excluded from LastGo by turning Off the Include Link Last Go setting in the Sequence Settings. LastGo only shows sequences triggered by the same user profile.
-
Fixed:
- Fixed Target:
This setting defines the sequence a sheet displays if the Link Type is Fixed. Tapping this setting opens an Assignment Editor pop-up where a sequence can be selected.
The mask settings for the sequence sheets are:
-
Color Mode:
This switches the color readout between RGB and CMY. The default value is to follow the setting in the User Profile. The user profile setting is shown between "<>". - Feature Graphic:
Shows or hides a small graphic next to each feature in the sheets showing the features. - Filter:
An existing filter can be chosen to filter the content of the window. -
Filter Toolbar:
This setting shows or hides a filter toolbar that can be used to filter the content of the sheet. - Line Height:
This defines the line height for the rows in the sheet. Valid options range from 1 to 12. There is also an Auto option, which selects the smallest height possible to show the content. -
Selection Only:
This On/Off button is a mask function that hides fixtures not currently selected in the programmer. This is valid when the Track Sheet mode is On. -
Show Command Test:
This makes it possible to test a command stored in a cue without activating the cue. Toggling this setting On will display a play icon ( ) in the command cells that contain commands. Tapping the play icon executes the command of the cue.
-
Show Notes:
This On/Off button shows or hides the notes for the selected cue at the bottom of the sheet. Read more about it in the Notes topic. - Show Recipes:
This On/Off button shows or hides the cue recipes at the bottom of the sheet. Read more about it in the Cue Recipes topic. - Show Steps:
This On/Off button shows or hides the cue steps in the sheet. This is useful in a sequence sheet with Track Sheet On. - Track Sheet:
This On/Off button shows or hides the values and tracking information for each attribute in the sheet.
Sequence Edit Toolbar
The encoder toolbar changes when the sequence sheet has focus. The sheet can get focus by tapping the sheet.

There are several pages with many different settings for the cues. The pages can be changed using the swipe button in the upper left corner of the toolbar (see the image above).
The top row in the toolbar gives access to select a cue. There are also playback controls that can be used to run cues. Read more in the Play Back Cues topic.
Turning the two rings on the encoders changes the respective values for the selected cue in the sheet.
The lower row is the outer ring of the dual encoder. The middle row is the inner ring of the dual encoders.