|
grandMA3 User Manual » Timecode » Time Ranges and Events
|
Version 2.1
|
Time Ranges
Time ranges, and markers are defined regions drawn on the timeline. They can be labeled, and they can get appearances assigned. A marker is created on the timeline section of a track group and will be applied downward to all the tracks in the track group. A time range is created on the timeline section of a track, and it is track-specific.
Time ranges and markers are tools for better navigation and visualization of the timecode show. They do not affect timecode playback or recording.
When a track is added, a new time range is created for that track, and the duration is set to the total length of the timecode show. To set the duration of the timecode show, see Timecode settings.
Events
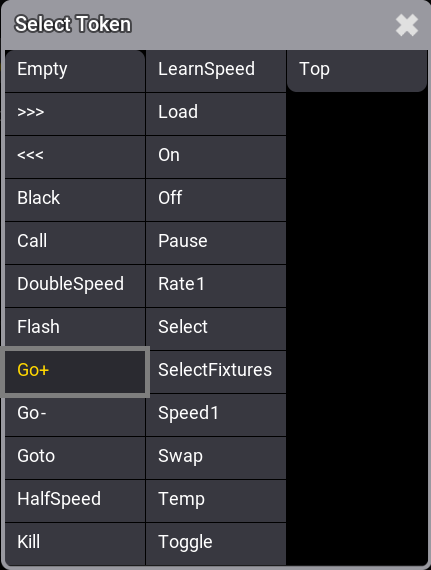
Events are tags positioned on the timeline that can get Tokens assigned.
Tokens can be assigned from the text display of the timecode view or with the event encoder in the encoder bar. For more information, see Toggle view mode.
The assigned tag is executed when the cursor (green timeline) reaches an event.
Edit Time Ranges and Events
Events and time ranges can be selected, added, deleted, moved, resized, and more using the toolbar.
To enable the timecode toolbar, tap Setup in the title bar.
The toolbar is displayed on the left side of the timecode view, and the encoder bar is switched to the timecode encoder bar.
|
|
Hint: |
| Press and hold any tool icon in the toolbar to display a short description in the command line. |
|
|
Hint: |
| Some toolbar buttons will be enabled depending on the commands you will execute. |
You must first define the target to edit time ranges or events using the toolbar. To do so, tap and hold Selection Target in the title bar. This will open the Selection Target Type pop-up. Then, select Time Ranges or Events.
Tap ![]() and then tap a time range or an event in the timeline. The selected event is displayed in yellow, and the selected time range as a yellow frame.
and then tap a time range or an event in the timeline. The selected event is displayed in yellow, and the selected time range as a yellow frame.
|
|
Hint: |
| - It is possible to select multiple events or time ranges using the lasso selection method. - A random selection can be performed by holding down the keyboard's Ctrl key and tapping the desired events or time ranges. |
To add an event to a track, tap ![]() then tap in the timeline where you want to add the event.
then tap in the timeline where you want to add the event.
To add a time range, tap ![]() , then do one of the following:
, then do one of the following:
- Tap in the timeline where you want to add the time range. A one-frame Marker is created when tapping in a TrackGroup section of the timeline. When tapping in a Track section of the timeline, a Time Range is created from this point to the end of the timecode show.
- Tap in the timeline where you want the time range to start, hold and drag your finger until you reach the desired length, and then release your finger.
|
|
Hint: |
| Events and time ranges can be adjusted in detail and accuracy using the dual encoders. For more information, see Edit a timecode show. |
Delete an event or a time range by tapping ![]() , then tap the event or time range you want to delete.
, then tap the event or time range you want to delete.
To move an event or a time range, tap ![]() , then tap-hold and drag your selection along the timeline.
, then tap-hold and drag your selection along the timeline.
Tap ![]() , then tap-hold, and drag your finger anywhere on a time range to resize it. Drag to the left to reduce the time range duration or to the right to increase it. This tool is enabled when Time Ranges is the selected target.
, then tap-hold, and drag your finger anywhere on a time range to resize it. Drag to the left to reduce the time range duration or to the right to increase it. This tool is enabled when Time Ranges is the selected target.
Events and time ranges can be ![]() (cut),
(cut), ![]() (copied), and
(copied), and ![]() (pasted).
(pasted).
- Tap
 , then tap the event or time range you want to cut or copy.
 - Position the cursor in the timeline where you wish to paste your selection.
- Select the track where you want to paste your selection.
- Tap
 , or
, or  then, tap
  . The selection is cut or copied to the desired track at the cursor position.
|
|
Hint: |
| Events can only be pasted to tracks. Time ranges can be cut or copied from tracks to track groups. |
Tap ![]() to add an event at the cursor position. This tool is handy for adding events while recording.
to add an event at the cursor position. This tool is handy for adding events while recording.
- Select Events as the target.
- Select the track you want to add events to.
- An event is added each time you tap
 .
.
Tap ![]() to add multiple events at the cursor position.
to add multiple events at the cursor position.
- From the title bar, select Events as the target.
- Select the track you want to add events to.
- Position the cursor in the timeline where you want to add multiple events.
- Tap
 , the Add multiple events pop-up opens.
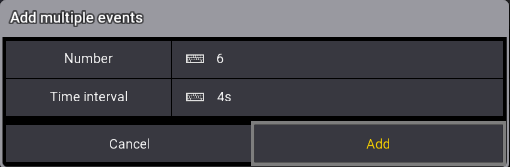
- Enter the number of events you want to add and specify the time interval between them.
The events are added.
To add a marker at the cursor position, tap ![]() .
.
- From the title bar, select TimeRanges as the target.
- Select the track group where you want to add the marker.
- Position the cursor in the timeline.
- Tap
 , the virtual keyboard opens.
 - Enter a name for the new marker and press Please or tap Enter.
- The new Marker is added.
To quickly add a marker at the cursor position, tap +M. This tool is handy for adding markers while recording.
- From the title bar, select TimeRanges as the target.
- Select the track group where you want to add the marker.
- A marker is added every time you tap +M.