|
grandMA3 User Manual » Timecode » Timecode Settings
|
Version 2.1
|
There are two different settings in a timecode:
- Window settings
- Timecode show settings
Open a timecode window. For more information, see Add windows. You can find the Timecode Viewer under the Tools tab.
Open the timecode window settings by tapping the MA logo on the title bar.
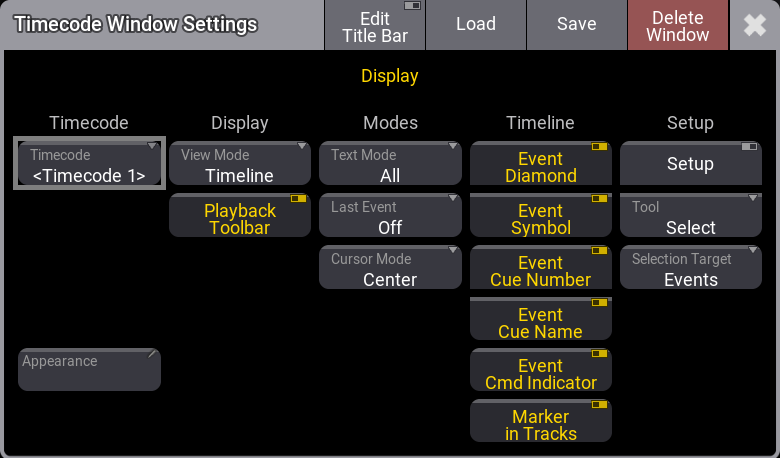
Timecode Window Settings
The timecode shows are stored in the timecode pool. For more information, see Record a Timecode Show.
Timecode:
Tap and hold your finger to open the drop-down menu, then select the timecode show to be displayed. Selecting <Link Selected> will display the selected timecode show from the timecode pool. When Several Timecode Viewer windows are set using <Link Selected> they are Linked together. This is useful, for example, to display the Timeline view mode in one window and the Text view mode in another. Tools, Selection Target, text Mode, and more can be set individually for each window. For more information, see View Mode.
|
|
Important: |
When several Timecode Viewer windows display the same timecode show, but it is not the selected timecode show, they are not linked together. |
Appearance:
Assign an appearance to the timecode window. For more information, see Appearances.
View Mode: Tap and hold to open the Select ViewMode drop-down list, then change the timecode window
view to Text, Timeline, or Both. For more information, see Toggle View
Mode.
Playback Toolbar: Enables the toolbar to navigate the timeline and playback or record the selected
timecode show.
Text Mode: When View Mode is set to Both or Text, tap and hold to open the Select TextMode
drop-down list, then change the text mode to All, Tracks, Selected, or Markers to
filter the text display.
Last Event: Defines if the last played-back event in the timecode show is selected:
- Off: The last played-back event will not be selected.
- Track: The last event played back in the selected track will be selected.
- All: Select the last played-back event, no matter which track.
- Cursor Mode: When the stopwatch is enabled in the title bar, the cursor stays visible when the timecode runs:
- Center: When an external signal is coming in or generated by the console, the cursor (green timeline) moves until it reaches the middle of the visible area of the timeline. The timeline starts moving to keep the cursor centered on the display. This is the default setting.
- Page: When an external signal is coming in or generated by the console, the cursor (green timeline) moves until it reaches the end of the visible part of the timeline. Then, a new section of the timeline is displayed. The cursor moves from the beginning to the end of that new section, repeating until the timecode is stopped.
- Event Diamond, Event Symbol, Event Cue Number, and Event Cue Name: Toggle on to display event diamonds, event symbols, event cue numbers, and event cue names on the timeline.
- Marker in Tracks: Toggle on to display markers on all tracks of a track group. When toggled off, the markers will only be shown in the track group section.
- Setup: Toggle to enable Setup mode.
- Tool: Toggles between the tool buttons in the timecode view's toolbar. The toolbar is visible only in setup mode. For more information, see Time ranges and events.
- Selection Target: Toggle to put the focus on Events or Time Ranges.
To Arrange the Timecode Viewer title bar buttons, tap Edit Title Bar on the Timecode Window Setting title bar:
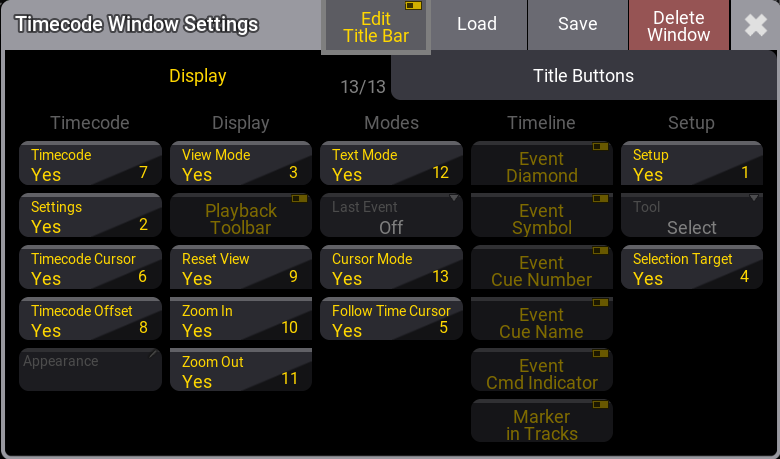
Timecode Window Settings - Edit Title Bar
Tap the Display tab, then tap a button to toggle its visibility in the Timecode Viewer window's title bar.
Tap the Title Buttons tab to arrange the order and visibility of the buttons in the Timecode Viewer window's title bar:
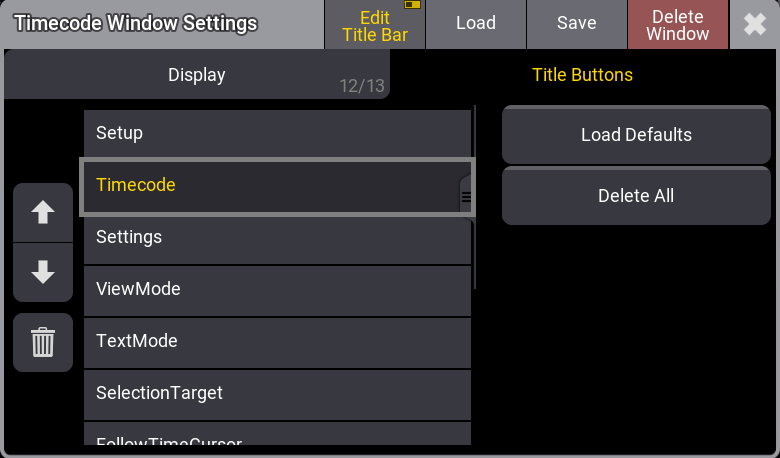
Timecode Window Settings - Title Buttons
For more information, see Title Bar Configuration.
Timecode Settings
To open the Timecode Settings, tap Settings on the title bar of the Timecode Viewer window:
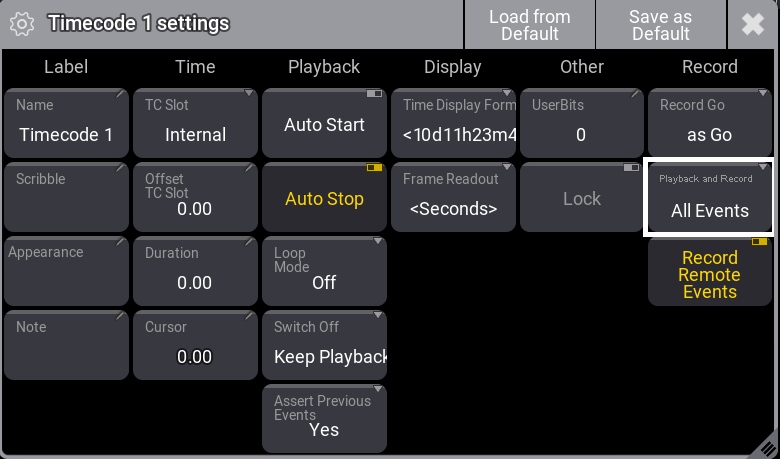
Name: Tap to open the Edit Name pop-up, then enter a name for this timecode.
Scribble: Tap to assign a scribble. For more information, see Scribbles.
Appearance: Tap to assign an appearance. For more information, see Appearances.
Note: Tap to enter a note. For more information, see Notes.
TC Slot: Tap and hold to open the Select TCSlot pop-up list, then select <Internal>, <Selected>, or TCSlot 1 thru TCSlot 8. To learn more about Timecode Slots, read What Are Timcecode Slots.
Offset TC Slot: Tap to open the calculator, then set the offset for the timecode slot.
When a timecode slot other than internal is set for a timecode show, Offset TC Slot button is displayed on the timecode viewer title bar.
If an offset is set to a timecode slot, the entire timecode show will be forwarded to match that offset.
For example, if an event in the timeline is added at 1m00.0, and an offset of 1h00m00.0 is set to the selected timecode slot, the event will be triggered when the incoming timecode signal reaches 1h01m00.0.
If you are programming a one-hour show, such as a musical, it is a good habit to have a timecode show for each act instead of a one-hour timecode show.
For instance, you can store a timecode show for the first act and offset the timecode slot at 1h00m00.0, then store a second timecode show for the second act and offset the timecode slot at 2h00m00.0, and so on.
Duration: Tap to open the calculator, then set the duration of the timecode show recording.
Cursor: Displays the cursor at its current position on the timeline. Tap to open the calculator and enter a new position.
|
|
Hint: |
|
The selected timecode slot appearance defines the cursor button background color. To learn more about
timecode
slots, read What are timecode slots.
|
Auto Start: Starts the timecode show automatically when an external signal is received.
Auto Stop: Automatically stops the timecode show when an external signal is stopped.
Loop Mode: When the timecode is internally generated:
-
Loop:
The timecode show will repeat playing from the beginning to the end. Press the stop button in the playback bar to stop the timecode show. -
Pause:
The timecode show will pause at the end. Press the start button in the playback bar to restart the timecode show from the beginning. -
Off:
The timecode show will not loop or pause.
Switch Off: Toggles between Playbacks Off and Keep Playback.
- Playbacks Off: Switches off all playbacks started by the timecode show.
- Keep Playback: Do not switch off the playbacks that were started by the timecode show.
Assert Previous Events: When set to Yes, events preceding the playhead will be asserted.
Time Display Format: Select the time display format you want to use <Default>, 10d11h23m45, 25 1h23m45, 10.11:23:45, or 251:23:45
Frame Readout: Select the frame readout between <Default>, Seconds, 24 fps, 25 fps, 30 fps, or 60 fps.
User Bits: Besides the 32-bit for 8-digit timecode time, timecode executes 32 User Bits (8-digit) per frame. Use User Bits to mark a timecode signal. For example, use User Bit 1 for light and User Bit 2 for pyro. This is not available when using an internal timecode source. Do not change unless instructed to do so by the timecode supplier.
Lock: When enabled, the timecode show can not be edited or deleted; it can only be played back or copied.
Record Go: When set to as Go, events will be recorded with a Go+ action. When set to as Goto (Status), events will be recorded with a Goto+ action.
Playback and Record: Defines which type of events will be played back and recorded:
- Manual Events: Only actions the user triggers are recorded and played back. Follow cues, for example, are not recorded nor played back. Changes made to commands in cues after the timecode show was recorded are respected when playing back the timecode show. This is the default value for Playback and Record.
- All Events: All events will be recorded and played back. The cells in the Execute Command column of the Text and Both View Mode display "---" to indicate that the execution of cue commands within the timecode show can not be overwritten. Cue commands are recorded, but changes made to commands in cues after the timecode show was recorded will not be part of the timecode show.
Events automatically recorded will display an icon next to the event diamond ![]() or in the center of it:
or in the center of it:
 : This event was recorded as a timed cue, for example, triggered by the follow-up time of a cue.
 : Command icon:
When displayed in the center of the event diamond, a command was executed in a cue.
-
 : This event was triggered by moving a fader, and the assigned sequence's AutoStart or AutoStop started or stopped the sequence.
  : When a playback is switched off via Off When Overriden. For more information, see Sequence Settings.
 : The event was created by executing a macro. For more information, see Create Macros.
 : This icon is displayed when two or more events are too close to one another to be displayed. It disappears when zooming in.
 : This icon is displayed when a toggle event is recorded. It will be accompanied by this icon
  if the toggle starts the sequence or by this icon
  if the toggle stops the sequence.
 : The event was created via a DMX remote.
 : This event was created via MIDI remote.
 : This event was created via a DC remote.
For more information about remotes, see Remote In and Out.
For events with disabled commands, the command icon will be displayed in red if you set Execute Command to No in the timecode show or by switching off Command Enable in the sequence.