Edit Recipe Mode
|
grandMA3 User Manual » Recipes » Edit Recipe Mode
|
Version 2.4 |
Create Recipes with the Edit Recipe Mode
Besides handling recipes in cues parts and presets, recipes can also be created and edited within the programmer. This mode is based on a programmer workflow for quickly and efficiently creating recipes. All pool item selections are logged, saved in a recipe, and then can be easily stored into presets and cues.
|
|
Restriction: |
| The edit recipe mode is only available for standard recipes. |
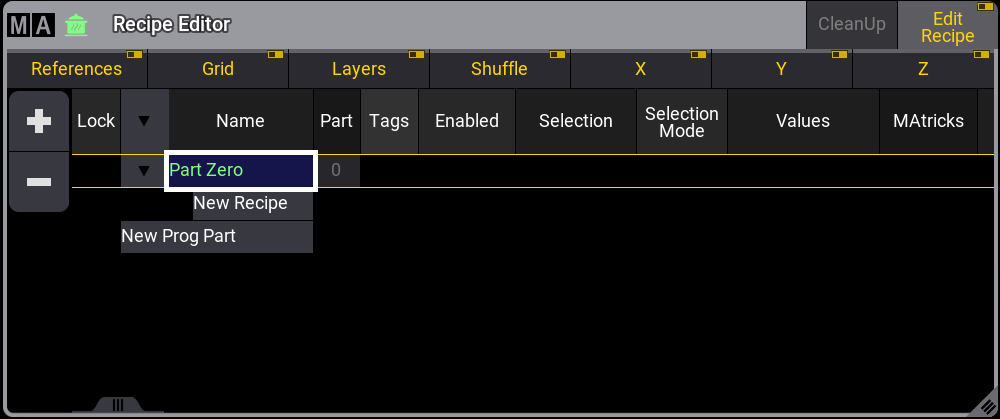
The Recipe Editor window is a handy tool to visualize and edit recipes while in edit recipe mode. For more information on the Recipe Editor window, see above.
There are multiple ways to enable the edit recipe mode:
- Tap Edit Recipe in the title bar of the recipe editor window.
- Enable Edit Recipes in the At Filter menu.
- Use the EditRecipe keyword.
Each object type that can be used for a recipe will have its pool window marked with a green ![]() , when edit recipe mode is enabled:
, when edit recipe mode is enabled:

The following windows use the recipe indicator:
- Groups
- Preset Pools
- MAtricks
- Worlds
- Filters
- Layout Viewer
- Fixture Sheet
| Hint: | |
| Make sure you set the Pool Action setting in the corresponding pools to SelFix/At or At so you can use them for recipes. |
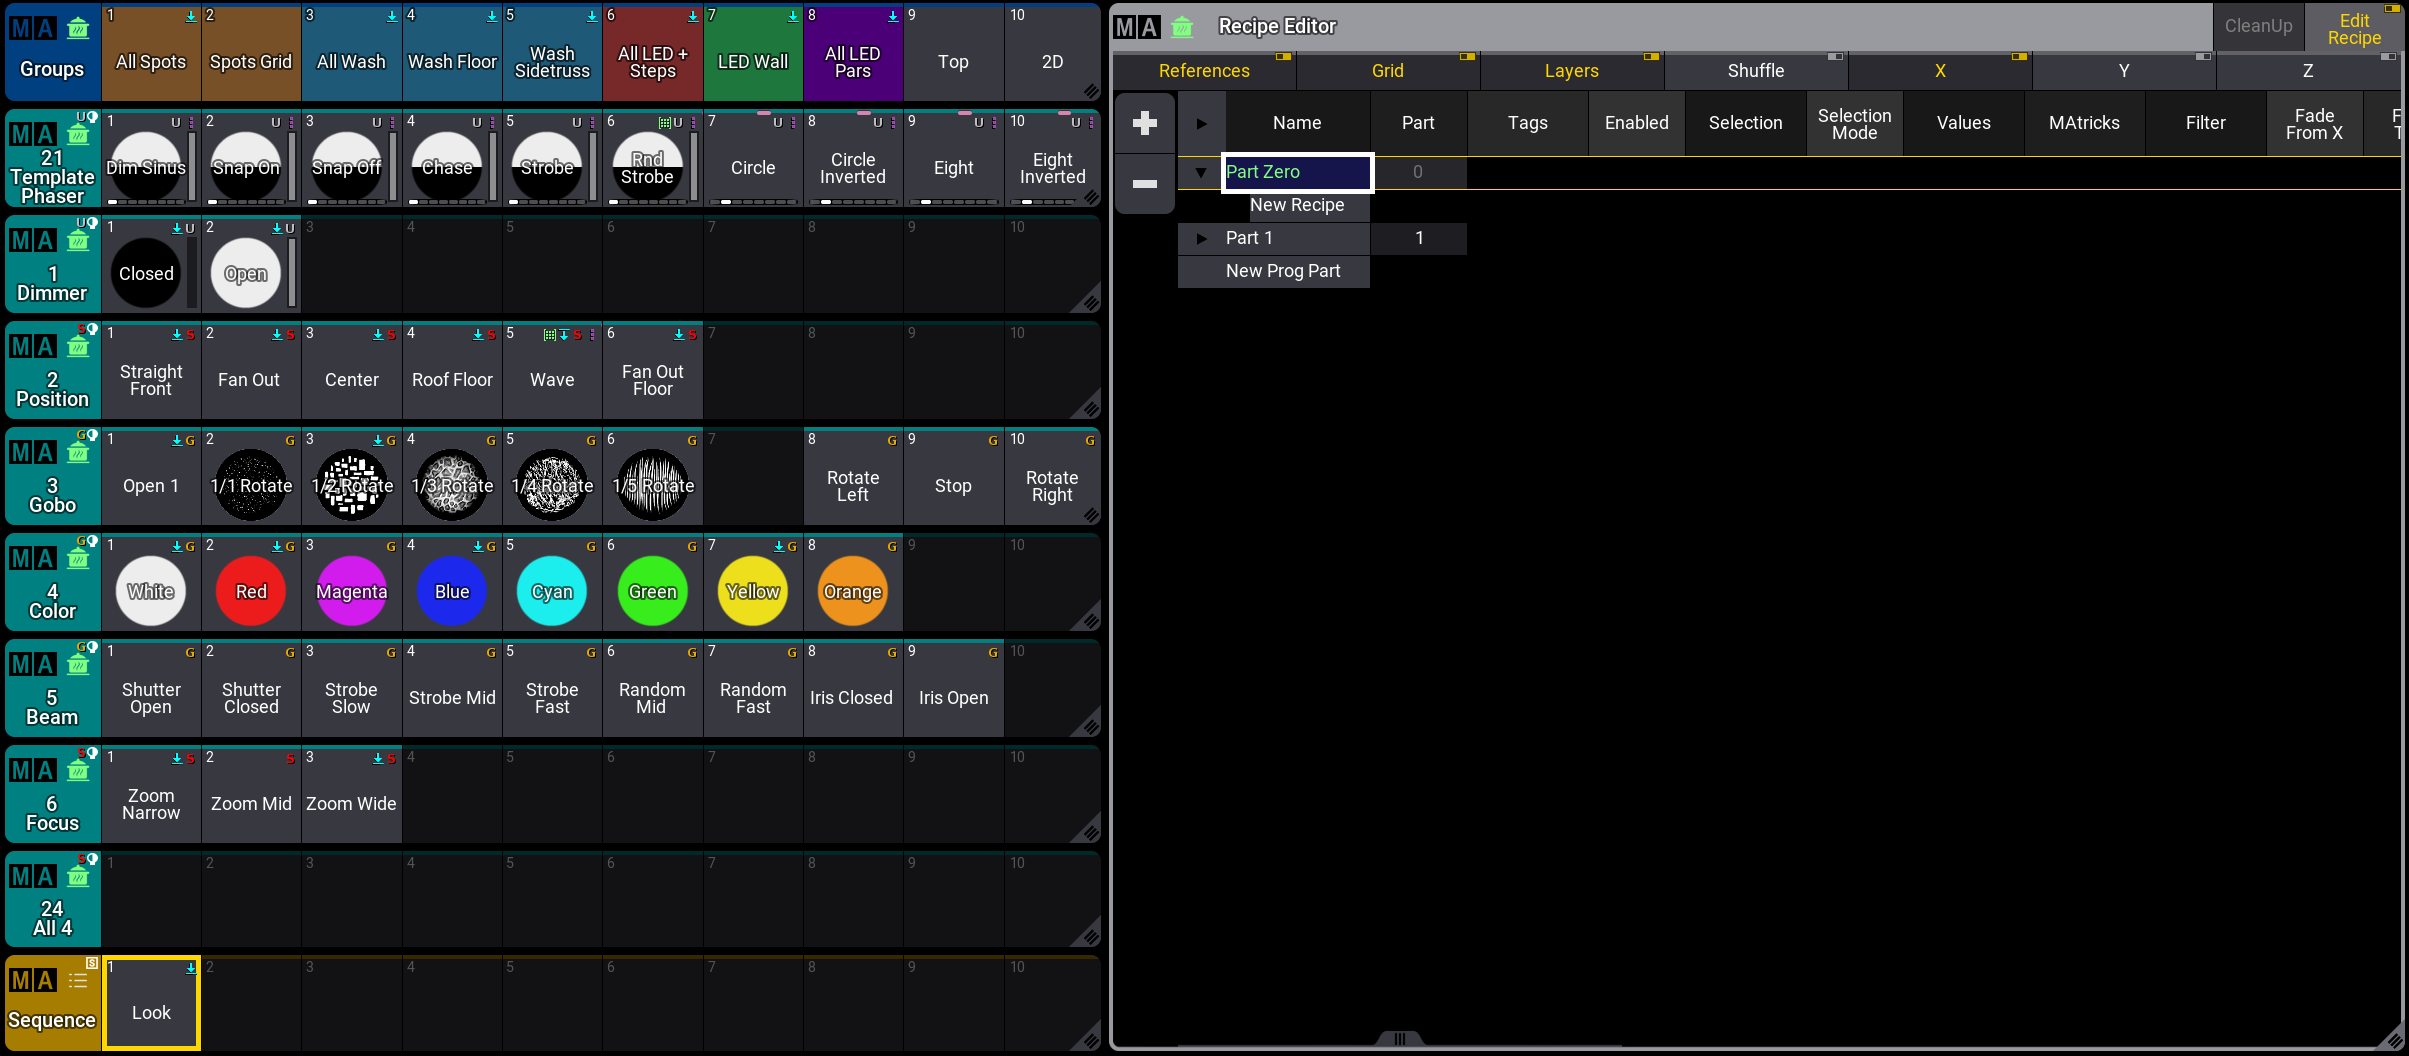
For creating recipes with the Edit Recipe mode, it is useful to have a groups pool, several preset pools, a sequence pool, and the recipe editor window visible:
The following steps outline the general workflow for creating recipes. For a practical example, see below.
- Activate the Edit Recipe mode.
- Select groups. The selected groups are indicated by a green frame around the pool objects. Multiple groups can be selected at the same time.
- Select presets. Presets that are not compatible with fixtures of the selected group will be grayed out. All objects selected for recipes of the currently selected groups are indicated by a green frame in their pool windows. The last selected preset and the corresponding recipe line in the recipe editor, will be displayed with rotating green dots around the objects. These rotating dots indicate it as the target of MAtricks or filter values.
Tap on a selected object again to deselect it. To select an already used preset (which has a green frame), press MA and tap the preset. Now MAtricks, filters, and worlds can be applied to the corresponding recipe. The corresponding line in the recipe editor is displayed with a green dotted frame.
Multiple values can be added to a selection, a single recipe line is created for each selected value in the recipe editor window. Also different selections can be defined, for example, by tapping Group 2. A brown frame around pool objects indicates the values for previous selections, for example, Group 1. Tap Group 1 again and the previously defined values for this selection are highlighted in green again. A feature group indicator bar at the bottom of the group objects shows the feature groups that are active in the recipe for this very group. - Store the new recipe to a cue, cue part, or a preset. Storing a recipe clears the recipe editor and only groups will remain as selected objects.
The order of recording selections and values has an impact on how the recipe is handled. The last recipe line determines the output if several recipe lines with the same selection refer to the same attribute. Storing recipes into Preset Pools for specific feature groups, for example the Color preset pool, stores not only values for Colors, but all recipe lines of the selected programmer part.
Executing the EditRecipe keyword with a corresponding cue, cue part, or preset, enables the edit mode for the specific object in the recipe editor mode. Press Off and tap a group or a preset to remove the corresponding recipe line. If a group or a preset has multiple lines linked, all corresponding lines will be removed.
It is not possible to directly enter values into a recipe, they have to be stored in a preset first. If no preset is selected, the values are put directly into the programmer.
| |
Important: |
Values that are entered for creating a recipe, do not overwrite or replace values that are directly entered into the programmer. The automatically cooked recipes are treated with low priority. To actively overwrite or merge programmer values, cook the programmer using the Cook Keyword. Also MAtricks values will only work with recipes and will not affect the programmer. |
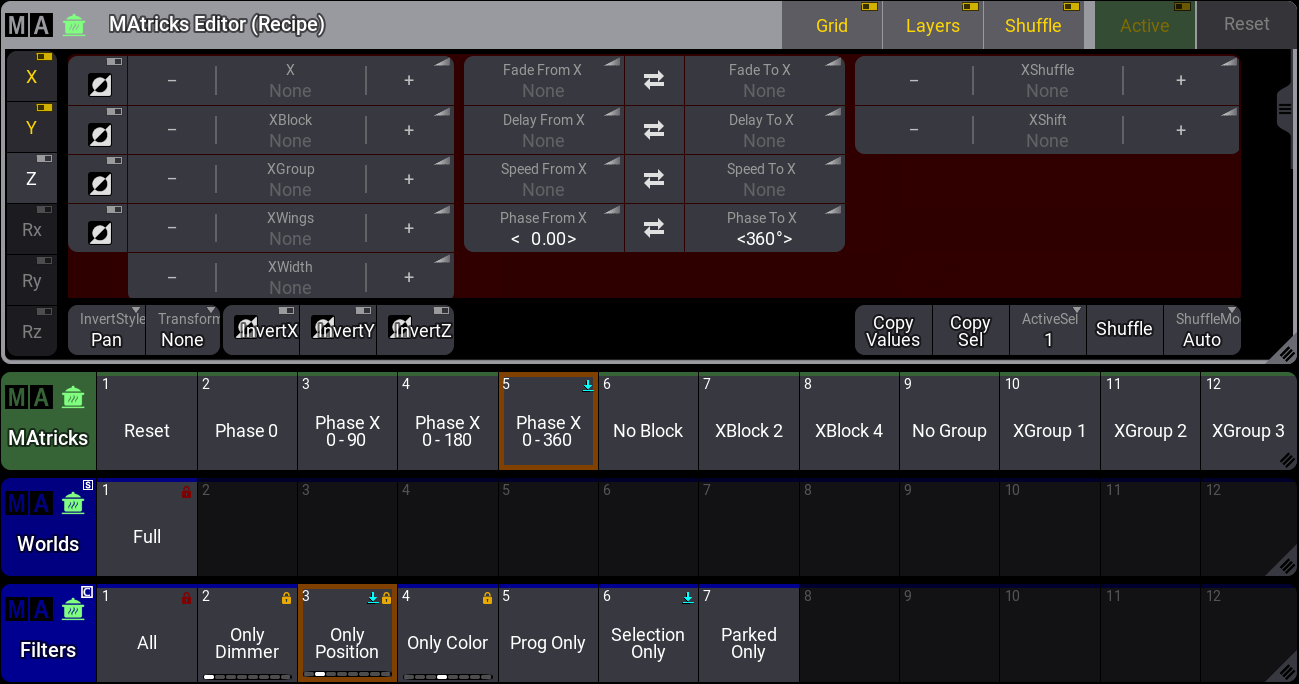
Open the MAtricks Editor to define specific MAtricks values to the recipe lines. While using the MAtricks editor to edit a recipe, the editor is displayed with "(Recipe)" and the green pot icon in the title bar. The rotating dots around the preset and recipe line indicate the target for MAtricks values.
To add MAtricks, Worlds and Filters to the last created recipe, tap on the objects in the pool. Pool objects of MAtricks, Worlds, and Filters have a brown colored frame around them when they are used by a recipe:
Example
This is a simple example of how to create recipe lines for a cue using the recipe editor window.
- Load the demo show file.
- Have preset pools, a groups pool, the recipe editor window, and the MAtricks editor visible. Also the sequence pool can be useful, but it is not a requirement.
Follow these steps to create two recipe lines and store it into a cue:
- Enable Edit Recipe in the recipe editor window.
- Tap on group 1 to select it. Group 1 now has a green frame around it.
- Tap on the dimmer preset 2. The dimmer preset appears with a green dotted frame around it.
- Tap on the color preset 2. The green dotted frame moves to the color preset.
At this point, two recipe lines are created. Group 1 is the Selection for both lines. For Values, the first line has preset 1.2, the second preset 4.2. - Now tap on a different group (Group 3) to select it.
The prior selections of all pool objects is now deselected and displayed with a brown frame. - Select a dimmer and color preset again: Tap on preset 1.2 and preset 4.4.
The selected presets are now connected to Group 3. - Tap on the position preset 3.
- Tap on the template phaser preset 1.
- Add some values for the MAtricks Editor: Set phase from X to 0, set phase to X to 360°.
The MAtricks Editor values are added to the last created phaser preset recipe line with a green dotted frame around the line. This is indicated by a small MAtricks icon in Name column of Recipe 6 of the recipe editor window: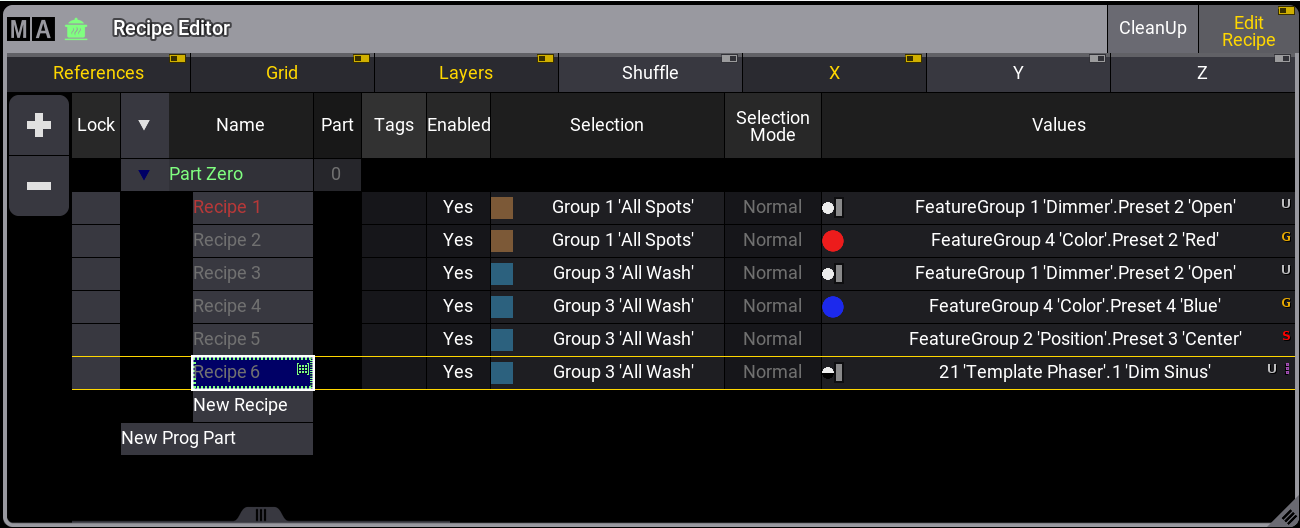
Recipe editor window with six recipe lines. The rotating dots around recipe line 6 indicate it as the target of MAtricks or filter values. - The last step is to store all recipe lines to a cue: Store Sequence 2 Cue 1.
Cue 1 with all six recipe lines is created and all lines are removed from the recipe editor window.
To see the example, tap the video below: