Markers
|
grandMA3 User Manual » Timecode Show » Markers
|
Version 2.4 |
Markers can be used to mark specific places in a Track Group. This could be used to mark when a specific part of a song or event is happening.
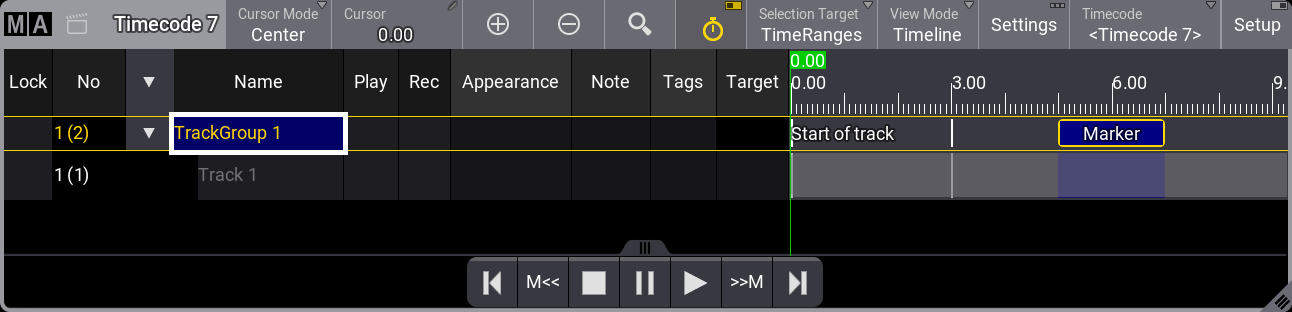
A vertical line indicates the position of a basic marker through all tracks in the track group.
Markers can be labeled. The name is shown in the track group. An appearance is displayed vertically through all tracks. The marker might need a duration for the appearance to be visible.
The two M<< and >>M buttons in the playback toolbar jump to the previous and next markers in the timeline.
Notes and Tags on markers are not indicated in the timeline view. They can be seen in text mode. Learn about the different modes in the Timecode Viewer topic.
Add Markers to the Track Group
To add a marker, the Setup mode must be active. Then, follow these steps:
- Make sure the Selection Target is set to TimeRanges. This can be done by tapping
 in the toolbar on the left. If the Selection Target is visible in the title bar, tap it to change the target.
 - Select the track group where the marker should be added.
- Position the cursor at the correct location in the timeline.
- Tap
 in the toolbar. The Edit Name pop-up opens.
 - Enter a name for the new marker and press Please or press Enter on an external keyboard.
- The new marker is added.
Watch the following video to see how to add a marker:
A duration can be applied to a Marker using the following methods:
- Timecode encoder bar:
- Enter edit mode by tapping Setup in the title bar.
- Tap in the toolbar on the left to set the Selection Target to TimeRanges.
- Tap TimeRange in the timecode encoder bar and select the desired time range from the drop-down list.
- Tap Duration in the timecode encoder bar and enter the duration in the calculator or rotate the outer ring of the encoder wheel to the desired duration.
- A more precise method is through the Text view mode. See View Mode - Text in the Timecode Viewer topic.
- Another option to add a marker is the quick marker tool +M:
- Make sure the Selection Target is set to TimeRanges. This can be done by tapping in the toolbar on the left. If the Selection Target is visible in the title bar, tap it to change the target.
- Select the track group where the marker should be added.
- A marker is added whenever +M is tapped.
This can be useful during recording as it does not prompt for a name during creation.