Timecode Viewer
|
grandMA3 User Manual » Timecode Show » Timecode Viewer
|
Version 2.4 |
The timecode viewer can be created as a window. It gives access to control the timecode show and can be in setup mode, where it can be edited.
The setup mode adds more elements to the viewer, turning it into an editor.

The timecode viewer can also be opened as a pop-up editor by editing a timecode pool object.
Title Bar
The window settings are accessed by tapping the MA logo on the left-side corner of the title bar or tapping the gear icon (![]() ) in the pop-up editor. Next to the MA logo and the timecode icon, the title bar shows the timecode number and name (if the name differs from the default "Timecode"), and in setup mode it also shows the selected tool. The buttons on the right can be edited, and they are described in the window settings below.
) in the pop-up editor. Next to the MA logo and the timecode icon, the title bar shows the timecode number and name (if the name differs from the default "Timecode"), and in setup mode it also shows the selected tool. The buttons on the right can be edited, and they are described in the window settings below.
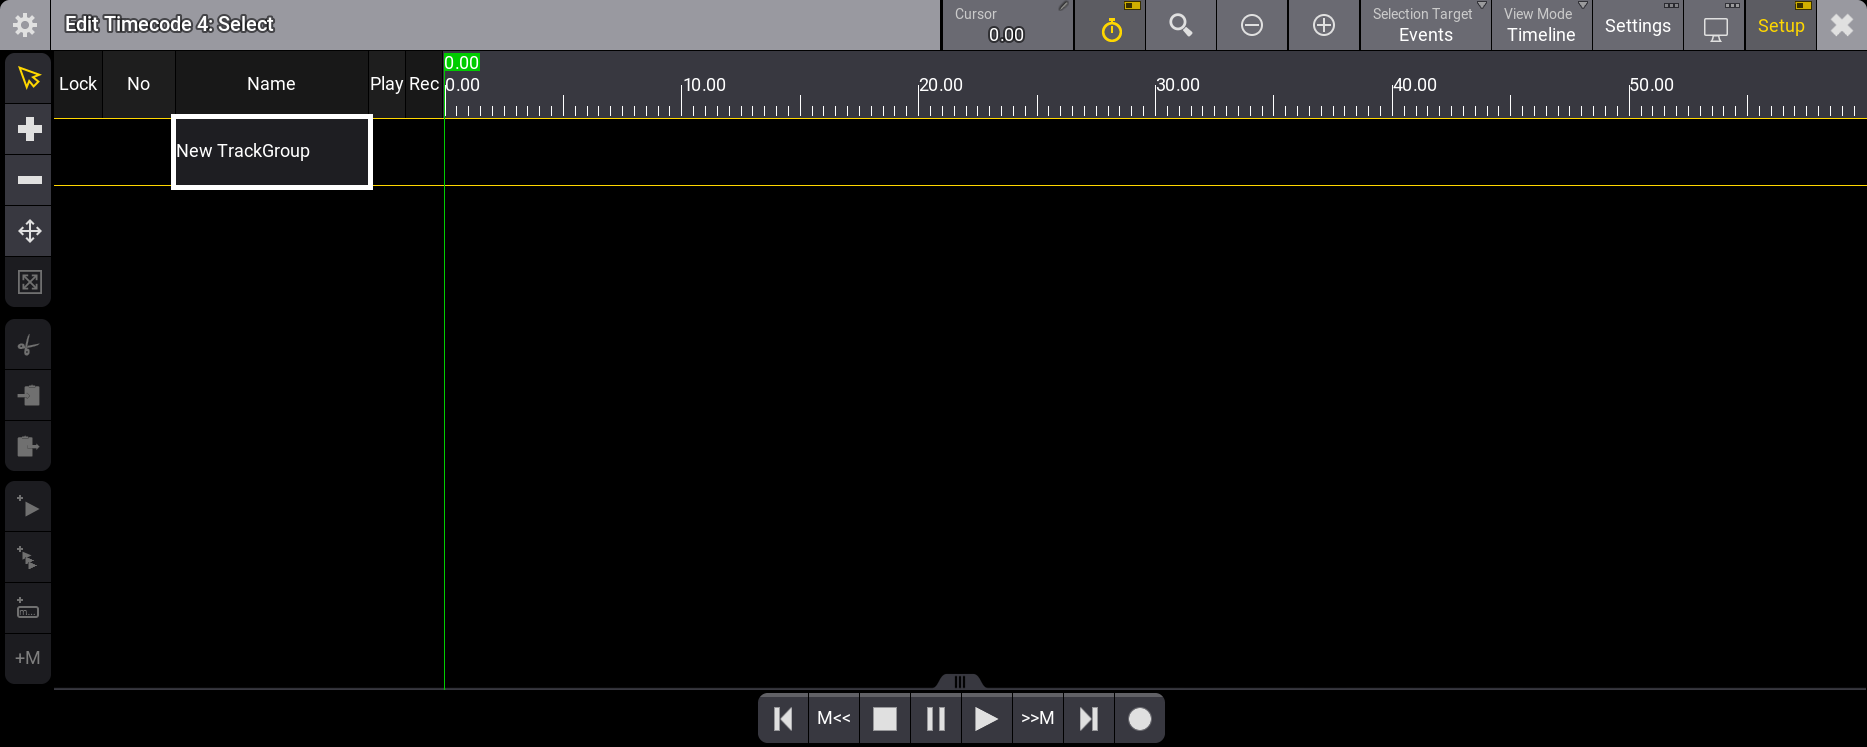
Left Side Toolbar
The left side toolbar is visible when the viewer is in setup mode. The toolbar is split into four different groups.
Select Target:
This group of tools defines which elements are being selected. These tools are only available in the timecode viewer with Setup active.
- Select Time Range (
 ):
):
Selecting this allows for the time ranges in the track groups to be selected. - Select Events (
 ):
):
Selecting this allows the timecode events in the tracks to be selected.
Tools:
This is a group of tools interacting with the tracks and track groups.
- Select Tool (
 ):
):
This tool is used to select elements in the tracks and track groups. When there is a selection, a small number appears in the lower-right corner of this button to indicate how many elements are selected. - Add Tool (
 ):
):
This tool manually adds relevant elements based on the selected target and the tapped element. - Minus Tool (
 ):
):
This tool manually removes tapped elements based on the tapped element and the selected target. - Move Tool (
 ):
):
This tool can be used to move selected elements. - Resize Tool (
 ):
):
This tool is used to change the length of a time range. The start location stays, but this tool can move the end.
Selection:
This group has tools to cut, copy, and paste the selected elements. This group is only visible when the Select Tool is active (see above).
- Cut Selection (
 ):
):
This can be used to cut the selected elements. - Copy Selection (
 ):
):
This can be used to copy the selected elements. - Paste Selection (
 ):
):
This can be used to paste the cut or copied elements.
Add Menu:
This menu is used to add events and markers to the tracks
- Add Event At Time Cursor (
 ):
):
Tapping this adds an event on the selected track at the current time cursor location - Add Multiple Events At Time Cursor (
 ):
):
Tapping this opens a small pop-up that allows to add multiple events with a specified time interval on the selected track beginning from the location of the time cursor. - Add Marker At Time Cursor (
 ):
):
Tapping this will add a marker and open a pop-up where a name or text for the marker can be added. The marker is added to the currently selected track group. - Quickly Add Marker At Time Cursor (+M ) :
Tapping this will add a marker to the currently selected track group without opening the name pop-up.
Playback Toolbar
The playback toolbar can be visible at the bottom of the viewer. The Playback Toolbar setting in the window setting defines if the toolbar is visible or hidden. Read about the settings below.
The toolbar looks like this when setup mode is active :

- Jump to start of timeline(
 ):
):
Tapping this jumps to the timeline's start. - Jump to previous marker(M<<):
Tapping this jumps to the previous marker based on the current cursor location. - Stop(
 ):
):
This stops the timecode show. - Pause (
 ):
):
This pauses the timecode show playback. - Play(
 ):
):
This activates play mode for the timecode show, allowing it to listen to the timecode signal and then replay the recorded events. - Jump to next marker(>>M):
Tapping this jumps to the next marker based on the current cursor location. - Jump to end of timeline(
 ):
):
Tapping this jumps to the end of the timeline. - Record(
 ):
):
Activates record mode and automatically records executor events to the timecode show.
View Mode
The Timecode Viewer has two primary view modes (Text and Timeline) and a third (Both) that combines the two.
The different modes do not change the left side of the window. This always shows the track groups and tracks.
The left side has the following columns:
- Lock:
This can be used to lock a track or a track group. - No:
This is the track group number or track number. - Name:
This is the name of the track group, track, or sub-track. - Play:
This can be used to disable playback of the track or track group. When the cell is empty, the track is played. Edit the cell to add a colored icon indicating that the track is not playing back.
- Rec:
This can be used to prevent new events from being recorded to the track or track group. When the cell is empty, new events can be recorded or overwritten. Edit the cell, add a colored icon indicating that the track is protected from changes when the record mode is active.
- Appearance:
An appearance can be set for the track or track group. Learn more in the Appearance topic. - Note:
A note can be added to a track or track group. Learn more in the Notes topic. - Tags:
Tags can be added to a track or track group. Editing this cell opens the Edit Tags pop-up. Learn more in the Tags topic. - Target:
The track needs a link to a target object, typically a sequence, sound, preset, group, or master. Editing this cell opens the Assignment Editor pop-up.
View Mode - Text
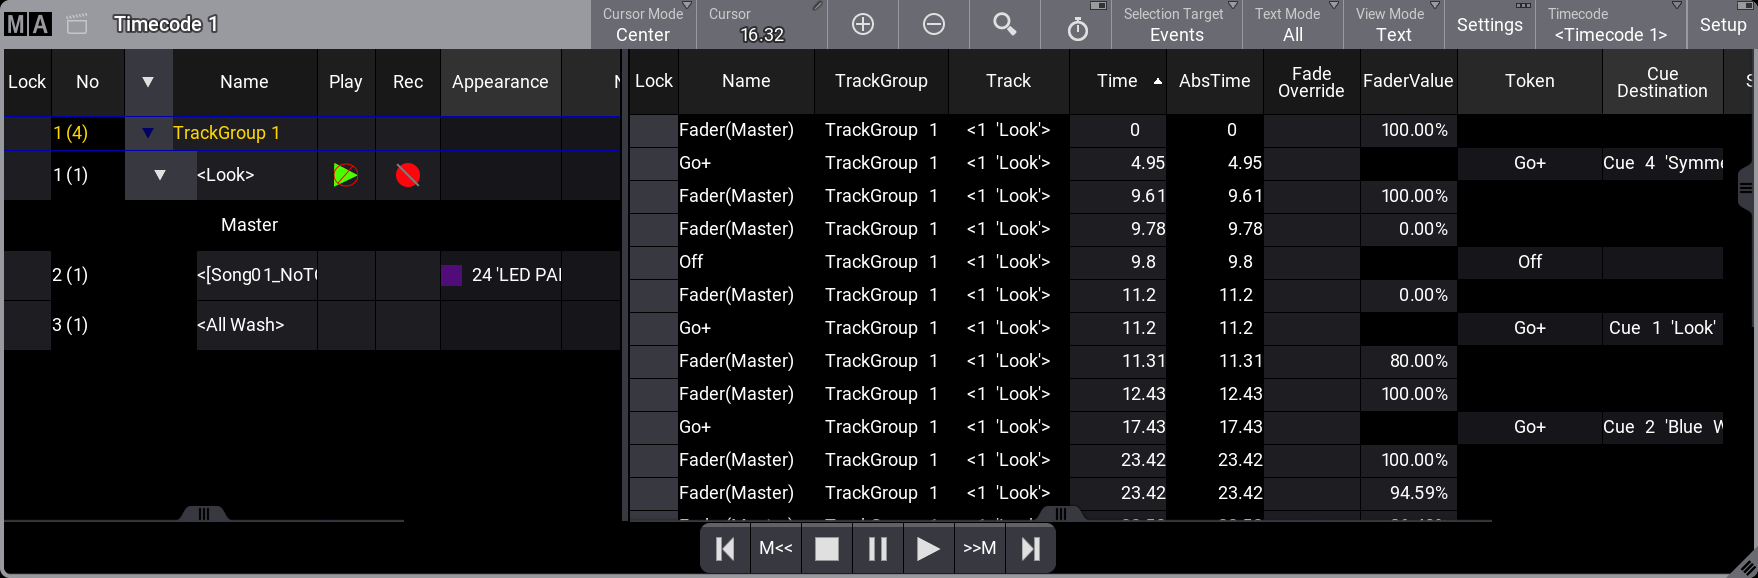
The text mode displays the events, tracks, and markers in a spreadsheet-like format on the right side of the window.
A Text Mode setting defines what information is shown. See more about the settings below.
There are four different modes. They can show the markers, the events, and the time ranges.
Be aware that the Selection Target settings greatly influence what the Text Mode shows to the viewer. The selection target can be Events or TimeRanges. Learn more about the settings below.- All:
With the Selection Target set to Events, the viewer displays all events across all tracks.
With the Selection Target set to TimeRanges, the viewer displays all markers and time ranges across all tracks. - Tracks:
With the Selection Target set to Events, the viewer displays all events in the selected tracks.
With the Selection Target set to TimeRanges, the viewer displays markers and time ranges for the selected tracks. - Selected:
With the Selection Target set to Events, the viewer displays the selected events.
With the Selection Target set to TimeRanges, the viewer displays the selected markers and time ranges. - Markers:
This mode shows all the markers for the selected track group.
By default, View Mode, Text Mode, and Selection Target are buttons in the title bar.
The possible columns in text mode are:
- Lock:
This can be used to lock the row. - Name:
This is the name of the element. The names of Event elements can not be edited. - TrackGroup:
This shows the track group for the element. - Track:
This shows the track. - Appearance (Time Range):
This is the appearance of the time range and markers. - Note (Time Range):
Notes can be added to the time ranges and markers. - Tags (Time Range):
Tags can be added or edited for the time range and markers. - Start (Time Range):
This can be used to edit the start time for the time range. - Duration (Time Range):
This can be used to edit the duration of the time range. - Speed Factor (Time Range):
This can be used to change the speed factor for the time range. Changing this will scale the time. The default value is 1. - Time (Event):
Reports the time of events inside their Time Range. The time can be edited. - AbsTime (Event):
Reports the absolute time of events inside the timecode show. The absolute time indicates when the event will trigger. The absolute time is a combination of the Time (above) and the start time for the time range. The start time for a time range functions as an offset. - Fade Override (Event):
This can define a fade time for the event that overrides the cue fade time when the timecode show is played back. - FaderValue (Event):
When recording a track using a fader, the fader movement is recorded in steps between 0% and 100%. This column displays the fader's value at each step. Tap and hold a cell in this column to open the calculator, then set a new value. - Token (Event):
This column shows the action executed when the event is replayed. Tap and hold a cell in this column to open the select token pop-up, then select a token. - Cue Destination (Event):
This is used to specify the cue related to the token (above). For instance, if the Token is Go+, and there is no cue destination, the next possible cue will be triggered. If a cue destination is defined, then the Go+ will trigger the specified cue. - Status (Event):
This is used to see and edit the status of tokens that can have a status. For instance, if the token is Flash, an On or Off status can be used to define what the Flash should do. - Execute Command (Event):
Defines whether cue commands are executed when an event is played back. Tap and hold a cell in this column and set it to Yes or No. The default is Yes.
If the cell shows "- - -", this indicates that the user cannot override the command execution of cue commands within the timecode show. Cue commands are recorded and later changes of the commands in cues are not part of the timecode show. This is only valid when the Playback and Record setting is set to All Events.
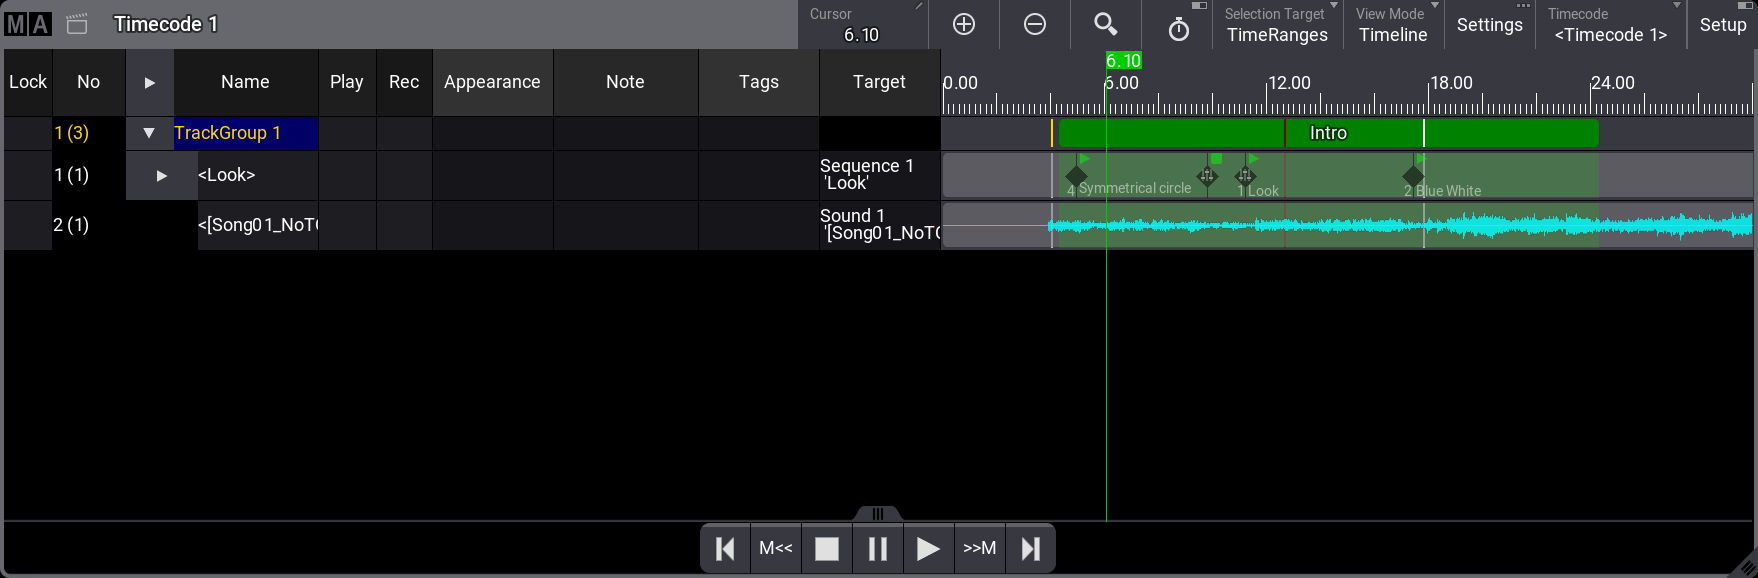
View Mode - Timeline
This displays the timecode show as a timeline where the tracks are rows, and events, markers, and time ranges can be shown in the timeline.
View Mode - Both
This shows both the timeline and the text mode side-by-side.
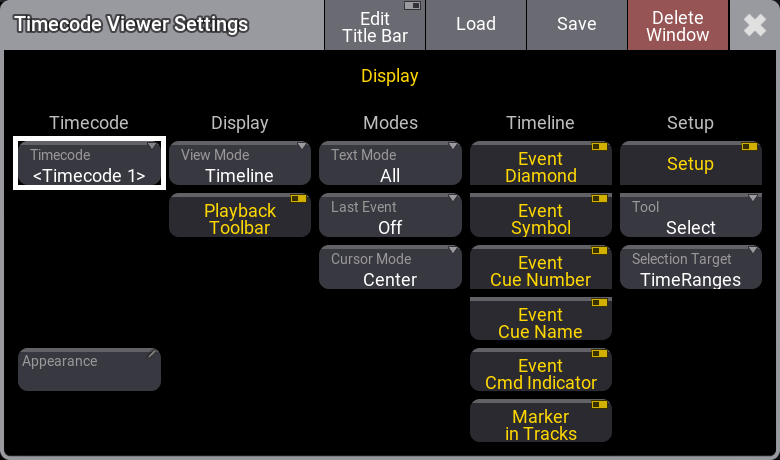
Window Settings
The window settings can be accessed by tapping the MA logo in the upper right corner of the viewer or the gear icon (![]() ) in the pop-up editor.
) in the pop-up editor.
Some settings are hidden and can be seen when the Edit Title Bar mode is on. Most of the hidden settings are button functions meant for the title bar.

Timecode
- Timecode:
The timecode setting selects which timecode show is displayed in the viewer. The options include choosing a specific timecode show, but "<Link Selected>" can also be used to have the viewer always display the selected timecode show. Because the viewer can have different View Modes (see above), having multiple viewers visible, linked to the selected timecode show, could make sense, each displaying the timecode show in a different mode. - Settings:
This toggles whether the title bar has a button to open the Timecode show settings. - Timecode Cursor:
The title bar can have a Cursor input field. The field shows the current cursor location. Tapping the field (in the title bar) opens the calculator, which lets you enter a new cursor position. If the time source is a timecode slot, the slot's frames-per-second value is displayed in a small square. For instance, if the timecode slot is set to 30 fps, then this icon is displayed:
- Timecode Offset:
A timecode show can have an offset from the received timecode source. This offset can be displayed in the title bar in an Offset TC Slot input field. Tapping the input field opens a calculator where the offset can be set. The offset is a part of the timecode shows settings. - Appearance:
Tapping this button opens a Select Appearance pop-up that lists all defined appearances and allows you to create a new ones. Selecting one will apply that appearance to the window.
Display
- View Mode:
Tapping this toggles between the three different view modes. Tap and hold to open a small, select pop-up with the same options. It changes the viewer's right side. Read more about the different view modes above.- Text:
The right side of the view displays events, markers, and time ranges in a text grid with rows and columns. - Timeline:
The right side of the view displays the timeline of the timecode show. The tracks are displayed as rows, and events, markers, and time ranges are displayed along these tracks based on time - Both:
Both Text and Timeline are displayed on the right side.
- Text:
- Playback Toolbar:
The playback toolbar can be visible at the bottom of the viewer. Read about the playback toolbar above. - Reset View(
 ):
):
This toggles if the Reset View icon is visible in the title bar. Tapping this button resets the zoom level in the timeline view mode. - Zoom In(
 ):
):
This toggles if the Zoom In icon is visible in the title bar. Tapping this button zooms in on the timeline. - Zoom Out(
 ):
):
This toggles if the Zoom Out icon is visible in the title bar. Tapping this button zooms out on the timeline.
Modes
- Text Mode:
This mode determines which information is shown in the viewer when the View Mode is set to Text or Both. Read about the settings above. - Last Event:
Defines if the last played-back event in the timecode show is selected. It has the following options:- Off:
The last played-back event will not be selected. - Track:
The last event played back in the selected track will be selected. - All:
Select the last played-back event, no matter which track.
- Off:
- Cursor Mode:
When the Follow Time Curcor ( ) is enabled in the title bar, the cursor stays visible when the timecode runs. The following options are available:
- Page:
When an external time signal is received or generated by the console, the cursor (green timeline) moves until it reaches the end of the visible part of the timeline. Then, a new section of the timeline is displayed. The cursor moves from the beginning to the end of that new section, repeating until the timecode is stopped. - Center:
When an external time signal is received or generated by the console, the cursor (green timeline) moves until it reaches the middle of the visible area of the timeline. The timeline starts moving to keep the cursor centered on the display. This is the default setting.
- Page:
- Follow Time Cursor():
This toggles if the icon is visible or hidden in the Title bar.
Timeline
This can be used to toggle if different elements are shown or hidden in the timecode timeline. See the Events and Markers topics to learn about the different aspects.
- Event Diamond:
Toggle on to display event diamonds on the timeline. - Event Symbol:
Toggle on to display the green event icon next to the events on the timeline. - Event Cue Number:
Toggle on to display the cue number next to the events on the timeline. - Event Cue Name:
Toggle on to display the cue name next to the events on the timeline. - Event Cmd Indicator:
Toggle on to display the command indicator on or next to the events on the timeline. - Marker in Tracks:
Toggle on to display markers on all tracks of a track group. The markers will only be shown in the track group section when toggled off.
Setup
- Setup:
This toggles the viewer's setup mode. When in setup mode, it is possible to edit the timecode show. - Tool:
This swipe button opens a list with the same tools found in the toolbar on the left side - read about them above. It can be used to select the desired tool. In addition to the tools described above, there is an extra option called Operate. This does not have a tool function, and it can be selected to avoid selecting one of the other tools. - Selection Target:
Toggle to put the focus on Events or Time Ranges. Read more above.
Timecode Encoder Bar
When the timecode viewer has Setup active and focused, or when the timecode pop-up editor is open, the encoder bar changes to the Timecode Encoder Bar.

The encoders have the following functions:
- Cursor:
Rotate the encoder to change the cursor location. Pressing while turning moves the cursor faster. Pressing the encoder shortly opens the calculator to input a specific cursor location. - Marker:
Rotate the encoder to jump between markers in the selected track group. Press the encoder button (next to the encoder) to open a small Select Marker pop-up. - Track:
Rotate the encoder to select a Track or Track Group. Press the encoder shortly to open a small Select Track pop-up. - TimeRange:
Rotate to select different time ranges on the selected track or track group. - Event:
Rotate any of the two encoders to select the different events on the selected track or track group. Press the inner encoder shortly to open the small Select Token pop-up, where the token can be changed or the calculator to specify the fader position (if the selected object is a fader event). Press the encoder button (next to the encoder) to open a small Select Event pop-up. - Start:
When an event is selected, turning the encoder moves the event on the timeline.
When a time range or marker is selected, turning the encoder moves the element's starting point. - Duration:
Rotate the encoder to adjust the marker duration or the time range.