
grandMA2 onPC Details
The grandMA2 onPC has a special menu only available for the onPC.
This menu can be opened from the "Command" screen. In the upper left corner there is a yellow ball. Clicking it with the mouse will open a menu like this:

This menu has the following elements:
- Clear Screen:
This will clear the virtual screen on the "Command" page. - Clear All Screens:
This will clear all the virtual screens. - Debug Window:
This opens a new window that shows the System Monitor as a separate window (not a part of the onPC windows). - Cascade Windows:
This will cascade all the open onPC windows (if there is more than one). - Reset Size of Windows:
The onPC screens can be changed in size. This will reset them to a 1:1 pixel size - if possible. - Reset Time to Systemtime:
This will set the time of the grandMA2 onPC to the time from the computer. - Options...:
This opens an options pop-up. It is descried below. - About grandMA2 onPC...:
This opens a small pop-up showing the version number and the date the software was build. - Quit:
This will close the grandMA2 onPC.
Options
The onPC options are divided into three tabs.
View Tab
This tab has multiple options.
The Mode option changes how the onPC handles screens of the onPC. Changing this requires a reboot of the onPC software. The options are:
- MultiScreen:
This will open multiple screens on the onPC. It will make the screen buttons on the right side toggle buttons that will open or close screens. This is great if you have enough computer monitor resolution - multiple computer monitors or 4K monitors. - SingleScreen:
This will only open one instance of the onPC. The screen buttons on the right side will change between the different screens. - SingleScreen (Internal only):
This is the same as the SingleScreen except for the External screens. They will open up in the resolution defined (read more below).
The Windows Frames option is an On or Off option. It will display or hide the normal Windows frames around the onPC screen. Changing this option will require a reboot of the onPC software before taking effect.
Encoder Style changes how the onPC encoders look and behave. There are two options:
- Rotation:
This is like the physical encoders. In the onPC it looks like this:
Encoder in "Rotation" mode
- MA:
This is a different way the encoder can be used in the onPC. Click and holding while moving the encoder Left and Right will change the value in a coarse resolution. Moving Up and Down will change the values in a normal resolution. The encoder looks like this:
Encoder in "MA" mode
There are two options for setting the resolution on the two external screens. Tapping the resolution will open a list of all the available resolution options.
The CmdWing Bar option can be turned On or Off. It changes how the bottom of screen 2 looks. It can match the look of the consoles or it can change to match the physical controls on the MA onPC Command Wing. See more in the Command Wing Bar topic.
Misc. Tab
The only option here is the Priority. There are two options:
- Normal:
This will make the onPC software run with a normal priority in windows. - High:
This will make the onPC run with a high priority in windows. This is a good idea if the onPC is the primary station in the system.
MIDI Tab
There are three options regarding the MIDI settings for onPC.
There is the option called MIDI from OnPC Command Wing can be used to turn On or Off the MIDI input and output from a connected onPC Command Wing.
The next two options needs a MIDI device connected to the computer.
There is also a MIDI In Device option that can be used to selected the MIDI device that will be used to input MIDI.
The MIDI Out Device can be used to choose the MIDI device that will output the MIDI.
Keyboard shortcuts
It is possible to activate the keyboard shortcuts by tapping the "Ins" key. Read more in the Keyboard shortcuts topics.
The Wings
Since version 3.3 it is needed to reboot the wings after the onPC has booted. When the wing connects there is a Confirm pop-up like this:
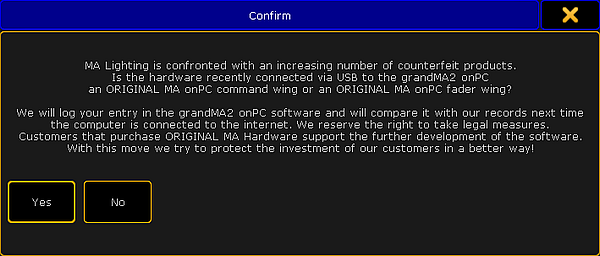
Unfortunately there are an increasing number of counterfeit products on the market. MA Lighting reserves the right to verify the use of original hardware. This is done to ensure the continued development of the hardware and software.
You must accept the pop-up by tapping Yes to continue using the wing. If No is tapped then another pop-up appears:
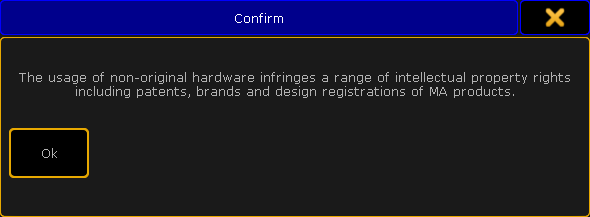
The connected wing cannot be used unless the first pop-up is accepted.
It is possible to connect 1 grandMA2 onPC Command Wing and 2 grandMA2 onPC Fader Wings to 1 grandMA2 onPC.
If there are 2 Fader Wings connected then they need to be identified. This is done in Setup->MA Network Configuration->onPC.
Here are two buttons called Identify Fader 1 and Identify Fader 2. Tapping one of these followed by one of the keys on the Fader Wings will identify the wing in the system. It is only necessary if there are 2 Fader Wings connected to same onPC.
It can be changed what block of 15 executors each wing should handle in the Wing & Monitor Setup. There is a green check mark in the detected hardware.