|
grandMA3 User Manual » Cues and Sequences » Sequence Settings
|
Version 2.0
|
Each sequence has a lot of different settings. The settings can be accessed from the title bar of each sequence sheet or the executor assign menu. Each of these two locations has a button called Edit Settings or Settings. Tap this to open the settings.
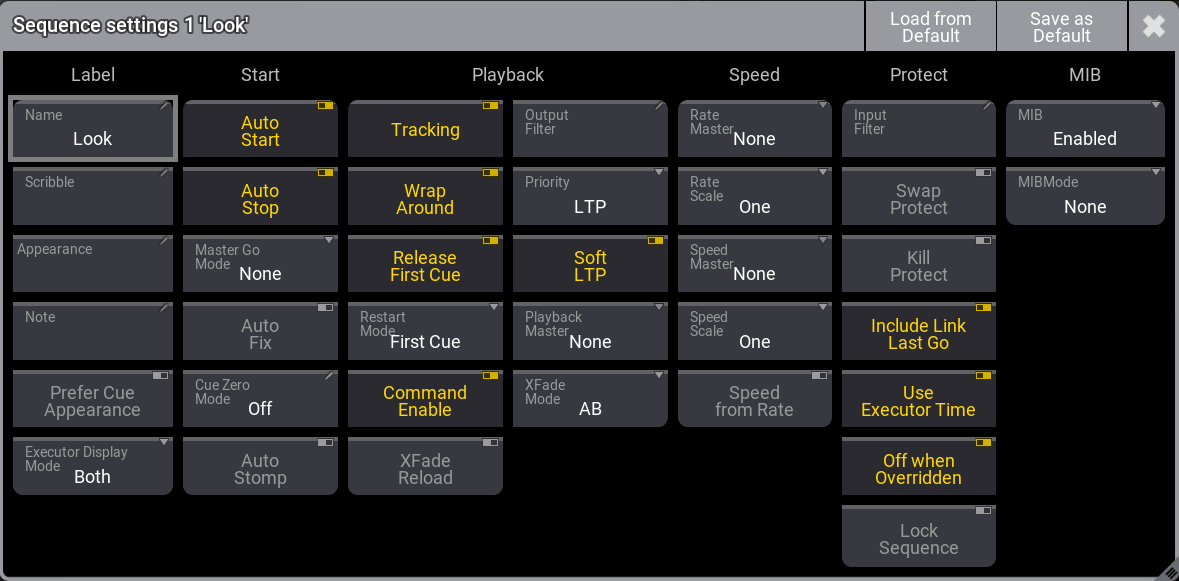
The settings are divided into different sections. Label, Start, Playback, Speed, Protect, and MIB. Read about the different settings in each section below.
Each user profile has default sequence settings. These settings are used when a new sequence is created. The default can be loaded and stored from this pop-up.
The title bar has two relevant buttons. The left one is Load from Default. Tapping this loads the stored sequence defaults. Next to this is Save as Default. Tapping this stores the current settings as the new default.
Label
This group is about the name and look of the sequence.
Name
Edit this input field to change the name of the sequence.
Scribble
This scribble field can be used to select or create a scribble for the sequence. This scribble is visible in the sequence pool and on the executor label.
Appearance
This appearance field can be used to select or create an appearance for the sequence. This appearance is visible in the sequence pool and on the executor label.
Note
This input field can be used to add a note to the sequence.
Prefer Cue Appearance
When this option is enabled, and the current cue has an appearance, the cue appearance will be displayed on the executor or in the layout instead of the sequence appearance.
Executor Display Mode
The executor display mode defines how the sequence will be displayed on an executor:
- Data only:
Only the cues with their appearances will be displayed. The cue appearance is only displayed in the line of the cue and not in the background. - Appearance only:
Only the sequence or cue appearance will be displayed. No cue names, fade bar, etc., will be displayed. This can be handy for sequences with only one cue, color cues, or gobo cues. - Both:
Each cue line displays its cue appearance, and the sequence appearance or the appearance of the current cue will be displayed in the background of the executor.
Start
The settings in this section are about starting and stopping the sequence.
Auto Start
The Auto Start feature switches the executor 'On' when the master is moved from zero.
Auto Stop
The Auto Stop feature switches the executor 'Off' when the master is moved down to zero.
Master Go Mode
The Master Go function is active if auto stop is turned Off. Tapping this button opens the Select Master Go Mode pop-up.
There are four options here. They all take effect when the master fader is moved from zero and up. The options are:
- None:
The cue is still running. - Go:
It executes a Go. - On:
The current cue is reloaded (fading in again). - Top:
The first cue is activated.
Auto Fix
The Auto Fix feature can be activated for each executor. It will automatically Fix active executors and keep them visible even when pages are changed. The executor is automatically unfixed when it is switched off.
Cue Zero Mode
This setting defines what is automatically stored in Cue Zero. There are three options:
- Off:
No attributes are automatically stored in the cue. This is the default option. - All Used Attributes:
This adds default values for all attributes of the fixtures used in the sequence. - Only Used Dimmers:
This adds default dimmer attributes of the fixtures used in the sequence.
Auto Stomp
If auto stomp is On, an absolute value from a cue will stomp a phaser running from a different playback.
Playback
The playback settings are about running the cues. Running or playing back cues is described in the Play Back Cues topic.
Tracking
This turns On or Off value tracking in the sequence. Read more in the What is Tracking topic.
Wrap Around
Wrap around allows the sequence to return to the top/first cue if a Go (forward) command is performed after the last cue in the sequence is reached.
Release First Cue
This setting defines if the first cue releases tracking values. These tracking values can come from the last cue if Wrap Around is active. If Release First Cue is On then it adds a <Yes> to the Release column in the first cue of the sequence. Learn more about the different columns in the Look at Cue and Sequences topic. The first cue can manually be set to release by editing the field in the sequence.
Restart Mode
There are three different restart modes:
- First Cue:
This always restarts the sequence with the first cue. - Current Cue:
This restarts the sequence with the cue where it was when the sequence was turned Off. - Next Cue:
This restarts the sequence with the next cue based on where it was when the executor was turned Off.
Command Enable
This option disables the execution of the commands in the CMD columns in a sequence. The stored commands are not deleted or removed. They are just disabled.
XFade Reload
When this option is enabled, the Xfader needs to be pulled back to 0 after completing a crossfade to do the next crossfade.
Output Filter
The output filter can have a Filter or World assigned. Tapping the button opens the Assignment Editor pop-up:
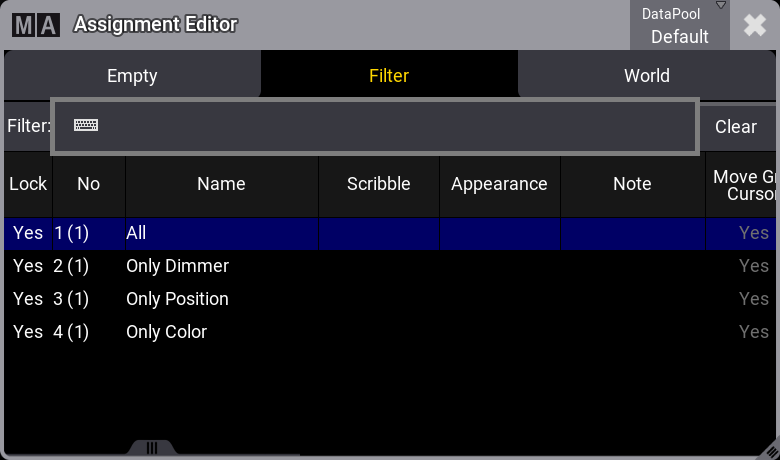
The editor has three tabs. Empty can be used to select no filtering. Filter and World are lists of each type. Each lists the possible choices of their type. Tap the desired filter or world to apply it.
The fixtures and attributes in the world or filter are allowed to pass the output filter and be output from the sequence. The same sequence can be played back from several executors, and each executor shares the output filter settings. If different output filters are needed, the sequence should be linked or shared with another. The other sequence can have different output filter settings. Read about linked sequences in the Cues and Sequences topic.
If the sequence has an output filter applied, there is a small output filter icon (![]() ) in the sequence pool button.
) in the sequence pool button.
Priority
This is the priority of the sequence. The priorities are described in the Play Back Cue topic.
Soft LTP
The Soft LTP function is described in the Play Back Cue topic.
Playback Master
Here it is possible to select a Playback Master. It functions as a sub-master that multiple sequences can share.
XFade Mode
This is used to set how the two CrossfadeA/XFadeA and CrossfadeB/XFadeB faders work. There are two crossfade modes:
- Split:
The dual crossfaders work as masters for the current/next cue. - AB:
The dual crossfaders work as crossfaders for increasing/decreasing values.
Speed
Speed and rate can be used to adjust the stored times without reprogramming the show. For instance, a cue can have a fade time of 5 seconds. A rate master can adjust the fade time live while playing it back. All sequences have their own individual rate and speed, but they can be linked to a global master. This master can then adjust the timing for multiple sequences simultaneously. Read more details in the Speed Masters topic.
Rate Master
The sequence has a rate master. It can be linked to a shared global speed master, or it can have an individual rate master. Tapping this button will open the Select Rate Master pop-up.
In the pop-up, it is possible to select the None option for having an individual rate master for the sequence or select one of the global speed masters.
Rate Scale
Enabling this binds the rate to defined steps instead of a variable value. Tapping this button opens the Select Rate Scale pop-up.
Choosing one of the steps in the pop-up, selects the multiplier or divider. This multiplies or divides the rate by the selected factor.
Speed Master
The sequence has a speed master. It can be linked to a shared global speed master, or it can have an individual speed master. Tapping this button will open the Select Speed Master pop-up.
In this pop-up, it is possible to select the None option for having an individual speed master for the sequence or select one of the global speed masters.
Speed Scale
If a sequence is assigned to a global speed master (read above), it can be useful to adjust a speed scale. Tapping this button will open the Select Speed Scale pop-up.
In the pop-up, selecting one of the multipliers or dividers is possible. This multiplies or divides the speed by the selected factor.
Speed from Rate
This links the speed to follow the rate.
Protect
This group of settings is used to protect the sequence from different actions.
Input Filter
The playback filter is described in a little bit more detail in the Cues and Sequences topic. Tapping this button opens the Assignment Editor pop-up: See above about the output filter.
The fixtures and attributes in the world or filter are allowed to pass the filter and can be stored in the sequence.
Swap Protect
Activating this option protects this sequence from the Swap playback action. Learn more about this action in the Swap Keyword topic.
Kill Protect
Activating this option protects this sequence from the Kill playback action. Learn more about this action in the Kill Keyword topic.
Include Link Last Go
This setting is On as default. When it is set to Off, playing back a sequence will not trigger the LinkLastGo functionality in the sequence sheet.
Use Executor Time
This makes the executor playback cues using the stored timing. If this is turned on, it is affected by the Exec Time master fader, who overwrites the timing.
Off when Overridden
The Off when Overridden function allows a sequence to be automatically turned Off if another sequence has taken control with all the attributes in the sequence = this executor does not control any attributes.
Lock Sequence
The sequence is locked against changes when this is On. It can still be played back.
MIB
This group is about MIB settings for the sequence. Read more about MIB in the Move In Black topic.
MIB
Enable, disable, or force MIB for the sequence. The options are:
- Enabled:
MIB will be performed according to the cue and cue part MIB settings. - Never:
MIB will never be performed for this sequence. All cue and cue part-specific MIB settings will be ignored. - Force Early:
Forces the early MIB for all cues that can perform MIB as soon as the dimmer is closed. Further MIB settings specified per cue or cue part will be ignored. - Force UponGo:
MIB is forced to be executed with the next cue transition after the dimmer is closed. For all cues that can perform MIB. Further MIB settings specified per cue or cue part will be ignored. - Force Late:
Forces the MIB latest in the cue before the dimmer opens again. For all cues that can perform MIB. Further MIB settings specified per cue or cue part will be ignored.
MIB Mode
This setting defines which MIB mode will be executed when doing a MIB. The MIB Mode per cue or cue part needs to be set to Default. The options are:
- None
- Early
- UponGo
- Late
Learn about the mode types in the MIB topic (link above).