|
grandMA3 User Manual » Executors » Assign Object to an Executor
|
Version 2.0
|
Many objects can be assigned to an executor. The executor is a physical key, fader, or knob that controls the assigned object. The physical devices can also be represented as on-screen controllers.
|
|
Quick Steps: |
These are the simplest steps to assign something to an executor - read below for details. |
Assigning Objects Using Keys and Pools
It is easy to assign something to an executor.
Press Assign followed by the desired object and then the executor to which it should be assigned.
Here are three variations on how it works. The examples use sequences, but it can be any of the allowed types:
Example 1
Using only the keys to assign sequence 3 at executor number 105 on the current page, type:
Assign Sequ 3 At MA + X16 | Exec 1 0 5 Please
Example 2
It is also possible to use a combination of keys and pools.
Having a pool visible on one of the screens makes it possible to combine key presses with pool selection.
- Tap and swipe out of the sequence pool object that should be assigned.
- Swipe to the Assign option and release the screen.
- Press one of the keys associated with the desired executor.
Example 3
Pressing the keys puts keywords into the command line. This means it can also be typed as a command line input.
|
|
User name[Fixture]>Assign Sequence 4 At Page 2.301 |
This command will assign sequence 4 to executor 301 on executor page 2. The page keyword needs to be used when addressing executors on specific pages. The page needs to exist before it can be addressed.
Assign Objects Using the Assign Menu
The Assign menu offers a visual approach to assigning something to the executors. Use the assign menu by selecting the executor first and then selecting the object.
There are two main ways to open the Assign Menu.
- Press Assign followed by any of the keys associated with the desired executor.
-Or-
- Tap the executor label in the Mini Executor Bar (do not do a long press - it opens the editor instead).
This is the Assign menu:
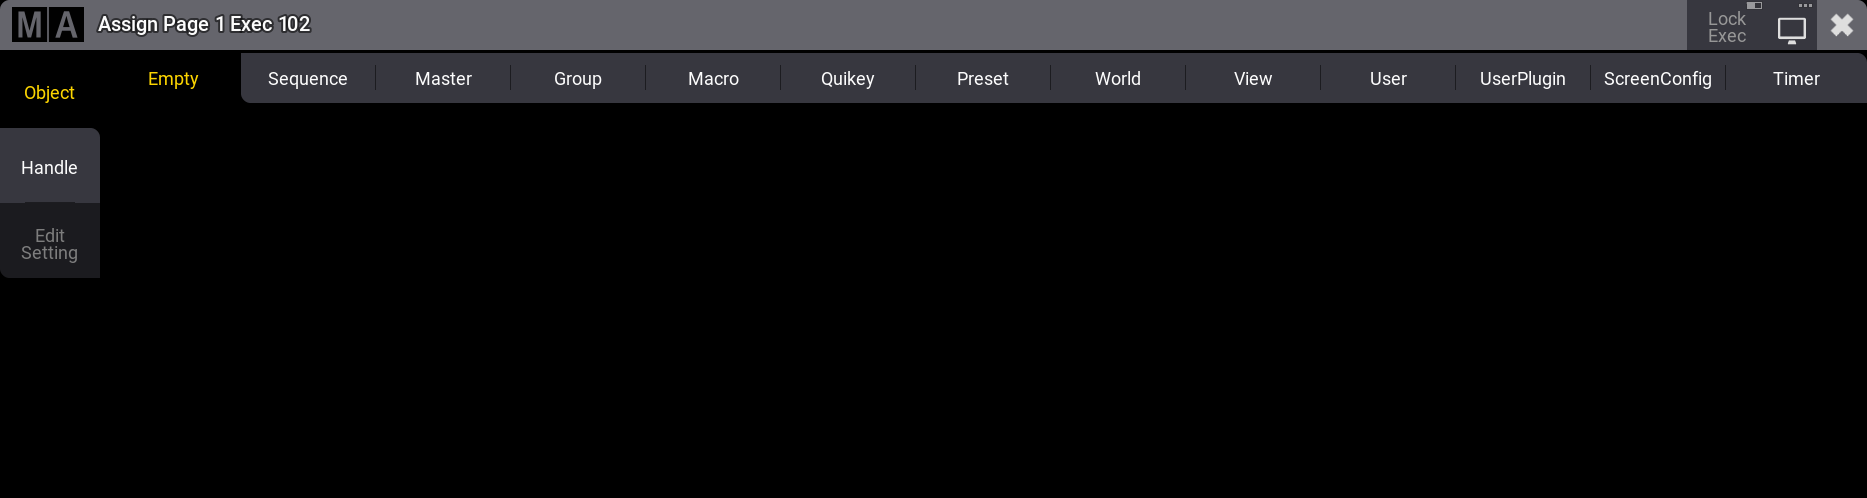
The title bar has a toggle button called Lock Exec. This can be used to lock the executor from changes. It does not lock the executor from playing back or performing other functions normally; the lock only prevents making changes to the executor.
This is the Object page of the Assign menu. This page is selected by tapping Object on the right side.
The top has several tabs. One for each object type that can be assigned to the executor and a special one used to select an Empty object. The other tabs open a selection list. The list will contain the possible objects of that type.
The different types are:
Tap Sequence to open the list of possible sequences. It could look like this:
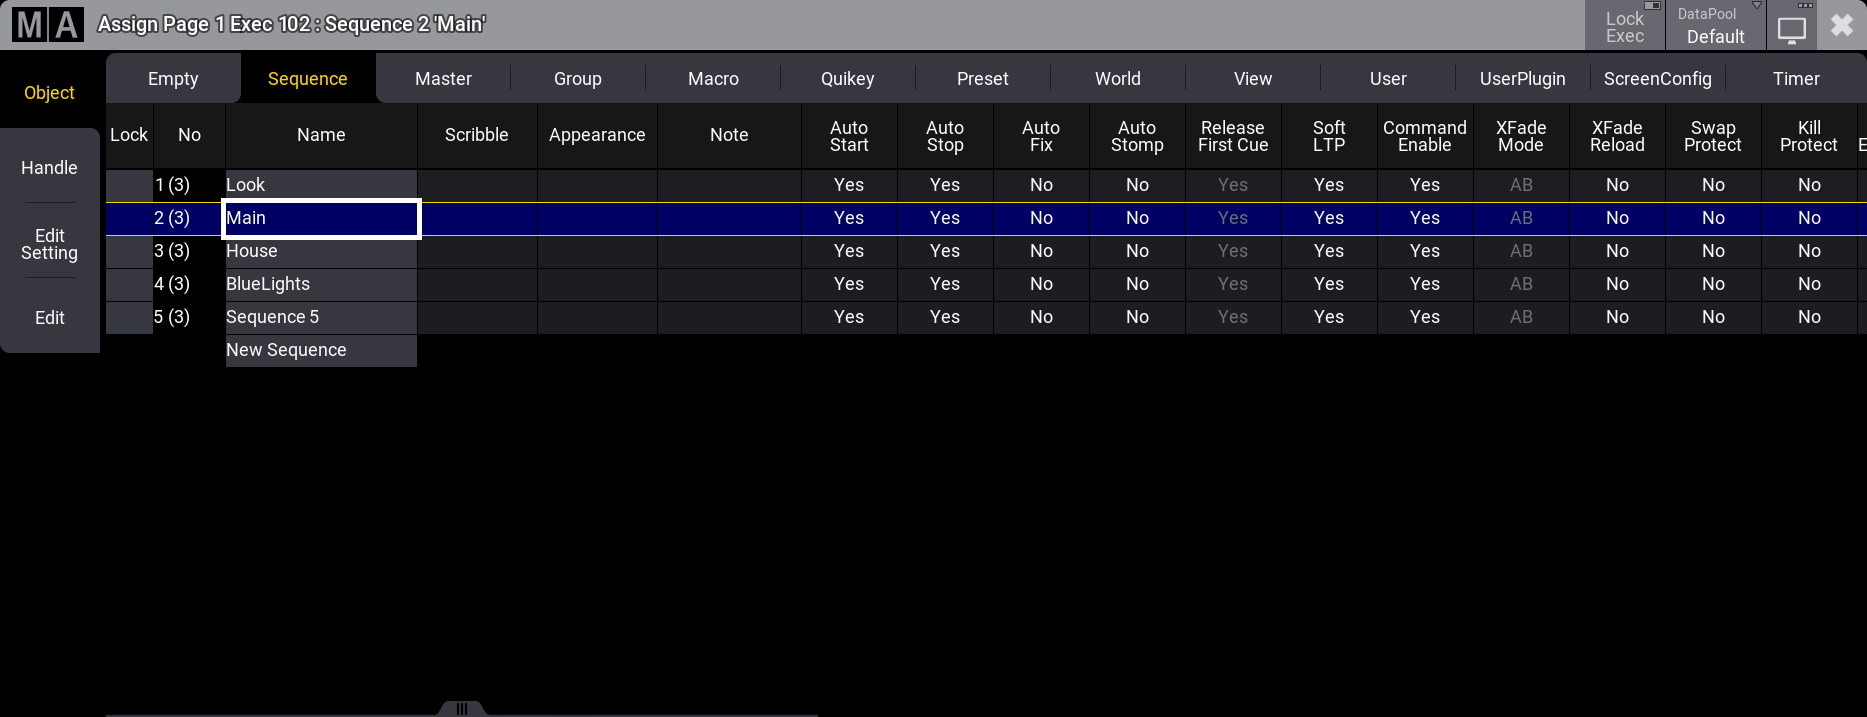
Each allowed type that can be assigned to an executor provides a list of the available objects. The DataPool in the title bar makes selecting an object from a different data pool easy.
Select the desired object by tapping it.
The default handle configuration is applied to the executor. This, including executor expansion, can be defined on the handle page.
Change Key Function and Executor Size
When the executor has something assigned, changing the functions assigned to the executor keys, faders, and knobs is possible.
If continuing to work in the Assign menu, tap Handle on the left side.
It could look like this:
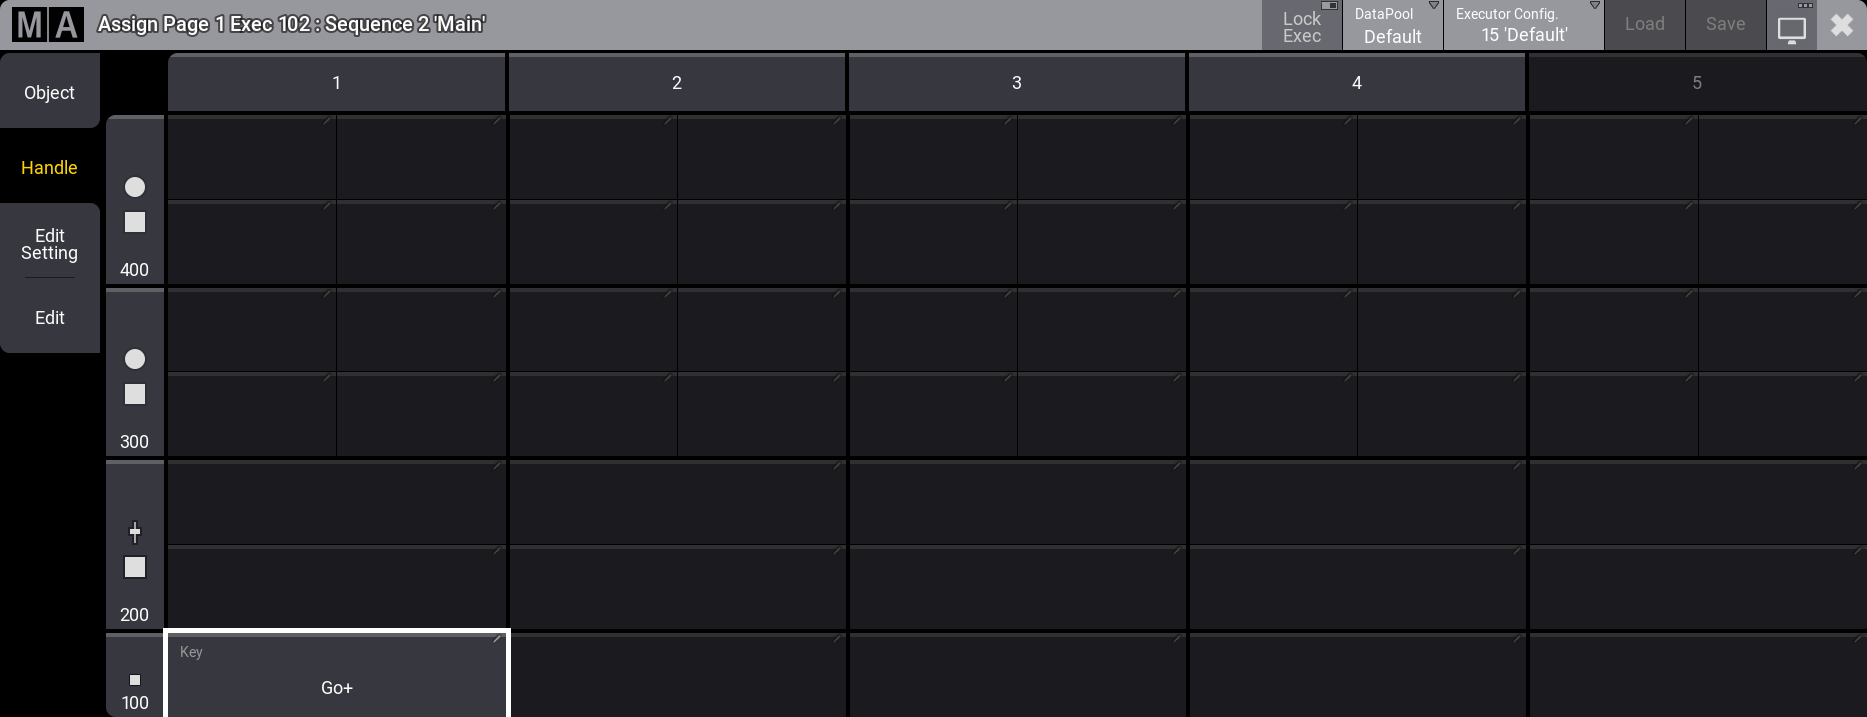
Executors can be expanded if the executors above and to the right are empty. They are grouped into sections of 5 in width, and this grouping cannot be crossed. For instance, executors 104 and 105 cannot be extended into executor 106.
They can also be extended upwards if there is available space. The example image above shows Executor 102 with space above and to the right. This executor can be extended to a width of 4 columns and a height covering all four executor rows.
It is expanded by tapping the column numbers on the top and the row numbers on the left. When it is expanded, then more buttons get available for the executor.
The 100-row only offers a single executor button. The 200-row has a button and a fader. Both the 300- and 400-rows have a button and an encoder knob. If an executor is extended to cover all four rows, then it could look like this:
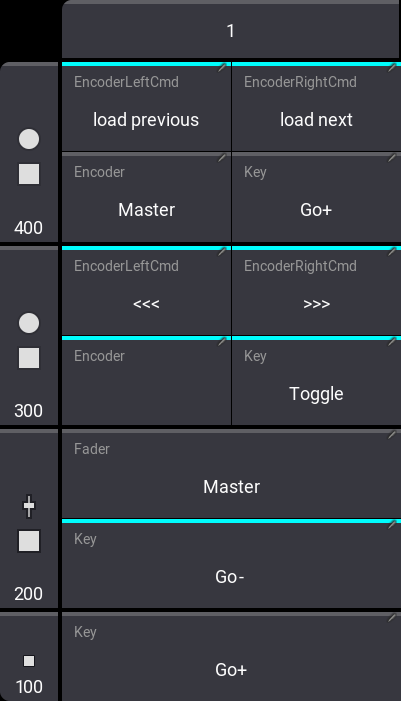
The keys, faders, and encoders can have different functions. The options might vary depending on the object assigned to the executor.
Tap any available button to get a small select pop-up with the available options.
The Encoder Left Cmd and Encoder Right Cmd open a pop-up that allows any command to be typed. There is even an option for different commands if the MA key is pressed while the encoder knob is turned.
|
|
Hint: |
| The encoder commands are mutually exclusive from the normal encoder function. In the example image above, there is both an encoder function and a command function. The encoder commands have a higher priority and overwrite the normal encoder function. |
The normal key options are:
- Empty:
The key has no function. - At:
Used with presets. Performs an At command on the assigned preset. Learn more about presets on executors in the Use Presets topic. - <<< (GoFastBackward):
This jumps one cue back without cue timing. - >>> (GoFastForward):
This jumps one cue forward without cue timing and will not trigger other cues. - Black:
This turns off the intensity of the executor as long as the button is pressed. - DoubleSpeed:
Pressing this doubles the resulting speed of the speed master. - Call:
Used with screen configurations. Performs a Call command on the assigned screen configuration. - Flash:
This turns the executor on and sets a virtual intensity master at 100, as long as you have the button pressed. When the button is released, it will return to the status before it was pressed. - Go+:
This executes a "Go". It uses fade and delay times. - Go-:
This fades backward using fade and delay times. - Goto:
This opens a pop-up where a cue can be selected. Tapping a cue in the pop-up immediately performs a Goto command on that cue. This means that the selected cue is now active. - HalfSpeed:
Pressing this halves the resulting speed of the speed master. - Kill:
This sequence playback action turns this sequence On and all other sequences Off. Sequences can be protected from the Kill action in the Sequence Settings. - LearnSpeed:
This sets the speed. By pressing it at least two times, it automatically adjusts the speed. - Load:
This opens a pop-up that lists the cues in the sequence. Tapping a cue performs a Load command on the cue, which will perform a go to the selected cue when the next Go command. - LogIn:
Used when a user is assigned. Performs the LogIn command for the assigned user. - Off:
This turns the executor Off. - On:
This turns the executor On. - Pause:
This holds an active fade and/or delay. - Rate1:
This resets rate fader. - Select:
This selects the executor. - SelectFixtures:
This selects the fixtures used in the object assigned to the executor. - Speed1:
This resets the speed fader to the default speed. - Swap:
Swap temporarily overrides the master level of executors to full and sets all other master levels to zero. Executors can be protected against the Swap in the Sequence Settings. - Time:
This toggles the time function for the executor. It overwrites the stored cue part times when it is On. - Temp:
This turns the executor on as long as it is pressed. The temp function uses the fade times from the cues and the level set by the intensity master. - Toggle:
This turns an active executor Off and an inactive executor On. - Top:
This fades to the first cue in an assigned sequence.
These main functions are keywords - they can be found in the All keywords topics with detailed descriptions of the keywords.
The functions can also be assigned using the keys or commands. Not all functions have a physical key that can be used; it can be done by writing the command using the keyboard.
Key Example
If the desired function has a physical key, assigning it to an executor key is easy. Press Assign, the function key you want, and the executor key where the function should be.
Example 1
For instance, to assign the Off function to the key associated with executor number 101, you need to press the following keys:
Assign Off – (the executor key in the lower-left corner on consoles)
Example 2
Assign the Fix function to an executor key
Assign MA + Pause [desired executor key]
Command Example
Functions can be assigned using the command line.
This is the general syntax:
Assign [Function] at [Location]
The location must be a specific physical key associated with an Executor Page.
To assign the Pause function to the top key associated with executor 5 on executor page 8, the following command could be typed:
|
|
User name[Fixture]>Assign Pause At Page 8.405 |
Change Fader Function
It might be possible to change the function of the fader. This depends on what type of object an executor has. They are changed just as the executor keys - by tapping the onscreen representation in the assign menu (see above).
The Select Fader pop-up lists the possible options.
- Empty:
Fader has no function. - Master:
Controls the intensity. The keyword is FaderMaster. - X (CrossFade):
Crossfades between two cues. Current cue and next cue. The current cue will change when the fader reaches the other end position from where it started. The keyword is FaderCrossFade. - XA (CrossFadeA):
Is the first of a two-fader manual crossfade between two cues. Works along with XB. The crossfade function can be changed in the Sequence settings. The keyword is FaderCrossFadeA. - XB (CrossFadeB):
Is the second of a two-fader manual crossfade between two cues. Works along with XA. The crossfade function can be changed in the Sequence settings. The keyword is FaderCrossFadeB. - Temp:
Crossfades the cue on when pulled up, and off when pulled down. The keyword is FaderTemp. - Rate:
Divides the fade and delay time in a sequence by the value of the fader. If Speed from Rate is on, it is also valid for phaser speed stored in cues - see Sequence Settings topic. The keyword is FaderRate. - Speed:
Controls the phaser speed in a cue. The keyword is FaderSpeed. - Time:
Sets the time for the executor time overwrite. The keyword is FaderTime.
The above functions are described in more detail in each of their keyword topics.
The functions can also be assigned using the command line.
The syntax is the same as the key functions. Except for "empty" - see examples below.
Examples
Example 1
To assign the rate function to executor number 209 on the current page, you will need to type the following command:
|
|
User name[Fixture]>Assign FaderRate At Executor 209 |
Example 2
If you want to assign the "Empty" function to the executor fader, then it is necessary to use a different syntax. This example assigns empty to the left-most fader on page 1:
|
|
User name[Fixture]>Set Page 1.201 Property "Fader" "Empty" |
Save the Key and Fader Assignment
The current assignment of key and fader functions can be saved into a pool of different configurations. Read more in the Executor Configurations topic.