Pool Windows
|
grandMA3 User Manual » Windows, Views, and Menus » Pool Windows
|
Version 2.1
|
Most of the show data in grandMA3 are organized in pools, which are part of a Data Pool. So, in essence, everything except the patch and fixture setup are stored inside a Data Pool. This makes having several shows with the same fixture setup but different data pools easy.
Pools contain a lot of different data. For instance, the Groups pool contains information about the selections of fixtures. The Views pool contains information about the arrangement of windows on a screen.
Pools are made like any other window - read more in the Add Windows topic. Pool arrangement and resizing are just like any other window - read more in the Rearrange topic.
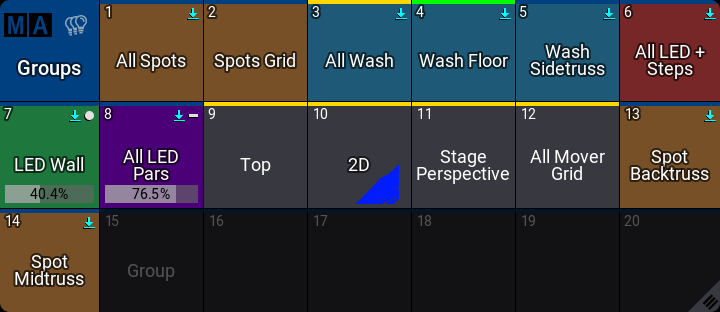
This is an example of the Groups pool:

Each pool has a title field. In the example above it is the first blue square with the MA logo, the pool icon (if available), and the name of the pool.
Tapping the logo opens the settings for the entire pool - read more about the window settings in the Window Settings topic. Read the relevant topics for details about the pool or preset specific settings.
Some pools have specific uses. This topic and the following subtopics describe the general concepts. Read the specific topics to learn the details of each type of pool.
Pool Object
All other fields except the title field contain a Pool Object. If something is stored in the pool object, it has a lighter gray color (default color) and a label (see the example pool above). It can also contain pool-specific information like a master level or icons that show information about the content or pool object settings.
The number in the upper left corner of each pool object is the unique pool number identifier. It can be used when the object is called. For instance, using Group 1 in the command line is the first object in the groups pool. The name of the pool object can also be used to call the group. For example, Group "All Spots" calls (all) the groups with that name. Asterisk can be used as a joker sign when using object names. Typing Group "All*" calls all the group objects where the name starts with All.
Working with or using pool objects can be done in many ways. The examples in the subtopics use the command line, but many of the operations could also be performed using the keys, screens, or any combination thereof.
Some pools have Selected pool objects. It is visualized with a yellow frame around the selected pool object.

A different pool object can usually be selected by tapping the object in the pool or using the Select keyword.
Swipey Commands
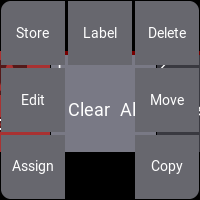
Each pool object can open a set of Swipey Commands. They give quick access to some common operations with the pool object.
This is how to open the swipey commands:
- Tap and hold the pool object.
- Move the finger/cursor outside the pool object while keep pressing the screen.

- Keep the screen pressed and move the finger/cursor to the desired command.
- Release the screen.
These are the available commands with the swipeys:
- Assign:
This adds "Assign" and the pool object type and number in the command line. Waiting for more user input. - Edit:
This starts the edit mode for the pool object - this is about the content of the pool object. - Edit Setting:
This opens a small editor that gives access to editing this pool object's settings - this is about the settings for the pool object. - Store:
This executes "Store" plus the pool object type and number. This is useful for storing new pool objects - for instance, groups. - Label:
This executes "Label" plus the pool object type and number. - Delete:
This executes "Delete" plus the pool object type and number - The result is deleting the pool object. - Move:
This adds "Move" plus the pool object type and number in the command line. Waiting for the user to tap the new location. - Copy:
This adds "Copy" plus the pool object type and number in the command line. Waiting for the user to tap the new location.
Sub topics