grandMA3 User Manual Publication
Quick Start
Quick Start

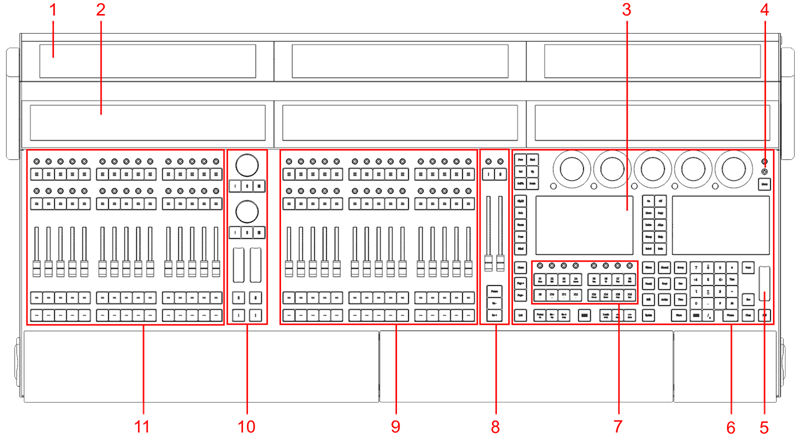
- Screens 1-3
- Letterbox screens 8-10
- Command screens 6+7
- Power key
- Level wheel
- Command area
- Xkeys section
- Master area
- Right executor area with 3 executor sections
- Custom area
- Left executor area with 3 executor sections

- Desk light
- powerCON TRUE1
- Power switch
- DMX A-G
- DisplayPort 1-5
- LTC
- USB 3.0
- Audio Remote In
- DC Remote Control
- Ethernet 1-3
- S/PDIF In+Out
- USB 2.0
- MIDI In+Out
Hint:
To display the rear panel connectors on the letterbox screens, type:
To display the rear panel connectors on the letterbox screens, type:
Menu "Connectorview"
Turn on the console
- Unpack the device.
- Remove the packaging, cushioning material, and dust cover.
- Place the device indoors on a stable surface.
- Connect external monitors using a native DisplayPort connector.
- Connect an external mouse or keyboard using the USB ports.
- Insert the power connector into the corresponding jack.
- Connect the power plug with the mains.
- Turn on the power switch on the rear panel.
- Press the power key on the front panel.
The device starts booting.
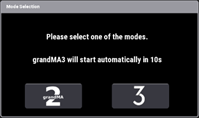
The Mode Selection dialog appears:

-
Tap an icon to select a mode.
For more information, read the Mode2 topic in the section grandMA3 Mode2 of the grandMA2 User Manual.
Turn off the console
- Press the power key on the front panel.
A warning pop-up appears:

- Tap OK.
The grandMA3 console shuts down. - Turn off the power switch on the rear panel.
For more information see the topic Shut down the System in the grandMA3 User Manual online available at www.malighting.com.
Update the software
- To update a grandMA3 device, download the latest software version from www.malighting.com.
The required installer is called grandMA3 Software x.x.x.x. - Extract the zip file "grandMA3_stick_v.x.x.x.x.zip" and copy the folders EFI, ma, and the update.scr file into the root directory of your USB flash drive.
- Insert the USB flash drive in a USB port.
- Turn off the grandMA3 device.
- For devices without an integrated keyboard (e.g. grandMA3 compact console), connect an external keyboard with a USB port.
- Turn on the grandMA3 device.
- Press the key 8/F8 on the internal or the external keyboard several times.
The Boot Manager opens. - Scroll down to EFI USB Device using the arrow keys.
- Press Enter on the (external) keyboard.
The console starts to boot. - Follow the onscreen instructions during the update process.
Important:
To configure the device, or to update or downdate the installed software, use a grandMA3 console or your PC or laptop with the grandMA3 onPC software installed. For more information see the topics Control other MA Devices and Update the Software via Network Update in the grandMA3 User Manual online available at www.malighting.com.
To configure the device, or to update or downdate the installed software, use a grandMA3 console or your PC or laptop with the grandMA3 onPC software installed. For more information see the topics Control other MA Devices and Update the Software via Network Update in the grandMA3 User Manual online available at www.malighting.com.