Create New Presets
|
grandMA3 User Manual » Presets » Create New Presets
|
Version 2.0
|
Please read the general Preset topic and the Preset Pool topic before this topic to get an understanding of the presets and how they are organized.
Creating and using presets requires some fixtures patched in a show file or the universal fixture in the patch for general universal presets.
For more information on patching fixtures, see Add Fixtures to the Show.
When presets are stored, some defaults are used unless other choices are actively made.
Some of these choices are accessible in the Store Options pop-up. This is opened by keeping Store pressed for approximately 2 seconds. The pop-up has a section regarding the presets:

|
|
Hint: |
| Changing a setting here without saving this as the new preference only uses the changed setting for the next store action. Learn more about it in the Store Options and Preferences topic. |
The preset mode is one of the options. The preset pool has a default setting, but a different mode can be chosen by tapping Preset Mode until it has the desired mode. Learn about the presets modes in the Presets topic and the Preset Pools topic.
Keep Activation means that when the preset is stored, the newly created preset is active in the programmer, ready to be stored in, for instance, a cue. Turning this setting Off stores the preset but leaves the values as inactive values in the programmer.
MAtricks allows storing MAtricks settings in the preset.
Read about Embedded and Input Filter below.
Input Filter
The Input Filter setting in the store options defines if the input filtering in preset pools are used. If this option is active, then it is only possible to store attribute values inside the preset pools if it is allowed by the filter. If the input filter setting is empty, a Feature Group filter is applied. This means that only attributes of the corresponding feature group can be stored in the preset pool. For instance, pan attributes can be stored in the Position preset pool but not in the Color preset pool.
The All preset pools do not have any feature group filtering. Any attribute can be stored, regardless of the Input Filter setting.
Custom filters and worlds can be assigned to the preset pool, or individual presets using the preset settings or individual preset options. Filters and worlds can also be assigned using the following syntax: Assign Filter [filter_ID] At Preset [preset_ID]. Substitute filter with world if a world needs to be assigned as an input filter.
Learn more about filters and worlds in the Worlds and Filters section. Learn about the preset pool settings in the Preset Pools topic.
Simple Static Preset
Storing a preset with simple static values is very easy:
- Select some fixtures.
- Give some of the fixture attributes a value in the programmer.
- Store this in the relevant empty pool object.
This is the general workflow.
The programmer values are stored in the preset if they are allowed to pass the input filter (read above).
The best way to work with presets is to have the desired preset pool available on a touch screen. Then the pool can be tapped to store and call the presets.
It is considered a static preset if it only contains values in step one. This means that the values are not changing. Read the Phaser topic to learn what steps are.
Global Preset Data
The global data is stored on real fixtures within the patch.
When storing new global presets, the global data will be created within the new preset automatically. When all data for the fixture type is the same, the first fixture from the stored data will be used to hold the global data within the preset.
Each fixture type gets its own global data value so that the global value can be adjusted per fixture type.
When adding selective data to the preset for one of the fixtures that hold the global data, or when deleting the fixture from the show, the global data will be moved to the first patched fixture for the fixture type. If the global data was held before by the first fixture, the data will be moved to the next patched fixture of this fixture type.
When editing a preset with global data, the fixtures with the global data in the programmer will display a yellow square marker in the top right corner of the attribute cell within the fixture sheet.
|
|
Important: |
| When converting old show files from grandMA3 v1.5 or prior, to grandMA3 v1.6 or later, the data from the global fixture type object will be migrated to the first patched fixture of the same fixture type that is not already holding selective data. |
The global value is determined by the average across all values of attributes within the same activation group:
(Value of fixture 1 + Value of fixture 2 + Value of fixture 3 + ... value of fixture n) / Number of used fixtures = Average value
The value closest to the calculated average value will be the global value. The fixture with this value will then hold the global value. In the case of color, all color attributes are handled together when choosing the global value.
Furthermore, the method to determine the global data across several attributes is now considering all attributes of the same activation group. This will result in taking all attributes of the same activation group of one fixture and not taking the different attributes from different fixtures.
Universal Preset Data
Storing a universal preset using a real patched fixture will store global data for active fixture types when the preset was stored.
Universal presets are more versatile and can use the data from a real fixture with global values when the Universal Fixture has no data inside the preset.
This has the added benefit of creating universal presets using a real fixture from the stage if the universal fixture has these attributes.
When calling a universal preset, the software first uses global fixture type data and then uses the data from the universal fixture. When no data exist for the universal fixture, the first fixture with global data is used instead.
|
|
Hint: |
| When calling universal color, it will be transformed through the color engine. If for instance, a 7-color LED is used to create a color and call that data universal, a similar color will be called on an RGBA fixture. |
Embedded Preset
The concept of embedded preset is explained in the Presets topic.
This is the workflow:
- Select the desired fixtures.
- Recall an existing preset so the preset is in the programmer.
- Store a new preset with the Embedded store option active.
A recipe preset could be an alternative to an embedded preset. Learn more about them in the Recipe Presets topic.
Store Selective Preset
- Select one or more fixtures.
- Give the fixture attributes some values in the programmer.
- Press and hold Store until the Store Settings open.
- Tap Preset Mode until the mode is Selective.
- Tap the desired preset pool object - ensure it is valid for the attribute values.
Store Global Preset
Attribute values need to be tagged with a global flag to be stored as global data.
- Select one fixture from one or more fixture types.
- Give the fixture attributes some values in the programmer.
- Press and hold Store until the Store Settings open.
- Tap Preset Mode until the mode is Global.
- Tap the desired preset pool object - ensure it is valid for the attribute values.
Store Universal Preset
- Select one or more fixtures or the universal fixture.
- Give the fixture attributes some values in the programmer.
- Press and hold Store until the Store Settings open.
- Tap Preset Mode until the mode is Universal.
- Tap the desired preset pool object - ensure it is valid for the attribute values.
Values that are a part of the universal fixture type are stored in this fixture. Attributes outside the scope of the universal fixture type are stored as global values.
MAgic Presets
The concept of MAgic presets is explained in the Presets topic.
|
|
Important: |
| The MAgic presets only work if the stored fixtures have different grid positions on the relevant axes, and the best result is if they start at grid position 0 and the fixtures are next to each other. This does not need to match the real-world position; it is only for the individual positions between the fixtures. |
|
|
Important: |
| Calling a MAgic preset in the programmer does not create a link to the preset. The fixture values are calculated based on the selection and stored as hard values. The only way to keep a reference to the MAgic preset is if the preset is used in a recipe. Learn more about recipes in the Recipe Preset topic. |
This is the general workflow for creating a MAgic preset:
- Select all the needed fixtures.
- Use Next to give the first fixture values to match the first point in the range.
- Press Next to select the next fixture and give it values for the next point in the range.
- Repeat step 3, if needed, to have a maximum of five fixtures (on each axis in the selection grid).
- Select all the used fixtures using Set.
- Store the preset in an appropriate preset pool.
- Edit the preset settings and tap MAgic to turn the MAgic function On.
The new preset can now be used by as many fixtures as needed.
Learn more about editing the Edit Presets topic.
|
|
Known Limitation: |
| Storing MAgic preset only works with selective data as you cannot define multiple points across universal or global fixtures. |
Example:
A path must be defined to control a color range from blue to yellow. The wish is to have the range go through the magenta/red area in a CIE color picker - instead of going through white or the blue/green area. Three fixtures are needed to define the range.
Requirement:
- Patch several fixtures (10 or more) with color mixing possibilities.
- Create a view with the color picker (in CIE mode) and the All1 preset pool.
Follow these steps:
- Select three of the fixtures.
- Turn the fixture intensity to 100%.
- Press Next to select the first of the three fixtures.
- Tap the blue area in the color picker.
- Press Next to select the second fixture.
- Tap the magenta area in the color picker.
- Press Next to select the third fixture.
- Tap the yellow area in the color picker.
- Press Set to select all three fixtures again.
- Press Store.
- Tap an empty pool object in the All1 preset pool.
- Use the swipey menu to select Edit Settings.
- Tap MAgic to turn On the option and close the settings.
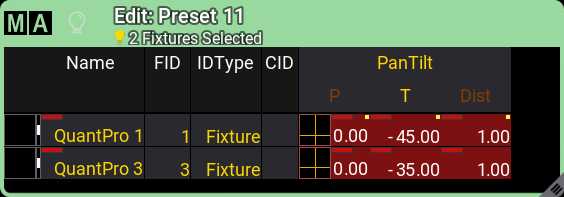
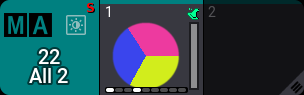
Now there is a preset that looks something like this:
- Clear the programmer.
- Select all the fixtures.
- Tap the MAgic preset.
The result should look similar to this in the color picker:
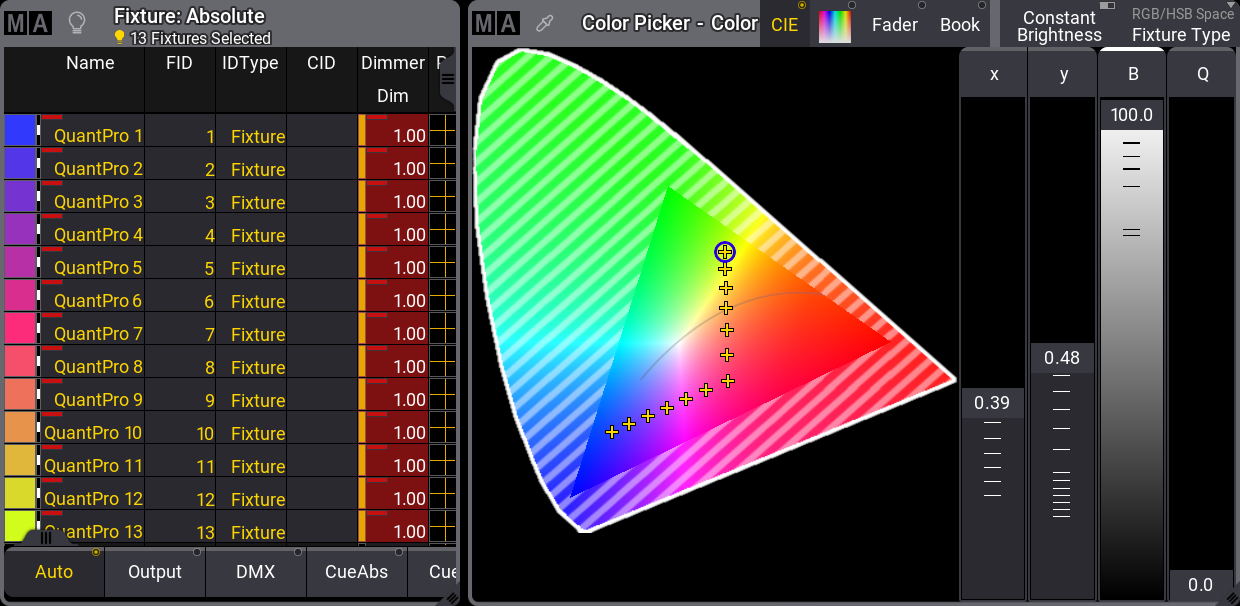
The dimmer values are not needed for this example; it just makes it easier to see the result.
Multistep Preset
Multistep presets are presets that contain values in more than one step. It is explained in a little bit more detail in the Presets topic. For an explanation of steps, please read the Phasers section.
With Phaser information in the programmer, a preset can be stored. This will then be a multistep preset.
|
|
Hint: |
| Presets can be used for more advanced functions with Recipes. Please read the Recipe Presets topic for more about recipes. |