|
grandMA3 User Manual » Remote In and Out » OSC (Open Sound Control)
|
Version 2.1
|
Open Sound Control, or OSC, is a client and server system that defines a message address pattern used to address elements in the receiving server. Open Sound Control allows devices of different types to control other devices via a peer-to-peer messaging protocol. OSC messages are human-readable, so they are more than just numbers and strings (unlike, for example, MIDI Show Control, or MSC).
The grandMA3 software supports OSC 1.1. For more general information about OSC, e.g. OSC Packets, see https://ccrma.stanford.edu/groups/osc/spec-1_0.html.
OSC Structure
OSC messages follow a specific pattern:
"(/prefix)/[OSC Address],[OSC Type],[Value]"
Prefix: This is optional, depending on your system setup. It can be used in a more complex OSC network to distinguish messages intended for one set of devices (e.g., lighting consoles) from others (e.g., sound consoles). If a prefix is specified, only OSC messages beginning with the specified prefix are processed, and the prefix is prepended to outgoing OSC messages.
| Hint: | |
| The prefix must not contain any slashes ("/"). |
OSC Address: This is the target you are controlling on the receiving device(s), for example /Fader201 would be the address to move the fader for executor 201 in grandMA3. Sometimes the address will be more complex, for example /Page1/Fader201 would be the address to move the fader for executor 201 on page 1 in grandMA3.
| Restriction: | |
| Only OSC messages are supported when receiving or sending an OSC packet. OSC Bundle messages are currently not supported. |
OSC Type: This is the type of value you're sending, for example:
i = integer
f = float
s = string
T = true
F = false
Value: This is the value you send to the target.
An example OSC command to set the fader for executor 201 to 100 might be:
- "/Page1/Fader201,i,100"
- or with a prefix to specify only, e.g. grandMA3 devices: "/gma3/Page1/Fader201,i,100"
OSC Menu
To open the OSC Menu:
- Menu - In & Out - OSC.
The OSC Menu opens:
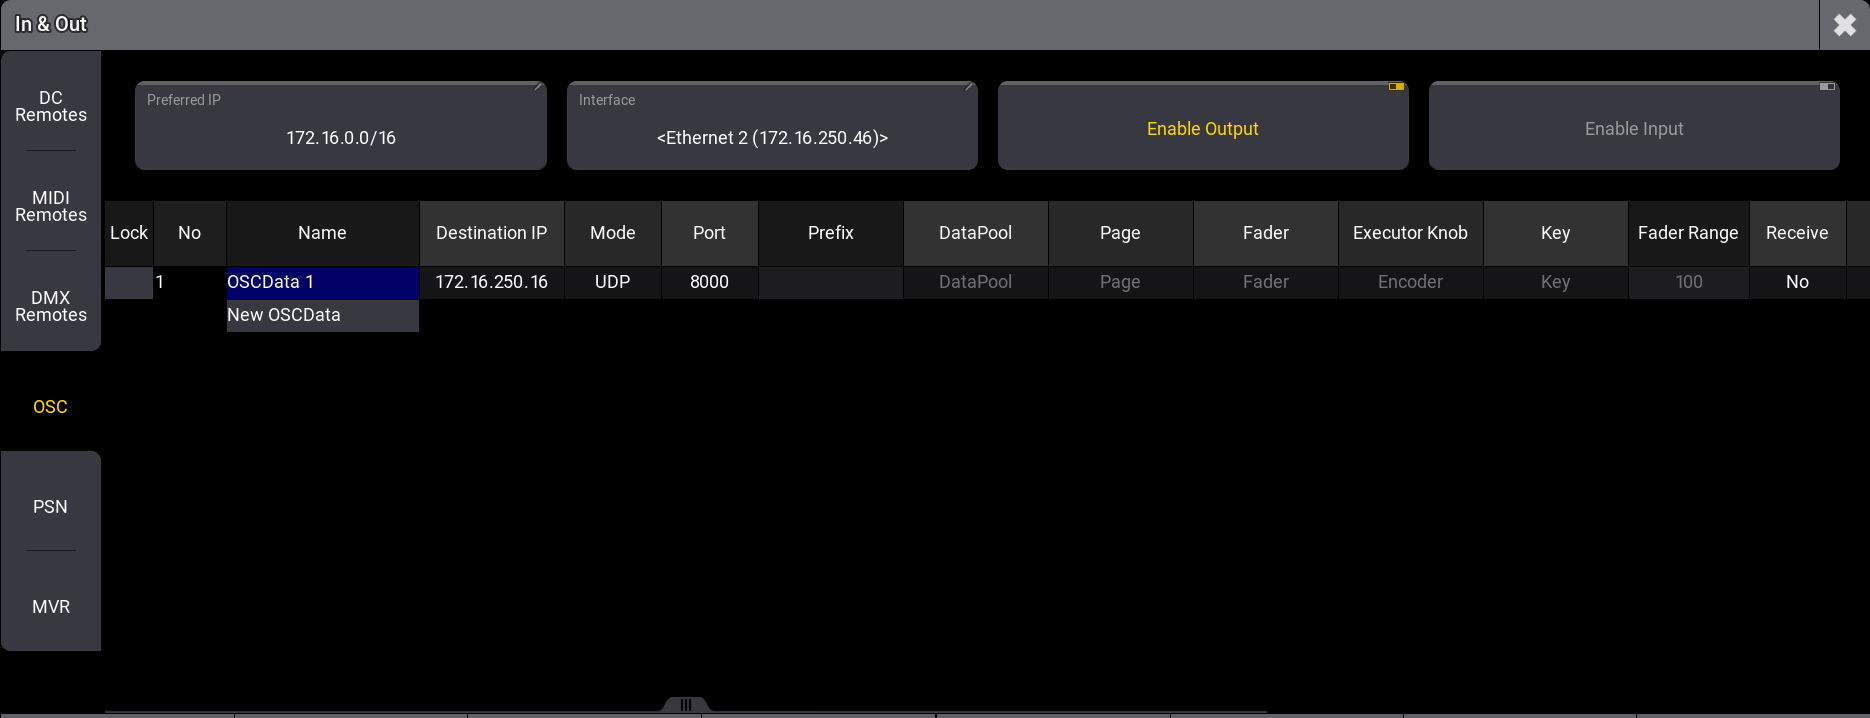
At the top of the menu, the following four options can be set:
- Preferred IP: This is the preferred IP address or address range used by the OSC protocol.
- Interface: Tap this button to open the Select Interface pop-up to select the desired network interface. For more information, see Interfaces and IP.
- Enable Output: This toggle button must be enabled to transmit OSC. See Station Control in Network preferences for more information.
- Enable Input: This toggle button must be enabled to receive OSC. See Station Control for more information.
| Hint: | |
| When receiving OSC messages, Enable
Input will highlight its title bar in yellow. When
sending OSC messages, the title bar of Enable
Output will be highlighted. |
The following are the specific parameters that can be set in the OSC menu:
- Name: Sets the name for this configuration.
- Destination IP: Sets the IP address for sending OSC data. A specific IP address or a broadcast IP can be set.
- Mode: OSC packets can be sent via UDP or TCP.
- Port: Specifies the network port of the incoming and/or outgoing OSC packets.
- Prefix: A prefix can be set by the user if he needs to. A prefix can be used for example as a criterion for limiting the range of possible receivers, e.g. /lighting would only take packets with /lighting into account, and discard OSC packets with the /sound-prefix.
- Page: Specifies which OSC Address of incoming OSC messages is routed to pages.
- Fader: Specifies which OSC Address of incoming OSC messages is routed to faders.
- ExecutorKnob: Specifies which OSC Address of incoming OSC messages is routed to the mini encoders.
- Key: Specifies which OSC Address of incoming OSC messages is routed to keys.
- FaderRange: Specifies which OSC value range is used for the fader, e.g. FaderRange 255 sets OSC 0-255 to 100%.
- Receive: Specifies if OSC data (but no commands) shall be received.
- Send: Specifies if this OSC configuration sends OSC data (but no commands).
- Receive Command: Specifies if commands for the command line will be received via OSC. This setting is independent of the general receive setting.
- Send Command: Specifies if commands of the command line will be sent via OSC. This setting is independent of the general send setting.
- EchoInput: Specifies if the input data shall be displayed in the system monitor.
- EchoOutput: Specifies if the output data shall be displayed in the system monitor.
- Note: Sets a note for this configuration.
With the buttons Receive All, Receive None, Send All, Send None, Receive Command All, Receive Command None,Send Command All, and Send Command None all OSC configuration lines can be modified together for the properties Receive, Send, Receive Command and Send Command.
Receive OSC
Requirement:
| Hint: | |
| If you want to use different ports for sending and receiving, you can create multiple configuration lines. |
Example
Example to receive OSC packets on a grandMA3 light console:
- Open the In & Out menu / OSC.
- Tap Enable Input. The input is enabled.
- Two-finger tap the first row below Receive in the grid. The parameter is set to Yes.
| Hint: | |
| When receiving OSC messages, Enable
Input will highlight its title bar in yellow. |
| Hint: | |
| Please note that in the example above, no prefix is defined. |
For more examples, see Advanced Examples.
Command Line Control
The entirety of the grandMA3 command line can be accessed via OSC by using the "/cmd" OSC Address and the string 's' OSC Type.
| Hint: | |
|
To receive OSC messages for the command line, set Receive Command to Yes in the corresponding OSC configuration line. |
- SendOSC 1 "/cmd,s,FaderMaster Page 1.201 At 50": Brings fader 201 on page 1 to 50% (same as the examples above but using gMA3 command line syntax instead).
- SendOSC 1 "/cmd,s,FaderMaster Page 1.201 At 50 Fade 5": Brings fader 201 on page 1
to 50% and additionally adds a fade time of five seconds
- SendOSC 1 "/cmd,s,Fixture 1 At 75": grandMA3 command line syntax is used to execute the command "Fixture 1 At 75" in the command line.
- SendOSC 1 "/cmd,s,Go+ Exec 402": Triggers executor 402.
- SendOSC 1 "/cmd,s,Patch Fixture 1 3.42": Patches fixture 1 to address 42 in Universe 3.
Object Playback Control
The Playback of the following pool objects are controlled through OSC:
- Sequences
- Masters
- Groups
- Presets
- Sounds
- Worlds
- Plugins
- Screen Configuration
- Timers
Pool objects are addressed by their enumerated address in the grandMA3 directory structure. For more information about the grandMA3 structure, see List keyword.
| Target |
Addresses | Type Tags | Arguments | Results | Example |
|---|---|---|---|---|---|
| Sequence X | /13.13.1.6.X | si | <Key function>,1 |
Press the Key of the given Key function. |
/13.13.1.6.1,si,Flash,1 |
| - |
- |
si |
<Key function>,0 |
Release the Key of the given Key function |
|
| - |
- |
sif |
<Fader function>,3,0 … 100 |
Set the Fader of the given Fader function to the given value in
percent. |
|
| - |
- |
sii |
<Fader function>,0 … 3, -100 … 100 |
Incrementally move the Fader of the Fader function by the given value in percent. |
| Important: | |
| The address in the grandMA3 directory structure may change between software
versions. Be sure to check the addresses when performing a software update. |
All playback functions that can be used when assigning the object type to an Executor can also be controlled through OSC. For more information, see Assign Object to an Executor.
Example
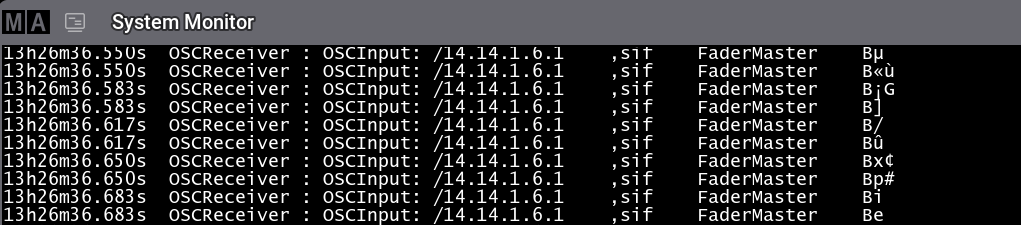
To display the argument of a playback control function in the System Monitor:
- On the reciving device, press Menu - tap In & Out - tap OSC menu.
- Tap Enable Input.
- Set Receive to Yes in the corresponding OSC configuration Line.
- Set Echo Input to Yes.
- Tap to close the In & Out menu.
- Open Add Window - More - System Monitor.
- Execute a playback command, e.g. move Fader201 on the sending device. The argument of the playback is displayed in the System Monitor of the receiver.
To retrieve the enumerated address of an object and display it in the Command Line History:
- Tap the command line.
- Type Lua "Printf( ObjectList( 'Master 1' )[ 1 ]:Addr() )" and press Please ( Replace the Master 1 in the example with
another object). The enumerated address is shown in the command line history.

Command Line History
For more information, see the Printf(string) Lua function.
Send OSC
|
|
Hint: |
| For more information about sending OSC, see SendOSC keyword. |
Example 1
To send OSC packets from a grandMA3 onPC station:
- Open the In & Out Menu / OSC.
- Tap Enable Output. The output is enabled.
- Two-finger tap Destination IP in the first row of the grid. The editor opens.
- Set the Destination IP of the receiving device and then press Please.
- Two-finger tab the first row below Send Command. The parameter is set to Yes.
- Send data to the receiving device, e.g by using the command: SendOSC 1 "/Page1/Fader201,i,50".
- The title bar of Enable Output turns yellow and OSC
packets are sent from grandMA3 onPC to the grandMA3 light console.

Title Bar of the Enable Output button is yellow when sending data
| Hint: | |
| When sending OSC messages, the title bar of Enable
Output will be highlighted. |
Object Playback Feedback
| Hint: | |
| To send OSC messages for playback action, set Send to
Yes in the corresponding OSC configuration line. |
Playback actions generate OSC output on the following objects, which can be used in the System Monitor when Echo Output is enabled:
- Sequences
- Masters
- Groups
- Presets
- Sounds
- Worlds
- Plugin Components
- Screen Configuration
- Timers
For more information on Plugin Components, see Plugins.
Example 2
- On the sending device, press Menu - tap In & Out - tap OSC menu.
- Tap Enable Output.
- Set Send to Yes in the corresponding OSC configuration line.
- Set Echo Output to Yes.
- Tap X to close the In & Out menu.
- Open Add Window - More - System Monitor.
- Execute a playback command, e.g. move Fader201. The command is send to the receiver.
Example 3
To send OSC data from a grandMA3 onPC workstation and receive it on a console:
Requirement:
- The IP addresses are set up correctly and the network is enabled on both devices .
- Some Fixtures are patched on the receiving console.
Sender:
- Open the In & Out Menu / OSC.
- Tap Enable Output. The output is enabled.
- Set Send Command to Yes.
- Tap the command line in grandMA3 onPC:
- Type SendOSC 1 "/cmd,s,Fixture 1 At 75" and press Please.
Receiver:
- Open the In & Out Menu / OSC.
- Tap Enable Input. The input is enabled.
- Set Receive Command to Yes.
- If the command is received, Fixture 1 on the console is dimmed down to 75%.
Example 4
To send OSC data from a grandMA3 onPC workstation to a third party device, e.g., a videoserver:
Requirement:
- The IP addresses are set up correctly on both devices
Sender:
- Open the In & Out Menu / OSC.
- Tap Enable Output. The output is enabled.
- Set Send Command to Yes.
- Tap the command line in grandMA3 onPC:
- Type SendOSC 1 "/Videoserver/Master,i,100" and press Please.
For more examples, see Advanced Examples.