
Assign a function
This topics describes how to assign an object to an executor and how to assign functions to executor keys and faders.
Assigning objects using keys and pools
It is quite easy to assign something to an executor.
Press the Assign key followed by what you want to assign and then where you want to assign it.
Here are three variations on how it works. The examples uses sequences, but it can be any of the allowed types:
Example 1
Using only the keys to assign sequence 3 at executor number 5 on the current page:
Assign Sequ 3 Exec 5 Please
Example 2
It is also possible to use a combination of keys and pools.
Having pool visible on one of the screens makes it possible to combine keys presses with pool selection.
- Press the Assign key
- Tap the sequence in the pool
- Press one of the keys associated with the executor where you want the sequence
Example 3
Pressing the keys are putting keywords into the command line. This means that it is of course also possible to type it as a command line input.
This command will assign (short version is "as") sequence (short version is "seq") to executor (short version is "ex") 5 on executor page 2.
Assign objects using the Assign Menu
The Assign Menu offers a visual approach to assign something to the executors. Using the Assign Menu makes you select the executor first and then select the function.
There are two main way to open the Assign Menu.
- Press the Assign key followed by any of the keys associated with the executor.
- Tap the top part of the Mini Executor Bar.
The assign menu can look like this:
This is the Function page of the Assign Menu. You can select this page by tapping the Function button on the right side - or U1 if the menu is on screen 1.
On the lower right side of the menu, there are seven buttons. Most of them will open a selection list above the buttons. The list will contain the possible object of each type. The exception to this functionality is the Empty button. This will empty the executor.
Tapping the Sequence button will open the list of possible sequences. It could look like this:
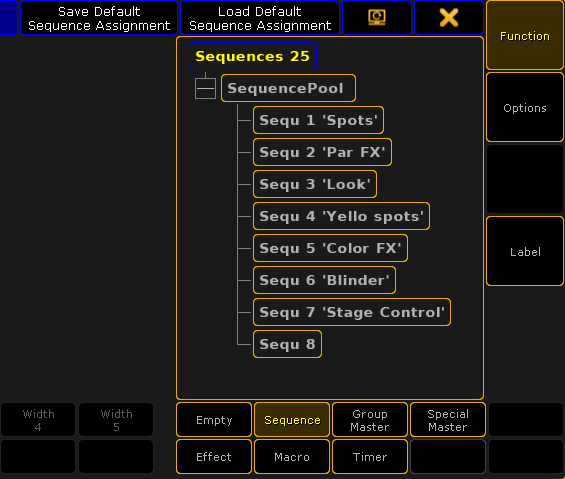
Each of the six allowed types that can be assigned to an executor will provide a tree structured list of the options.
Select the object you want to have on the executor by tapping it or use the screen encoder to scroll through the list and tap the encoder to select the desired object.
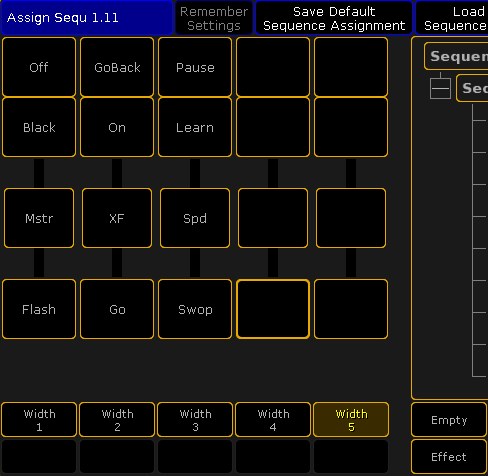
Change Key function
When the executor has something assigned, then it is possible to change the functions assigned to the executor keys.
If continuing to work in the Assign menu, then the executor is symbolized on the left side.
It could look like this:
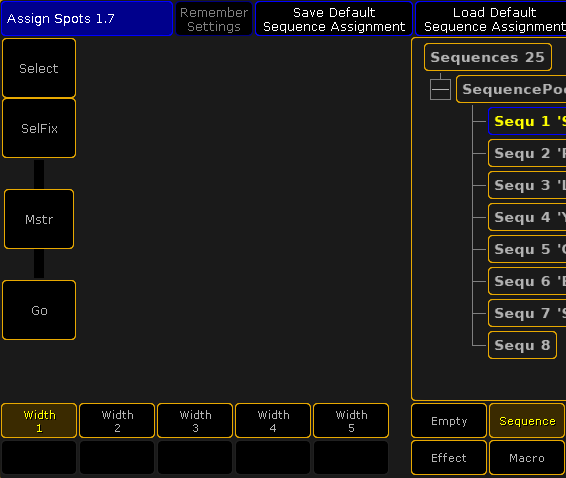
Here is an example showing a Fader Executor. There are two buttons above the fader, the fader, and the bottom button.
Tapping any of the three buttons will open the Select Function pop-up. It looks like this:
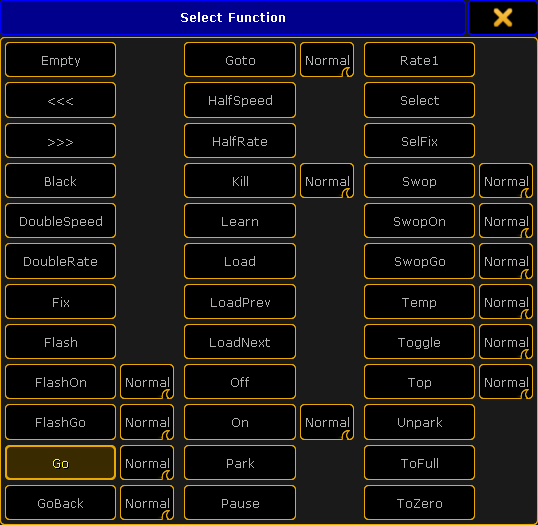
There are many functions here. The pop-up might show a smaller selection. This depends on what type of object that is assigned to the executor.
Some of the functions have and extra option. These are the swipe buttons next to function. The options are:
- Normal:
This is the normal function. - Assert:
This option will perform the function using the Assert option. Assert will force tracked values to the fixtures. - XAssert:
This variation of Assert will force the values using a fade time - typically from the cue going into. - Release:
This option will perform the main function and then turn off the executor.
The main function are:
- Empty:
The key has no function. - <<< (GoFastBack):
This jumps one cue back - The fade timing can be changed in Setup -> Show -> Playback & MIB Timing. - >>> (GoFastForward):
This jumps one cue forward and will not trigger other cues - The fade timing can be changed in Setup -> Show -> Playback & MIB Timing. - Black:
This turns off the intensity of the executor as long as you have the button pressed. - DoubleSpeed:
This will double the speed. - DoubleRate:
This will double the rate. - Fix:
This fixes or unfixes the executor. - Flash:
This turns the executor on and set a virtual intensity master at 100, as long as you have the button pressed. When the button is released it will go back to the status before the button was pressed. - FlashOn:
This performs the same action as the Flash, but it also executes an On command. - FlashGo:
This performs the same action as the Flash, but it also executes a Go command. - Go:
This executes a "Go". It uses the fade and delay times. - GoBack:
This fades backwards - The fade timing can be changed in Setup -> Show -> Playback & MIB Timing. Default is the cue timing. - Goto:
This gives you the Select Cue for Goto pop-up that allows you to select a cue to go to. It could look like this: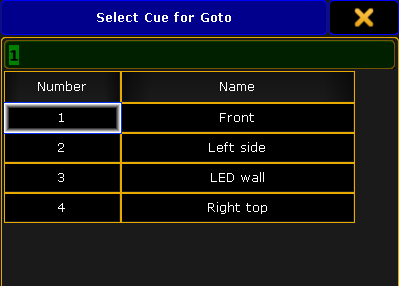
Select Cue for Goto pop-up
The fade timing can be changed in Setup -> Show -> Playback & MIB Timing. Default is the cue timing. - HalfSpeed:
This will half the speed. - HalfRate:
This will half the rate. - Kill:
This is the same as a "Go" but it also turns of all other executors (except those that has "Kill protect" turned on - see Executor Options topic). - Learn:
This sets the speed. By pressing it at least two times it automatically adjusts the speed. - Load:
This gives you the Select Cue for Load pop-up that allows you to select a cue to load. It looks like the Select Cue for Goto pop-up pictured above. - LoadPrev:
This will load the previous cue. If it is pressed multiple times, then it will load the previous cues based on the currently loaded cue. - LoadNext:
This will load the next cue. If it is pressed multiple times, then it will load the next cues based on the currently loaded cue. - Off:
This turns the executor Off. - On:
This turns the executor On. - Park:
This parks the fixtures in the object assigned to the executor. - Pause:
This holds a active fade and/or delay. This also pauses a timecode show. - Rate1:
This resets Rate and Speed faders. - Select:
This selects the executor. - SelFix:
This selects the fixtures used in the object assigned to the executor. - Swop:
When this is pressed, all other fixtures will fade out the dimmer (except those that has "Swop protect" turned on - see Executor Options topic). They return when it is released. - SwopOn:
This performs the same action as the Swop, but it also executes an On command. - SwopGo:
This performs the same action as the Swop, but it also executes a Go command. - Temp:
This turns the executor on as long as it is pressed. The temp function uses the fade times from the cues and it uses the level set by the intensity master. - Toggle:
This turns an active executor Off and an inactive executor On. - Top:
This fades to the first cue in an assigned sequence. - Unpark:
This unparks the parked fixtures used in the object assigned to the executor. - ToFull:
This will move the intensity master at full. - ToZero:
This will move the intensity master to zero.
These main functions are keywords - they can be found in the All keywords topics. Here are detailed descriptions of all keywords.
The functions can be assigned using the keys or commands. Not all functions has a physical key that can be used, then you will need to write the command.
Key Example
If the desired function has a physical key, then it is very easy to assign it to an executor key. Simply press the Assign key, then function key you want, and finally the executor key where you want the function.
Example 1
For instance to assign the Off function to the top key associated with executor number 1, you need to press the following keys:
Assign Off (the top executor key labeled:) 1
Example 2
Assign in a Load function to an executor key
Assign Goto Goto [desired executor key]
Pressing the the "Goto" key twice will give the "Load" command.
Command Example
Functions can be assigned using the command line.
This is the general syntax:
Assign [function] (at) [location]
The location needs to be a specific physical key associated with an executor. The keys are called "ExecButtons". They are numbered. The key below the fader and the single key for executors without faders are named "ExecButton1". The key right above the fader is "ExecButton2" and the top key is called "ExecButton3".
To assign the ToFull function to the top key associated with executor 5 on executor page 8 you would need to type the following command
Change Fader function
It might be possible to change the function of the fader. This depends on what type of object an executor has. They are changed just as the executor keys - by tapping the onscreen representation in the Assign menu (see above).
The Select pop-up could look like this:
The pop-up might present a smaller selection. This depends on the object on the executor.
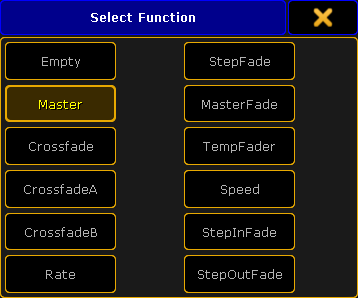
- Empty:
Fader has no function. - Master:
Controls the intensity. - Crossfade:
Crossfades between two cues. Current cue and next cue. The current cue will change when the fader reaches the other end position from where it started. - CrossfadeA:
Is the first of a two fader manual crossfade between two cues. Works along with CrossfadeB. The crossfade function can be changed in the Executor options. - CrossfadeB:
Is the second of a two fader manual crossfade between two cues. Works along with CrossfadeA. The crossfade function can be changed in the Executor options. - Rate:
Divides the fade and delay time in a sequence by the value of the fader. If Link Effect to Rate is on, it is also valid for effect speed stored in cues - see Executor options topic. - StepFade:
Controls the fade time between steps in a chaser (=softness). - MasterFade:
Controls the on and off fade time of chasers and effects. It controls also the off time of executors. - TempFade:
Cossfades the cue on when pulled up, and off when pulled down. - Speed:
Controls the fade and delay times in effects in a cue, and chase speed in chasers. - StepInFade:
Controls the step in time of the chaser steps. - StepOutFade:
Controls the step out time of the chaser steps.
The above functions are described in more details in each of their keyword topics. They can be found under All Keywords.
The functions can also be assigned using the command line.
The syntax is the same as the key functions. The difference is that there is only one fader per executor.
Examples
Example 1
To assign the rate function to executor number 9 on the current page, you will need to type the following command:
Or address the actual fader:
Example 2
If you want to assign the "Empty" function to the executor fader, then it is necessary to use the fader as the location
Save the Key and fader assignment
The current assignment of key and fader functions can be saved, to the current user profile, using the Assign Menu.
In the Title bar there are two buttons. Tapping the Save Default [object type] Assignment will store the current assignment to the defaults for that type of object. This means that a sequence have one set of defaults and an assigned Effect will have a different set of defaults.
The defaults are used when the executor gets something assigned.
Tapping the Load Default [object type] Assignment will load the currently saved default to the keys and faders.
Executors can be extended to use up to 5 executors in the width. Read more about this below. The number of keys and faders are then changed. Each width size has a different set of default key and fader assignment for each object type.
This means that a sequence using 1 executor width have one set of defaults and the same sequence using two executor widths will have a different set of defaults.
Change the Width of Executors
Sequence and Effects assigned to an executor can use more than one executor in the width - up to five.
A timer assigned to Button Executors can use up to two executors in the width.
This is changed using the Assign Menu (see the top of this topic for more about using the Assign menu). The left side of the Function page of the Assign Menu could look like this:
The bottom of the left side will show how much the executor can be extended.
The executors are organized in groups of five. It is not possible to extend into a different group of five. It is also not possible to extend into executor that already has something assigned. So to extend an executor to five in width, it needs to be originally assigned to executor 1, 6, 11, 16, 21, 26, and so on AND the following five executors needs to be empty.
When fully extended it could look like this:
Each key and fader can have a function that will execute the selected function to the assigned sequence or effect.