
Executors on the screens
The grandMA2 supports a lot of executors. Most system are not set up for physical control of all these executors. They are still reachable as virtual executors on the screens.
The different virtual executors are windows that can be created using the Create Basic Windows pop-up. They are all in the Playbacks tab.
Action Buttons
The Action Buttons can show executor 101 to 190. That is all the possible Button Executors. To have them all in one big window you will need to have it on one of the big screens.
If the window does not get all that space, then it will adapt and show the possible amount of executors. They are arrange in groups of 5 executors. The smallest possible size is 3 x 5 squares (H x W). Then it could look like this:
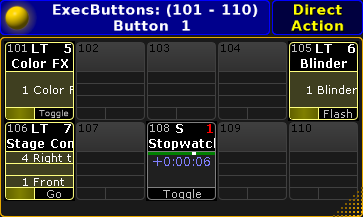
In the title bar there is the yellow ball that opens the options. The title bar shows what executors are being displayed in the window and the Executor Page number. On the right side there is a Direct Action toggle button.
Direct Action changes how the executor buttons work.
If it is disabled, then they work as described in the Sequence Mini Executor, but in relation to what is assigned to the executor. Please also have a look at the Mini Executor Bar topic. This window functions more as a label and indicator when Direct Action is disabled.
With Direct Action enabled, then the entire button will perform the action assigned to the Executor Button, or physical key, when it is tapped on the screen.
Options
Opening the options allows you to choose what section of executors the windows should begin with.
The choices are: Intern 1 (101 through 115), Intern 2 (116 through 130), Wing 1 (131 through 145), Wing 2 (146 through 160), Wing 3 (161 through 175), and Wing 4 (176 through 190).
At the bottom of the options window there are two buttons. They control what executor page is displayed. The button called Button Page Floating will make the Action Buttons change page following the Button Page selection. Tapping the Select Page button will open a Select Page pop-up like this:
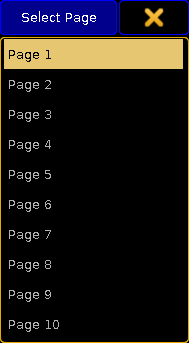
Here you can choose to lock the Action Buttons to a specific Button page.
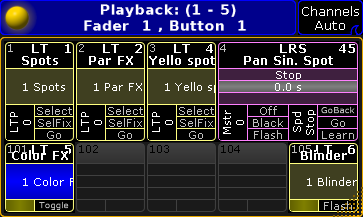
Playback Big
The Playback Big window displays what is assigned to the executors. It also provide virtual faders and buttons. The button and fader label area, known from the Mini Executor Bar, is replaced by labeled buttons and faders providing the same information but with better control. Tapping the buttons will perform the action. Touching and moving the virtual faders will be the same as moving the real faders.
The window adapts to the size. The width can span from a minimum of 5 through the maximum amount of available squares. It can display up to three groups (of 5) executors. The height can be from 4 through the maximum amount of squares. If the height is only 4 or 5 squares then the window will only display the Fader Executors. From 6 and more i height it will also display the corresponding Button Executors.
This is an example of what it could look like:
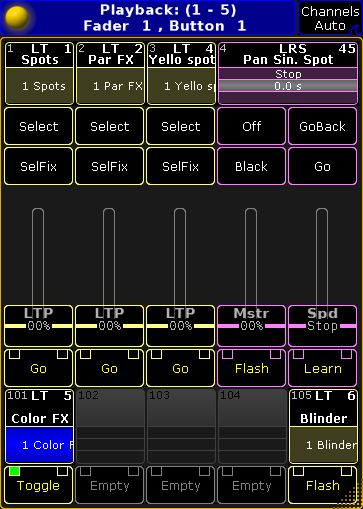
The title bar have the yellow ball that opens the options. The title bar shows what executors are being displayed and the number and possible name of the Executor Fader Pages and the Executor Button Page. The button on the right side has three different settings related to Channel pages. The options are
- Channel Auto:
This will change the virtual Fader Executors to Channel Faders if this is changed on the real executors. - Channels Forced:
This will force the virtual Fader Executors to always be Channel Faders. - Channels Never:
This will prevent the virtual Fader Executors to ever change to Channel Faders.
Read about the Channel Faders in the Channels Pages topic.
Options
The options could look like this:
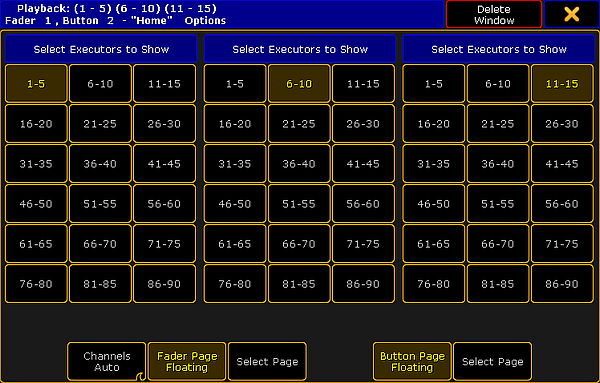
If you have three groups (of 5 executors) visible executors, then you also have three selection sections - as in the image above. If you only have one group of executors, then there will only be one selection section. Here you can choose what executor group each section should display.
Even though the numbers are for the Fader executors, the Button Executors are also selected using this section selection. They will follow the selected Fader Executors.
At the bottom of options pop-up, there are two groups of buttons. They control what executor page is displayed. One group is for the Fader Executors and the other is for the Button Executors. The "Floating" button will make the executors change page following the general page selection. The Select Page buttons will allow you to select a specific page for the executors. Tapping the button will open the small Select Page pop-up described options for the Action Buttons (see above).
The Fader Executors group has an extra button. This is the same as the one in the title bar - please read the description above.
Playback Small
The small playback window is the same as the Mini Executor Bar. It is fixed in 3 squares height but can be extended from minimum 5 and up to the maximum about of possible squares.
It will adapt to the about of groups (of 5 executors) displayed depending on the width of the window.
The minimum size could look like this:
The title bar have the yellow ball that opens the options. The title bar shows what executors are being displayed and the number and possible name of the Executor Fader Pages and the Executor Button Page. The button on the right side has three different settings related to Channel pages. The options are
- Channel Auto:
This will change the virtual Fader Executors to Channel Faders if this is changed on the real executors. - Channels Forced:
This will force the virtual Fader Executors to always be Channel Faders. - Channels Never:
This will prevent the virtual Fader Executors to ever change to Channel Faders.
Read about the Channel Faders in the Channels Pages topic.
Options
The options look and functions exactly as the Playback Big options. Please read the description above.