
Channel Pages
The Fader Executors can be changed to be Channel Faders instead of Executors.
Changing to the Channel Pages does not remove or turn off the Executors.
There are two types of Channel Pages: Static pages that can have dimmer attributes for specific fixtures. Dynamic pages that will be populated by the attributes and selected fixtures.
Static Channel Pages
Static Channel Pages can have attributes of fixtures assigned to the faders. In the Channel Pages the faders are called ChannelFaders.
The static Channel pages are organized in a Channel Pool. The pool could look like this:
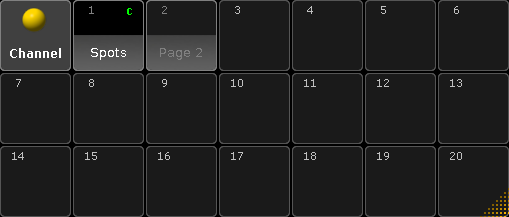
This works as any of the pool - if you have not read the Pools in General section, then please read it.
This is what it looks like in Sheet Style:
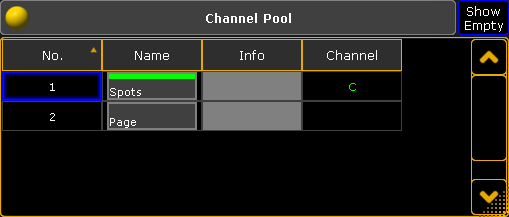
The green C indicates that this Channel Page is currently active. A gray C indicates that this is the last viewed page (It is probably back to en Executor page).
Tapping one of the objects in the pool will change to the Channel page. It is also possible to change the page using the Ch Pg + and Ch Pg - keys or the ChannelPage command. Keeping the Ch Pg - key pressed for a second will jump back to page number 1.
Assigning fixtures
Static Channel Pages needs to be build - that means fixtures needs to be assigned to the ChannelFaders.
This can be gone using the keys: Assign Chanel (or Fixture) [number or range] Page Page (this gives the ChannePage command) [page number].[fader number] Please.
If an attribute is not specified then the dimmer will be assigned. Other attributes can be assigned, but it takes a little bit of investigation to find out the attribute number or name. This is the general syntax:
Assign Fixture [id number].[subfixture number].[attribute] (At) ChannelPage [page number].[fader number]
The best way to show how to find an attribute number is by an example.
Example
In my show I have a fixture patched that has pan and tilt attributes it is Fixture ID 1. I would like to have the dimer assigned to ChannelFader 1 on ChannelPage 1. And then the Pan on fader 2 and Tilt on fader 3.
Before we can assign anything, we need to create the page. Simply press Ch Pg + once to open the first Channel Page - this also creates the page.
Assigning the dimmer to fader 1 is simple: Assign Fixture 1 and then press on of the keys associated with fader number 1.
Now we need to find the attribute numbers for fixture 1. Open a Command Line Feedback window.
We need to explore fixture 1 so type the following command and execute it with a please:
CD is short for the ChangeDirectory command.
The command line shows that we have navigated to the fixture. We need to list the subfixtures in fixture 1. Type the following command (you do not need to type anything before the >)
Depending on your show it might look exactly like above. The important part is the List command.
Now the Command Line Feedback window show that there are at least one subfixture. In my show it is a Vari-Lite with only one subfixture.
Navigate to the subfixture using the CD command again:
If I know that my fixture only has one subfixture (or if I need subfixture 1), then it is possible to navigate to this location using the following command CD Fixture 1.1 - Do not run this command now.
Now we need to do another List command to see the attribute list for this fixture. The list displayed in the Command Line Feedback window shows that the PAN is number 3 and the TILT is number 4. With this knowledge we can go back to the root of the command line and assign the two attributes. Type the follwoing:
This returns to the root command.
This is how it is done using the attribute numbers.
It is actually a lot easier to use the attribute names. If we knew that fixture number 1 is a simple fixture with only one subfixture, then we could just have done this:
It is still useful to know how to find the attribute numbers and names of fixtures. That enables you to find and assign any attribute.
Auto Create Channel Pages
Channel pages can be auto created using Setup -> Show -> Auto Create and then select the Channel Pages tab.
It could look like this:
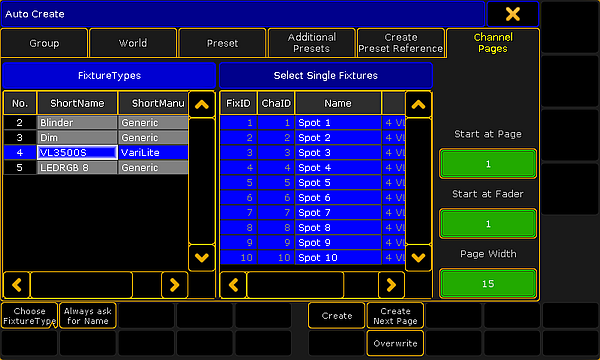
This menu is separated into a left and a right side. The left side can show to different things: FixtureTypes or Layers. These two things can be toggled by tapping the Choose button at the bottom left.
The right side displays the content of what is selected on the left side.
The workflow is selecting one or more elements in the list on the left side and then selecting or deselecting fixtures from right side. Each selected fixture will create a Dimmer attribute fader.
On the far right side there are three green input fields. The top one set the ChannelPage number for the auto created faders. The middle one sets the fader number for the first ChannelFader. The bottom one sets the width of the page. It can be a good idea to set the width to match your hardware.
Tap the Always ask for Name button if you wish to name the Channel Pages when they are created.
The Overwrite button does not do any difference. Assigning attributes to ChannelFaders always overwrites the current assigned attributes.
Tap the Create button to create the ChannelFaders. Notice that this action will change the Start page and the start fader input fields to the next available ChannelPage and ChannelFader.
The Create Next Page will also do a create action but it will start at the next page number.
Dynamic Channel Page
The Dynamic Channel Pages are channel pages that are created based on the selection of fixtures and the currently active Feature.
The Dynamic Channel Pages can be accessed when the Channel Sheets and the Fixture Sheets have activated the Link Faders option. Read more about activating this in the Title Buttons topic.
Dynamic Channel Pages can also be called using the ChannelLink command.
This allows you to turn On or Off the Dynamic Channel Page.
It can also be used to create special combinations of attributes.
Read more about it following the link to the ChannelLink above.