
Assign a macro to a key
Macros can be assigned to Executors, View buttons, and X-keys.
This can make it faster and easier to run and use the macros.
The Macro pool is shared by all users, but the assignment of macro to View buttons and X-keys/User is stored in your user profile. So this is not share by different users profiles (different users can use the same user profile).
Macros assigned to Executors are shared by all users.
The easy way to assign a macro is to press the Assign key, then tap the macro, and then the destination where you want it. Read below for more details about the three different locations.
Executor
Any executor can have a macro assigned. You can use the method described above, the command line, or you can use the Assign Menu.
Command line method
Macros can be assigned using the command line input. For example to assign macro number 1 to executor number 7 on page 2 you could write:
Assign menu method
Macros can be assigned using the Assign Menu. The menu can be opened by pressing the Assign key and then press any key belonging of the executor where you want to assign a macro.
The menu could look like this:
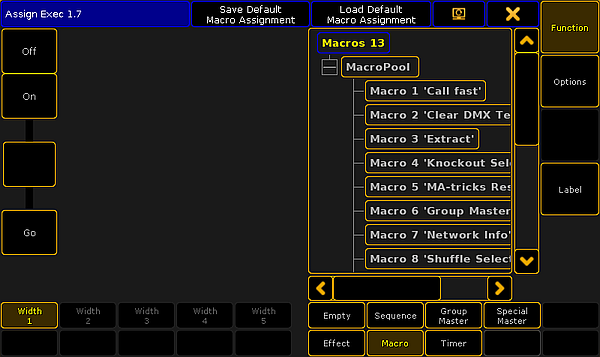
In this topic we are not going into details about the Assign Menu. If it opens and does not look like the image above then you might need to tap the Function button on the right side.
Now you need to select that you want to assign a macro. Tap the Macro button at the bottom of the menu. Now the right side displays a list of all the available macros.
Tap the one you want.
There are no options to an executor with a macro assigned and the "Width" can only be 1. You can change what the executor buttons do.
There is limited possibilities of functions for executor keys when a macro is assigned (compared with assigned sequences). You can choose the function by tapping one of the virtual executor keys on the left side of the menu. This opens a Select Function pop-up. It looks like this:
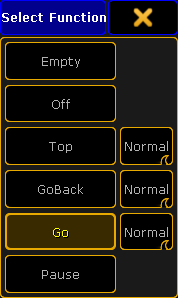
Here you can select the function wanted for the keys.
The different options next to "Top", GoBack", and "Go" are not relevant for macros.
The most used function is the "Go" function. This is the one needed to run or activate the macro.
Read the Macro Timing topic for details about these functions.
You can close the Assign Menu using the "X" in the upper right corner of the menu when you are happy with your assigned macro and the executor button functions.
Mini executor
When macros are assigned to executors you can see them in the Mini Executor Bar.
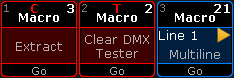
It could look like this:
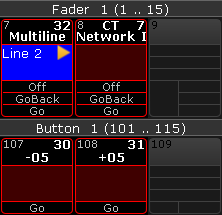
In the Mini Executor Bar you can see the macro name in the top part of the mini executor.
The number on the right side of each executor is the macro number.
The number on the left side is the executor number.
If CLI is turned off then there is a "C" in the top middle part. If timing is turned off then there is a "T" in the top middle part.
The middle part displays the macro line number on a blue background when the macro is active. It will also display an icon showing the play mode.
The lower part shows the functions assigned to the executor buttons. Notice the difference between the macros assigned to an executor with a fader (three buttons) and the ones assigned to an executor without a fader (one button).
The frame is displayed in the same color as your macro pool. Macros with individual colored frames are also showing the individual colors in the frame on the Mini Executor Bar.
View button
The view buttons can also have macros assigned.
The easiest way to assign a macro is to use the method described above with the Assign key, tapping the macro pool, and then the View button where you want it.
You can also use the command line. For example to assign macro number 2 at view button number 5 on view page 1 you could write the following:
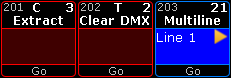
Macros assigned to view buttons could look like this:

Since the view button assignment is a user profile setting, it can also display the same frame color as the macro in the macro pool - this includes individually colored macros.
The top left corner of the view button displays the view button page and number.
Below this you can see the active line number and play mode - if it is active.
Below this is the macro name.
At the bottom you can see that it is macro assigned to the view button and the macro number.
You cannot see the "C" (CLI turned off) or "T" (timing turned off) letters in view buttons.
User key / X-key
The X-keys or User keys function as either Executors or View buttons. Depending on what you have visible (List, User 1, or User 2) then they function as described above.
When macros are assigned to Executor buttons on screen 1, it could look like this:
The same three macros would look like this, when they are assigned to View Buttons, on screen 1:
The location, on screen 1, is very convenient for often used macros. Remember that macros assigned to Executors are shared by all users and macros assigned to View Buttons are a user profile setting.