
Manually create a macro
- Edit an empty macro pool object.
- Add a new line by tapping the Add button.
- Type the desired command.
- Add more lines if needed.
- Label the macro by tapping the Label button and type the macro name.
- Close the editor by tapping the X in the upper right corner.
This were the quick steps - Keep reading for more details.
You can create your own macros - this is one of the very powerful features of the grandMA2.
Macros are stored in the Macro Pool. The easiest way to create a new macro is to edit an empty macro pool object.
There are several ways to edit a pool object:
- Right-click with a mouse or trackball on the pool object.
- Press the Edit key and then tap the pool object.
- Tap the pool object and then tap the screen encoder.
- Using the keys Edit Macro pool object number Please.
- Type it in the command line.
The Edit Macro pop-up is used when editing a macro. It could look like this:
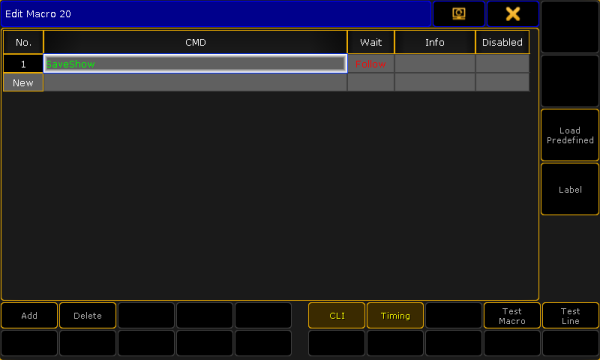
In the image above you see a macro that is not empty. There is already a line with a command.
Buttons in the editor
There are buttons on the right side and the bottom to help with the macro creation, settings, and modifications. The following is a short description of the buttons:
Add:
Tapping this button will add a line, in your macro, above the currently highlighted line (if there are any). It will also open the Edit CMD pop-up that allows you to type the desired command immediately.

Delete:
Tapping this button will delete the currently selected line in the macro.
CLI:
CLI is short for Command Line Interaction. CLI is activated when the text is yellow - it is active by default. CLI allows you to interact with the pool object. This means that the command line will react to you tapping the macro in the pool. Read more details about CLI and Macros in the Command line interaction topic.
Timing:
The Timing button allows you to turn on the timing defined in each macro line or to just run it as fast as possible. Read more about macro timing in the Macro timing subtopic.
Test Macro:
This button allows you to test run the macro before closing the editor. All commands are executed, so this is not a macro simulation.
Test Line:
This can be used to test the highlighted macro line (white or blue frame). This can be useful in the creation process.
Load Predefined:
This button is used to load one of the predefined (factory-made) macros. For more about this please read the Import predefined macros topic.
Label:
If you want to label the macro, then you can tap this button. It opens the Enter Name for.. pop-up. Here you can write the macro name.
Main part
The main part of the editor is where you can add, edit, see and delete the lines with the commands.
There are five columns in this part.
No.:
This is the macro line number. You cannot edit it, but it can be useful to see the macro line number for instance when the macro is executed.
CMD (Command):
The CMD is short for Command. This is where you type your macro command. You can use the keyboard to write the command. But when the Edit CMD pop-up is active then your command line input has a red background - like this:

This means that you can also use the physical keys to type your command without executing the command - it is sent to the Edit CMD pop-up.
Each macro line has an automatic "Please" at the end of the line - even though it is not displayed. This executes the macro line. The exception to this is if the macro line finishes with a "@". This is a special character used to allow the macros to interact with user input. Please read more about this in the Command line interaction topic.
Wait:
This is used to add a wait time until the next macro line is executed. This wait time is only used if Timing is activated. There are two special options here: Go and Follow. "Go" is used if you want the macro to wait until there is a new Go command to the macro. "Follow" means that the macro will continue as fast as possible. "Follow" is the same as setting the time to 0. Read more about macro timing in the Macro timing subtopic.
Info:
Here you can write information that explains the macro line. Might be a good idea for others to understand complex macros.
Disable:
Disabled macro lines are not executed. You can change the state by editing the cell in this column. If the line is disabled it is displayed with red text color.
When you are done creating your macro then you can close the pop-up by tapping the big X in the upper right corner.
Please read the subtopics for more options in advanced macros.