Create masks
You can create masks in the pool or in the individual windows. The workflow is the same.
If you do not know about the mask pool then please read the What are masks topic.
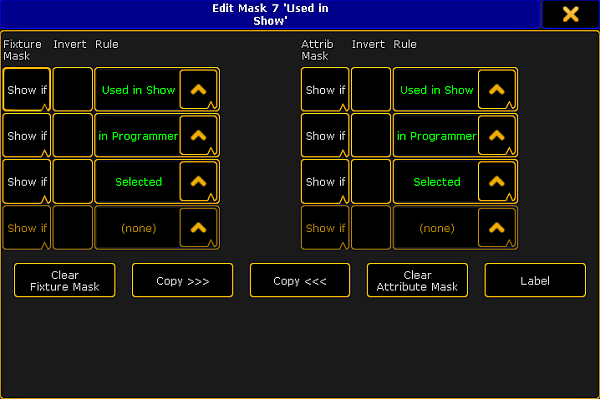
Press the Edit key followed by one of the Mask Pool objects to open the Mask Editor:

The mask editor has two sections. The top part have the mask settings and the bottom part have buttons that allows you to work faster and do other things. The lower part changes a bit depending on from where you access the editor.
The Mask section
The left side masks fixtures. The right side masks attributes.
Each side has four rows and up to four columns. Each row is a mask criterion. A mask can have up to four criteria. That means that in order for a fixture or attribute to be visible it needs to follow one of the four criteria or rules.

The left most column is used to decide if the row shows or hides the fixtures or attribute, depending on the rule in the third column.
The next column is used to invert the rule in the third column.
The third column is the rule column. Tapping the up arrow gives you a small select pop-up that allows you to choose the rule. The different options are almost the same for the fixture side and the attribute side:
(none) - both:
The row doesn't contain any mask criterion.
Active - both:
Displays fixtures and attributes that will be stored.
In Programmer - both:
Displays fixtures and attributes that are in the programmer.
Parked - both:
Displays parked fixtures and Attributes.
Used in Sel. Sequ (Selected Sequence) - both:
Displays the fixtures and attributes that are stored in the selected sequence.
Used in Show - both:
Displays all fixtures or attributes stored in cues, selective Effects, or selective Presets.
Selected - both:
Displays all (attributes of) selected fixtures.
DMX-tested - both:
Display all fixtures with attributes that currently have values in the DMX tester. And on the attribute mask it displays all the attributes that have values in the DMX tester.
Fade/Delay - both:
This will display all the fixtures and attributes with individual fade or delay timing in currently active cues or is active in the programmer.
Effect - both:
Displays all fixtures and attributes currently using effect parameters at the output.
In Object... - both:
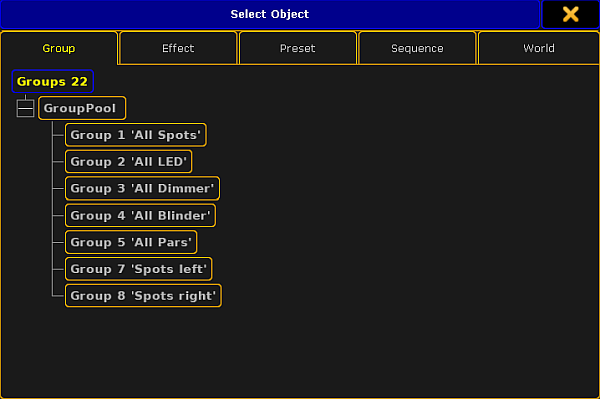
This will give you the fourth column. Here you will get a button that opens the Select Object pop-up. Here you can select a specific Group, Effect, Preset, Sequence or World as your object. This will then display all fixtures or attributes currently using the defined object.
The pop-up could look like this:

In this pop-up there are five different tabs with the different object types you can select. In each tab you will find the different object that exists in your show.
Look - both:
This can be used to display fixtures and attributes that will be affected by the same options as when using the Look options when storing.
Applying this filter to the fixture side means:
- Show all fixtures with dimmer attributes.
- Show all fixtures without dimmer attributes but other active programmer content.
- Hide all fixtures without dimmer and no programmer content.
For the attribute side this means:
- Show all dimmer attributes.
- Show all attributes of fixtures with dimmer values above zero.
Live - fixture side:
Displays the fixtures with a dimmer value above 0% or with a stored 0% value in the current cue.
In Saved Selection - fixture side:
This will give you a new button in the fourth column called "Take Selection". Pressing this will store the current selection of fixtures. If none is selected, then the sheets will be empty!
Moved - fixture side:
This will display all the fixtures that have stored changing (blocked) non dimmer values active at the output.
Full Patched - fixture side:
Displays fixtures that are fully patched. They need to be patched in all DMX breaks to be fully patched.
Virtual Fixtures - fixture side:
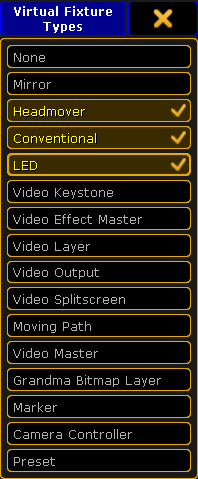
This will give you a button in the fourth column. Tapping this button allows you to make a selection of which type of fixture you want to see. The Select Virtual Fixture Types pop-up could look like this:

These are not exactly a question of the imported fixture types in your show file. It has to do with what class of fixture they are. This is defined in each of the fixture profiles. The list have all the possible fixture classes in the console. You can select multiple classes in this pop-up. When you are happy with your selection, then you close the pop-up by tapping the "X" in the upper right corner.
No Parameter - fixture side:
This will display the fixtures that have the "No Parameter" option in the EditSetup. This can be useful when you have fixtures that are only controlled by the MA VPU (=video processing unit) through the console, and you want to see what they do.
RDM Notification - fixture side:
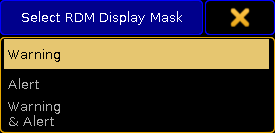
This will display fixtures with active RDM notifications. Selecting this will give you a new button in the fourth column. Tapping this will open the Select RDM Display Mask pop-up. It looks like this:

Here are three options. Warning, Alert, and Warning & Alert. Select the notification level you want in the pop-up. The select option is now displayed in the button in the fourth column.
At NonDefault - attribute side:
Displays all attributes that currently have other than default values.
Of Current PresetType - attribute side:
Displays the currently selected PresetType - for example Color.
Of Current FeatureType - attribute side:
Displays the currently selected Feature - for example ColorMix.
In Saved Attributes - attribute side:
Gives you a new button in the fourth column called "Define Mask". This will open a pop-up where you can selected one or more of the attributes in the show. The pop-up is just like the attribute part of the Edit Filter pop-up. Read more about this in the Create filters Topic.
The Lower part
The lover part changes a little depending on how you get the mask editor. The different ways to get to the editor is discussed in the Use masks in sheets topic.
There are four buttons that are almost always visible:

The two "Clear" buttons will clear all the criterions in each of they own sides. The two "Copy" buttons are used to copy the criterions from one side to the other. The arrows in the buttons shows the direction it will be copied. Only common rules can be copied.
The other buttons that can be in the lower part is:
Label:
Tapping this allows you to label the mask. This button is only an option when you edit a mask from the mask pool.
Save to:
This button is available when you edit a mask from a sheet. This allows you to save the current criterions as a new mask in the pool. Tapping this open a Select Mask pop-up. It lists all the unlocked pool objects in the mask pool. It could look like this:

Load From:
This button is available when you edit a mask from a sheet. This allows you to load a set of mask criterions from the mask pool. Tapping this also opens a Select Mask pop-up - except this lists all the available masks.
Save Always:
This button is only available if you have loaded a mask from the pool. This check box allows you to automatically save any changes you make back to the mask loaded from the pool.
Save:
This button is only available if you have loaded a mask from the pool. This allows you to save the current criterions back to the loaded mask - if you have not activated "Save Always".
Please read the Use Masks in Sheets topic to learn more about how it use the masks in the different sheets and windows.

