|
grandMA3 User Manual » Cues and Sequences » Cue Timing
|
Version 2.0
|
Each cue part has a lot of timing information.
The default times are used if nothing is defined on cue creation. The default can be changed. Read more about defaults in the Store Options and Defaults topic.
Any cue timings can be changed at any point using the command line or the GUI (Sequence Sheet).
There are a lot of elements that affect how a fixture changes values, and they can be divided into different groups:
- General cue times
- Preset Timing
- Individual Attribute times
- Executor Time at point of cue execution
- Dynamic changed Rate
This is also the priority list from lowest to highest priority.
There is also the cue transition that defines how the values change from one to another.
General Cue Times
There are six different general cue timings. Each has its own column in the Sequence Sheet when condensed timing is turned off - read about it in the Look at Cues and Sequences topic :
- Cue In Fade
This is the fade time used for all intensity values changing from a lower value and going to a higher and any other attribute changing value. It starts when the cue is triggered and after the Cue In Delay has counted down. - Cue In Delay
This is the delay before the fade. This defines a countdown time between the cue is triggered and when the fade should begin. The In Delay affects the In Fade. The default value is 0, meaning that there is no delay. - Cue Out Fade
The out fade is used by intensity values fading from a higher value to a lower. It is executed after the Cue Out Delay. The default value is the in fade, meaning that it is the same as whatever the cue in fade is. - Cue Out Delay
This is the delay time for the Out Fade. It can be used to delay when intensity values should start to fade down in value. The default value is in delay, meaning it is the same as the Cue In Delay value. - Snap Delay
Some attributes are defined to Snap. This means that they do not fade from one value to another. They change values as fast as possible. This can make sense for attributes like gobos. This delay is used to delay when the snap is performed. It makes it possible to have the fixture fade out before snapping to a new gobo. This delay affects all snap attributes stored in the cue. It can be overwritten by individual attribute timing. - Command Delay
This delays the execution of a command. This is the only place where this delay can be defined. There is no individual timing for this.
These values can be changed using this syntax:
Cue ["Cue_Name" or Cue_Number] CueInFade [New_Cue_Time]
Just use the relevant keyword: CueInFade, CueOutFade, CueInDelay, CueOutDelay, SnapDelay, or CommandDelay.
There are two more options for setting the cue fade and delay. They are called CueFade and CueDelay. They can be used to set the four cue fade and delay times mentioned above. They are used to set the in and out time using just one keyword.
The in and out time is separated by a slash. The time before the slash is the In time. The time after the slash is the Out time. It is not necessary to specify both in and out. The slash can be used to set just one of them. The desired time has to be on the correct side of the slash.
If only one time is set without any slash, then the in time gets the actual value, and the out time is linked to the in time - it is technically set to time "None". The result is that, for instance, the fade in and fade out will be the same.
For example, setting the in fade to 5 seconds and the out fade to 8 seconds in cue 3 could be done with the following keystrokes:
Cue 3 Time 5 / 8 Please
The command line would read:
|
|
User name[Fixture]>Cue 3 CueFade 5/8 |
If only one time is given, both in and out will use the time. For instance,
|
|
User name[Fixture]>Cue 4 CueFade 7 |
This makes cue 4 use 7 seconds to both fade in and out.
They can also be used to address only the in or out time by adding the slash and a number to the relevant side. For instance, setting the CueOutFade to 3 and the CueInDelay to 1 on the currently active cue:
|
|
User name[Fixture]>CueFade /3 CueDelay 1/ |
Both CueFade and CueDelay can be addressed using the Time key. Read more about delays by following the links above to the keywords.
Preset Timings
Each preset type has its own fade and delay time. There are columns for each of these in the Sequence Sheet.
These times are used by all fixtures changing the values of that preset type. Overwriting the general cue timing for that preset type.
|
|
Important: |
| Intensity values changing to a lower value are not affected by the "Fade Dimmer" time. They are controlled by the "Cue Out Fade". |
The preset type fade and delay default is general cue timing. This means they are the same as the time for the Cue In Fade and Cue In Delay.
Individual Attribute Timing
Each individual attribute can have an individual fade and/or delay time. This is called individual time. These individual times are selected using the programmer and added to the cue when it is stored. They can also be edited in the sequence sheet while in tracking mode.
There are two columns in the sequence sheet called Indiv Fade and Indiv Delay. They display the highest of the individual times. The Indiv Duration column shows the complete individual time (delay + fade).
Executor Time
There is an Executor Time master fader. It can be seen and changed in the Master Controls pop-up. It can also be assigned to physical controls or executors.
If this function is turned On, the set time will be used instead of the stored fade and delay timing. The Executor Time faders position is registered when the cue is triggered. The fader can be moved afterward without this affecting the running cue fade. Read more in the Time Control topic.
Sequences can be protected from this function by turning Off the Use Executor Time setting in Sequence Setting.
Rate Time
The Rate allows the timings to be dynamically adjusted while the cue fade runs. It does not change the stored times. It simply adjusts the time to be faster or slower.
Moving the fader up makes the fade faster, making the stored times appear smaller. Pulling the fader down makes it go slower, extending the stored times.
Times affected by the rate has an asterisk (*) in front of the time. If the rate is all the way down, the times will show *Stopped. If the rate is all the way up, the times will show *0.
An executor with the rate function shows the rate as a percentage in the executor label. If the rate is exactly 100%, then the label shows 1:1. If the rate is at maximum, the label show 1:∞. If the rate is at minimum, the label show *Stopped.
The rate can be reset using the Rate1 keyword.
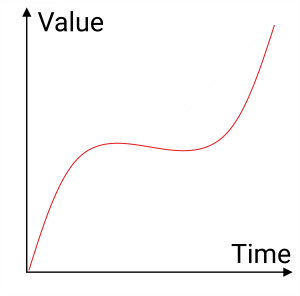
Cue Transition
The cue part property Transition allows modifying the path values used during the fade from one cue to another. The transition can be set per cue part.
There are nine different transition forms available. They are visualized with these images.
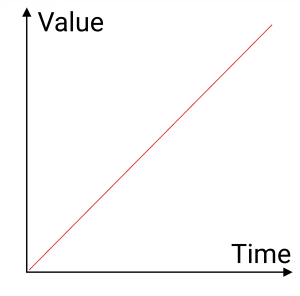
- Linear:
This is the default transition. There is no acceleration or deceleration of the values.
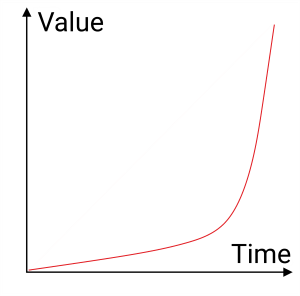
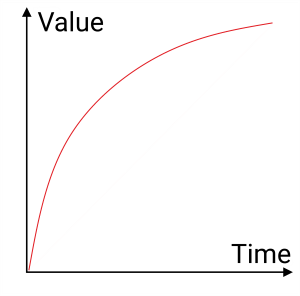
- Slow:
This uses slow acceleration and fast deceleration.
- Slow+:
This is an exaggerated version of Slow.
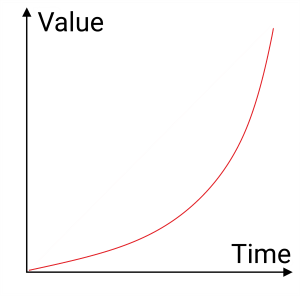
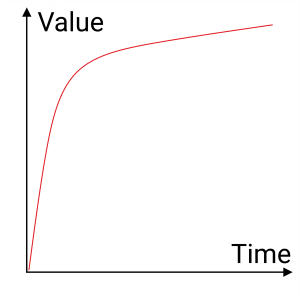
- Fast:
This is a fast acceleration and slow deceleration.
- Fast+:
This is an exaggerated version of Fast.
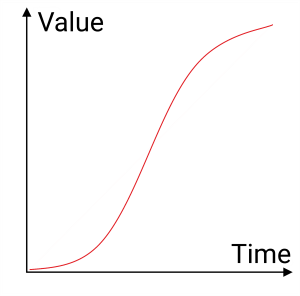
- SCurve:
This uses slow acceleration and slow deceleration.
- Swing-:
This uses fast acceleration and fast deceleration.
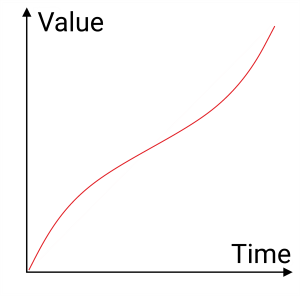
- Swing:
This is a slight exaggeration of Swing-. The values change slows down in the middle of the transition.
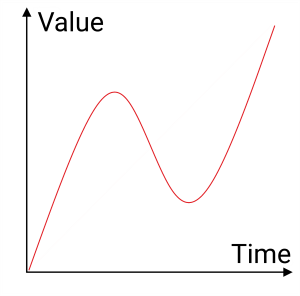
- Swing+:
This is an exaggeration of Swing. The values go backward in the middle before accelerating forward again.