Recipe Editor
|
grandMA3 User Manual » Recipes » Recipe Editor
|
Version 2.4 |
The recipe editor with its multiple columns is part of recipes in cue parts, presets, and the Recipe Editor window. Besides minor differences, the recipe editor covers the same information in all three places.
For settings that are mutually exclusive for the recipe editor window, read Recipe Editor window.
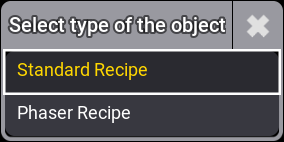
To create a new standard or phaser recipe, tap and hold the cell New Recipe, or select the cell and tap + on the top left side. A pop-up opens:
Alternatively, you can add recipes tapping Add Standard Recipe and Add Phaser Recipe on the right side of the context area. For more information on the context area, read below.
Columns of the Recipe Editor
Standard recipes and their columns have a green background in the editor, and phaser recipes and their columns have a violet background. Only cells with a background color can be edited.
These are the columns of the recipe editor:

- Name:
The Name column can also be used to give the recipe line a name. If the name text is red, that indicates that the line cannot be cooked. For example, if the values are not valid for the selection or if crucial ingredients are missing. MAtricks values that do not come from a pool object, Worlds, or Filters, are indicated by small green icons ( ,
,  , or
, or ) on the right in the Name cell.
 - Part:
Displays the programmer part. Tap and hold to edit the Part of the recipe line. This column is only available in the recipe editor window. - Step:
Displays which step of the phaser the recipe line corresponds to. The step is set automatically and cannot be changed manually. - Tags:
Displays assigned Tags. Tap and hold to edit the cell and assign or unassign tags. For more information on tags, read Tags. - Enabled:
If set to Yes recipe lines will be cooked. With No, the recipe line is marked red and will not be cooked. - Selection:
This is the selection of fixtures using this recipe line. If the selection is a group, then the number and the name of the group is displayed. If the group is empty, the text is red. Tap and hold to open a pop-up with a drop-down of all groups. To select all fixtures of a preset, that is set in the values column, select <From Value> in the drop-down. The pop-up also offers a search function and a Data Pool selection in the title bar. To create a new group, tap New at the bottom of the drop-down. A new groups pool is created with the edit mode active.
-
Selection Mode:
This defines how subfixtures are handled when only main fixtures are part of the selection of the recipe:
Hint: When migrating show files from v1.9.7.0. or earlier, the Selection Mode setting will be set to Strict in existing recipes.- Normal:
Values are passed down to the sub fixtures. - Strict:Values are strictly applied to only the fixtures in the selection.
- Normal:
- Values:
This is the value reference used in the recipe line. If the value is a preset, then the number and the name of the preset and many of the different preset icons indicating Preset Mode, MAtricks, MultiStep, Layer information, and so on are shown. If the fixtures of the selected group are only partly used, the text in the values column is displayed in orange. This happens for example if not all fixtures of the selection in use can use the selected preset or a world is added to a recipe line. If it is red, it is not compatible to fixtures in the Selection column. When adding a standard recipe line to an existing phaser recipe, the phaser recipe can be linked in the Values column. Tap and hold the values cell in the standard recipe line and select the phaser recipe in the Edit Values pop-up. - Filter:
Assign a filter or world to the recipe line. For more information on shapes, read Worlds and Filters. - Shape:
Select a shape from the shapes pool. Shapes span across the entire phaser. Selecting a shape influences other values. When adding a phaser recipe line to an existing phaser recipe, the previous phaser recipe can be linked in the shape column. Select the phaser recipe in the Edit Shape pop-up. If you assign a shape to a phaser recipe, values that are set in the shape are applied to the corresponding empty cells in the phaser recipe. Values that are set manually in a phaser recipe have priority over values set the shape. They are not overridden if a shape is assigned. For more information on shapes, read Shapes.Hint: Curves that are set manually are overridden with the curves in the shape if the shape is called a second time. 
Restriction: With PSR, phaser recipes lose their linked shapes.
- Value Source:
To add another value source, select one of the following cells and tap +, or tap Add Value Source in the context area. Tap on the left side of value source to expand the column and display the Trans X, Width X, Accel X, and Decel X sub columns.
- Attributes:
Select an attribute from the list. To select a filter, tap Filters in the Sheet tab or tap the Filter tab in the assignment editor.
To filter the list of attributes, tap Filter next to the search bar in the context area or in the title bar of the assignment editor. The options are All, Used, Unused, and Selection. Used and Unused refer to the attributes used in the show file. Selection displays all attributes that are available for the current selection. If there is an attribute set in the selected shape object, the attribute of the shape will be automatically added if the Attributes column is empty. To clear the attributes cell, tap Clear Attribute in the context area or tap the Empty tab in the assignment editor. Attributes are set for all steps. - Value:
- Absolute: Set an absolute value for an attribute, for instance a dimmer value of 50%, or select a preset from the context area. Presets that cannot be used as absolute values are grayed out in the pool. Empty presets can be selected as absolute values. Select None in the Specials tab in the calculator to specify that no absolute value is applied.
- Relative: Set a relative value for an attribute, for instance a dimmer value of -20%. Presets can be used as relative values. Presets that cannot be used as relative values are grayed out in the pool. Empty presets can be selected as relative values. Select None in the Specials tab in the calculator to specify that no relative value is applied.
- Curve:
Select a curve from the dropdown. The options are Linear, Ease In and Out, Ease Out, Ease In, Snap, and Swing. If a curve differs from the predefined curves or you manually adjust a curve in the Editor tab of the context area, the cell displays Custom. A visual representation of the curve is displayed on the left of the cell. Curves can be edited per step. For more information on editing curves, read Shapes.
To reset the curve of a single step to the shape that is set in the phaser recipe, select Reset in the dropdown. If no shape is set, the curve will be reset to the default Linear. To reset the curves of all steps to the shape that is set in the phaser recipe, tap Reset to Shape in the encoder bar. If no shape is set, the curves will be reset to the default Linear. - Trans X/Y/Z and Width X/Y/Z:
Set transition and width values or a range of values on the X, Y, or Z axis. For more information, see Phasers. - Accel X/Y/Z , and Decel X/Y/Z:
Set an acceleration and deceleration value or a range of values on the X, Y, or Z axis. "P" or "F" in front of the value in the cell indicates, if Spline in the calculator is set to Proportional (P) or Free (F). For more information on the accel layer, see Phasers.
- Attributes:
- Speed X/Y/Z:
Set a speed value for the phaser. Setting two speed values allows spreading the speed values over a range, for example 60 Thru 90. - Phase X/Y/Z:
Set a phase value. Two phase values allow spreading the phase values over a range. - Measure:
Change the value of the measure layer. For more information on measure, see Phasers. - Filter:
Set a filter for the recipe. For more information, see Worlds and Filters. - Playback:
- NShot:
Determine the number of times the phaser runs. After completing the number of cycles set in the cell, the phaser automatically stops. To keep the values that are active at the end of the determined phaser cycles, set NShot Stay to Yes in the calculator. To run the phaser in a loop, tap Unlimited in the calculator. To retrigger an NShot phaser, use Sync in the encoder bar.Hint: NShot can be set to a number lower than 1. The phaser then stops before completing an entire cycle. For example, if you have a phaser with 4 steps and you set NShot to 0.75, only the first 3 steps of the phaser will run, the fourth step will be omitted. - Direction:
Set the direction in which you want the phaser to run.- Forward: The phaser steps run in the order set in the phaser, for example 1 - 2 - 3.
- Backward: The phaser steps and transitions run in reverse order, for example, 3 - 2 - 1.
- Alternate: The phaser continuously alternates between running forward and backward. If you use Alternate in combination with NShot, one cycle includes one forward and one backward run of the phaser. Example: If NShot is set to 1 in a phaser with three steps and direction is set to Alternate, the phaser runs 1 - 2 - 3 - 2 - 1 and then stops.
- Adaptive Measure:
If set to Yes, the measure is adapted to the number of grid positions on an axis. By default, Adaptive Measure applies to the x-axis. Example: If you have a selection of 10 fixtures that are arranged across the x-axis and enable Adaptive Measure, the measure is set to 10. This can be used to synchronize the phaser to a beat. To apply the value that is set in the shape of the phaser recipe, select Take from Shape in the selection pop-up. The selection pop-up is only available if a shape is set in the recipe. - Adaptive Width:
If set to Yes, the width of the first step is adapted to the number of grid position on an axis. By default, Adaptive Width applies to the x-axis. Example: If you have a selection of 5 fixtures that are arranged across the x-axis and enable Adaptive Width, the first step is automatically calculated to be 20 %. This can be used to output exactly one grid position of a selection at a time. Curve, width, and transition reflect the calculated values. The transition can be edited in the first step.
When adaptive width is set to Yes, the width cannot be changed manually. To apply the value that is set in the shape of the phaser recipe, select Take from Shape in the selection pop-up. The selection pop-up is only available if a shape is set in the recipe.
Adaptive width can only be used with phasers that have two steps. If a step is added to a recipe with Adaptive Width set to Yes, it is automatically set to No. - Adaptive XY Rotation:
Rotate the axis to which Adaptive Measure and Adaptive Width are applied. To apply the value that is set in the shape of the phaser recipe, tap Take from Shape in the editor pop-up.
- NShot:
X, Y, Z, and Shuffle:
Enable the toggle buttons to display the relating MAtricks columns below.- MAtricks:
This is a reference to an existing MAtricks pool object. Having a reference to an existing MAtricks, adds referenced values in the Grid columns.MAtricks values without a reference to a pool object are displayed in the bottom right of the MAtricks cell. This includes values that override the value of an object. The properties are indicated by a combination of the axis and the first letter of the property, for example YF for Fade Y. If only values on the x-axis are set individually, the X is omitted, for example: W for XWings. To remove all MAtricks values without a reference to a pool object, tap Clear Individuals in the selection drop-down.The following columns are displayed when all toggle buttons (X, Y, Z, and Shuffle) are enabled:
- Invert Style, Speed X/Y/Z, Phase X/Y/Z, Fade X/Y/Z, Delay X/Y/Z, X/Y/Z, X/Y/ZBlock, X/Y/ZGroup, X/Y/ZWings, X/Y/ZWidth, X/Y/ZShuffle, X/Y/ZShift, X/Y/ZInv B, X/Y/ZInv G, X/Y/ZInv W, Invert Style, Invert X/Y/Z, Phaser Transform
For more information on the single columns, see MAtricks and Shuffles.
- Invert Style, Speed X/Y/Z, Phase X/Y/Z, Fade X/Y/Z, Delay X/Y/Z, X/Y/Z, X/Y/ZBlock, X/Y/ZGroup, X/Y/ZWings, X/Y/ZWidth, X/Y/ZShuffle, X/Y/ZShift, X/Y/ZInv B, X/Y/ZInv G, X/Y/ZInv W, Invert Style, Invert X/Y/Z, Phaser Transform
Recipes do not need information in all columns, but they can have information in all. They often only have information in a few columns.
Context Area
The context area changes with the selected cell in the recipe sheet above. For example, selecting a shape cell, displays the shapes pool in the Pool tab of the context area, pool objects in sheet style in the Sheet tab, and a shape Editor to edit the shape directly in the context area:
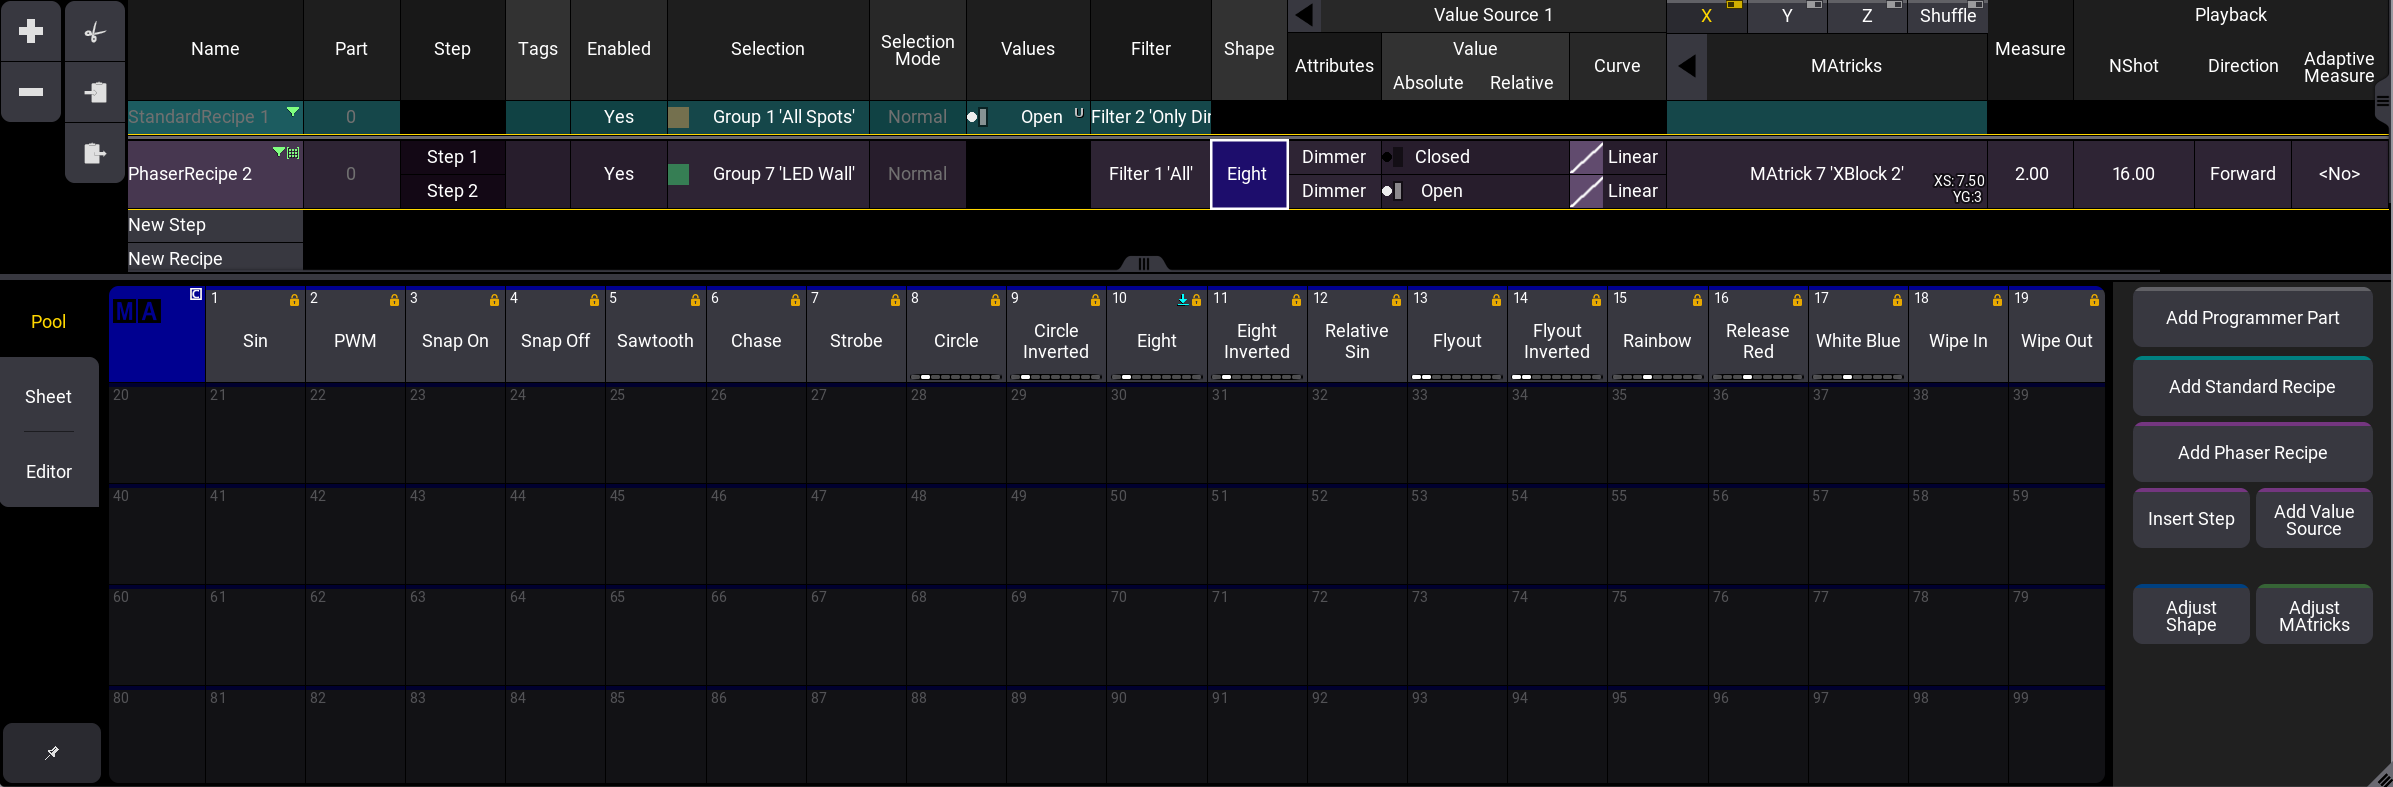
- Pool: Displays the corresponding pool of the selected cell.
- Sheet: Displays the corresponding sheet of the selected cell.
- Editor: Displays the corresponding editor of the selected cell.
 : When enabled, the selected tab of the the selected cell is pinned in the context area.
- Add Programmer Part: Add an additional programmer part in the edit recipe window.
- Add Standard Recipe: Add a new standard recipe line to recipe editor.
- Add Phaser Recipe: Add a new phaser recipe line to recipe editor.
- Insert Step: Adds a new step to the last selected phaser recipe line.
- Add Value Source: Adds a new value source to the last selected phaser recipe line and opens the assignment editor for the attributes column.
- Adjust Shape: The context area displays the shapes Pool tab of last selected phaser recipe line.
- Adjust MAtricks: The context area displays the MAtricks Editor tab of last selected phaser recipe line.