
Auto Create groups
You can auto create groups.
You do this by using the Auto Create menu. You will find this in the Setup -> Show -> Auto Create.
This menu is separated into different tabs. One is called "Group" and it could look like this:
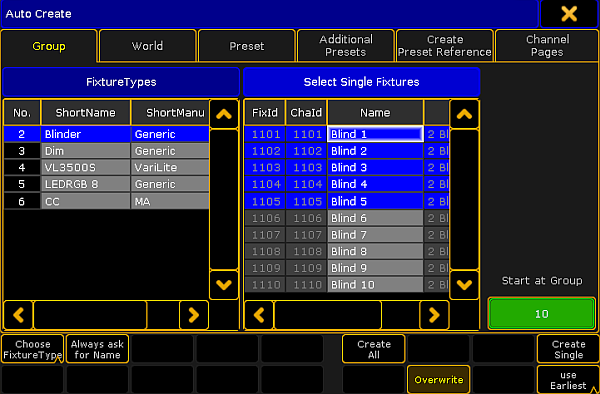
There are two different sections of this window.
The left one can displays the Fixture Types or the Layers (depending on your settings - read below).
The right one displays the single fixtures of the selection in the left section. On the far right side there is a small green input box where you can manually select the group number where the first created group should begin.
Everything that has a blue background is selected. Multiple selection is possible using the Ctrl key on the keyboard.
The bottom part of the menu have different buttons:
Choose:
This button has two different modes: Layer and Fixture Type. It chooses what the left section displays.
Always ask for Name:
When this is On (yellow text and background), you will get a name pop-up for each selected Layer or Fixture Type when you create "All" groups.
Create All:
This will create "All" groups for each of the selected Fixture Types or Layers.
Create Single:
This will create single groups for every one of the selected fixtures.
Overwrite:
This will allow for auto create groups to overwrite existing groups. If this is off, and there is a conflict, the console will present you with a Auto Create Conflict pop-up (read more about this below).
Use:
This button has two modes. When it is Earliest the console will use the first free pool button. When it is Latest the console will use the first pool button after the last one used.
Work flow when auto creating groups
So the work flow is that you select the separation order in the left section using the Choose button.
All groups
If you want to create "All" groups then you need to select the Fixture Types or Layers.
Then select the first group number. Either by typing the number in the green input box or by the Use button.
Now you need to select if you want to name each group manually (activating the Always ask for Name button) and if you want to overwrite existing groups (using the Overwrite button).
Last thing is to tap the Create All button.
Single groups
If you want to create "Single" groups then you need to select the Fixture Types or Layers and then the one of the sections in the left side. You can then select the fixture you want in the right side. You can use a lasso function to select several fixtures or you can hold the Ctrl key and select or de-select fixtures in the list.
Then select the first group number. Either by typing the number in the green input box or by the Use button.
Now you need to select if you want to name each group manually (activating the Always ask for Name button) and if you want to overwrite existing groups (using the Overwrite button).
Last thing is to tap the Create Single button.
Auto Create Conflict pop-up
If "Overwrite" is not active and there is a conflict, then you will get a pop-up like this:
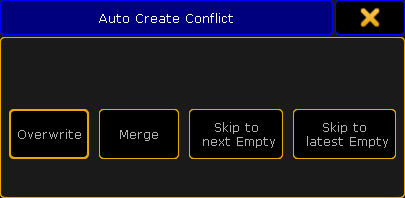
This pop-up has four options:
Overwrite:
This will delete the current content in the group (world, preset, or channel page) and store the new selection instead.
Merge:
This will add the new content to the current content (group, world, preset, or channel page).
The new content will be added after the existing content. For example if you have a group with fixture 1, 3 and 5 and you merge in fixtures 2, 4 and 6. Then your group will have fixtures 1 to 6, but the selection order will be 1,3,5,2,4,6.
Skip to next Empty:
This will store the new content (group, world, preset, or channel page) at the first empty position.
Skip to latest Empty:
This will store the content at the pool object after the currently last used pool object. For example if the highest group number you have is 11 then it will create group 12.