
Group Master on Executors
Groups can be assigned to Executors and be used as group masters.
The idea is that you create the group in the pool and this group can be assigned to an executor with a fader.
The fader can then be used to set a limit of the groups dimmer output. There is also a special mode that allows you to use the fader to produce dimmer output. Read about the different modes below.
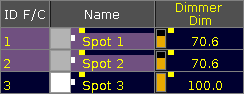
When a fixture is limited then the Fixture/Channel ID and Name gets a lavender background color. It could look like this:
The two limiting Group Masters (positive and negative modes) works as relative masters - not maximum masters.
This means that if a fixture is told to be at 50% by a cue and is limited by a Group Master by 50%, then the output from the fixture is 25%: 50% of 50%.
Assigning a group to an Executor
There are several ways to assign a group to an executor.
Using the keys
If you want to assign group number 1 at executor 3 on page 2 then you need to press the following keys:
Assign Group 1 At Exec 2 . 3 Please
Using the Screens
When we say using the screens, we cannot just use the touch screens - it a combination of keys and screens.
Have a group pool visible. Press the Assign key, then the group in the group pool, and then any of the keys associated with the executor where you want the group master.
Using the assign menu
You can also open the Assign Menu for the executor and use that to assign a group.
Tap the area on the mini executor view (at the bottom of screen 3 and 4) marked red in this picture:

This will open the Assign Menu on one of the screens (default is screen 1) - read more about the Assign Menu here.
Make sure the Function part of the Assign Menu is visible by tapping Function on the right side of the menu - or possible pressing U1 if the menu is on screen 1.
In the lower right side of the view you will find a button called Group Master - tap this or press the X8 key (if it is on screen 1).
This will list all the available groups on the right side of the menu. Here you can select the group you want to assign.
When you are done you can close the Assign menu by tapping the X in the upper right corner.
Group master modes
The group masters can have three different modes. They are called Positive, Negative, and Additive.
When a group is assigned to an Executor, then open the Assign Menu and look at the Options part of it. You can change to it by tapping the Options button on the right side of the menu - or possible by pressing the U2 key if the menu is on screen 1.
In this menu there is only one button called "Mode". Tapping this will open the Select Group Master Mode pop-up:
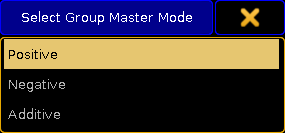
Here you can select what mode the Group Master should use.
The difference between Positive and Negative Group Masters
The only situation where the two modes have an effect is when there is an overlap of fixtures in several Group Masters.
A Positive Group Master works by a "highest takes precedence" principle. This means that a fixture will be allowed to output light it is allowed by any one of several Group Masters.
This is what the Mini Executor looks like with a positive Group Master assigned - notice the "P" in the top center part:

Positive example
We have two Group Masters. One has fixture 1 and 2. The other has fixture 2 and 3.
All three fixtures are told to be at 100% by the programmer or a cue. Both Group Masters are at 100%.
If you limit the first Group Master (the one with 1 + 2) then you are only limiting fixture 1 because fixture 2 is allowed in the second Group Master.
A Negative Group Master works by a "lowest takes precedence" principle. This means that a fixture will be limited in outputting light if it is limited in any of several Group Masters.
This is what the Mini Executor looks like with a negative Group Master assigned - notice the "N" in the top center part:

Negative example
We have two Group Masters. One has fixture 1 and 2. The other has fixture 2 and 3.
All three fixtures are told to be at 100% by the programmer or a cue. Both Group Masters are at 100%.
If you limit the first Group Master (the one with 1 + 2) then you are limiting both fixture 1 and 2 even though fixture 2 is allowed in the second Group Master.
Additive Group Master
The last mode is the Additive Group Master. This mode gives values to the fixtures in your group. So they do not need to have a values from cues or the programmer.
So turning up the master will give the fixtures the corresponding output.
If the fixture already has a value, then the Group Master will not take affect before the Master goes above that value.
This is what the Mini Executor looks like with an additive Group Master assigned - notice the white arrow in the top center part:

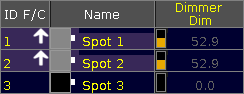
When a fixture gets a value from an additive Group Master, then it gets a small white arrow next to ID number and a darker lavender background color. It could look like this:
Locate a Group Master
You can use the Locate command to find a Group Master for a group. The locate function will only find (and change page to) the first location for the group.
For example if you want to find the group master for group number 3, then you can write the following command:
This will change to the page where the Group Master is and the middle part of the Mini Executor will look like this:

To exit the locate function, you will need to execute the locate command without anything specified. Read more about the locate command here.
Group Master view
A better way the see or find your Group Masters might the Masters Window or the temporary Masters view.
They provide an overview off all the group masters in the show.
They are described in the Masters Window topic.