
Create groups
Groups contain a selection of fixtures and the selection order of the fixtures.
To create groups you'll need to select some fixtures first.
Create group using Group pool (GUI)
When you have a selection of fixtures, then you can store it as a group.
For more information on how to store group objects see Manage pool objects.
Store a group on an existing group
If you store a selection of fixtures into an existing group then you are presented with some options. It's the Choose store Method pop-up:
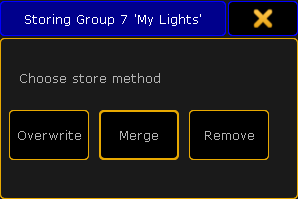
There's three options here:
- Overwrite This will delete the current content in the group and store the new selection instead.
- Merge This will add the new fixtures to the current fixtures. The new fixtures are added after the existing fixtures. I.e. if you have a group with fixture 1, 3 and 5 and you merge in fixtures 2, 4 and 6. Then your group will have fixtures 1 to 6 but the selection order will be 1,3,5,2,4,6.
- Remove This will remove your currently selected fixtures from the group (should they be there).
If you tap the X in the upper right corner of the pop-up then you cancel the store operation.
Labeling the groups
The grandMA2 will try to give the group a name when you store it. But if your selection is to complex for the console, then it'll just call it "Group" and then the group number.
Immediately after you have stored the group, you can start typing on the keyboard. This will name the group you just stored.
If you wish to name the group later then you can use the Label command.
For more information on how to label the groups see Manage pool objects.
Editing groups
When you are in the edit mode, then you get the group content as selected fixtures in your programmer. You can then change this selection. If you want to save the new selection then you press the Update key and confirm that you want to update the group in the small confirmation pop-up.
For more information on how to edit groups see Manage pool objects.